<?xml version="1.0" encoding="UTF-8"?>
<feed xmlns="http://www.w3.org/2005/Atom">
  <author>
    <name>NetworkBoot.org</name>
  </author>
  <link rel="alternate" href="http://networkboot.org/planet/" type="text/html"/>
  <title>Blog posts related to network booting</title>
  <entry xml:base="http://www.jbmurphy.com/">
    <link rel="alternate" href="https://www.jbmurphy.com/2026/06/09/coming-back-to-endpoint-management-sms-2-to-autopilot/" type="text/html"/>
    <content type="xhtml">
      <div xmlns="http://www.w3.org/1999/xhtml"><p>I have been doing endpoint management for a long time. I started on SMS 2.0 – Microsoft Systems Management Server – back when there were rumors the product was going to be cancelled and it was not clear it would survive. It did. It became SCCM, then Configuration Manager, and a good chunk of this blog from 2010 to 2015 is me working through that era: OSD task sequences, building WinPE boot images, driver packages, collections and advertisements, the <a href="https://www.jbmurphy.com/2010/04/08/sccm-trickle-install/">trickle install</a>, <a href="https://www.jbmurphy.com/2010/04/25/just-discovered-tsconfig-ini/">TSConfig.INI</a>, and <a href="https://www.jbmurphy.com/2011/02/10/run-a-task-sequence-after-completed-osd/">running a task sequence after OSD</a>. Then I moved on to other things and have not touched endpoint deployment in a while.</p>
<p>I wanted to catch up – to see how the new technology actually works now, not just read about it. So I rebuilt Windows 11 bare-metal in a dev environment from scratch, on purpose without a management server, to find out which parts have changed and which are exactly the same. This time I took it all the way: bare metal to a managed, Entra-joined machine with its apps installed.</p>
<h3>What I built</h3>
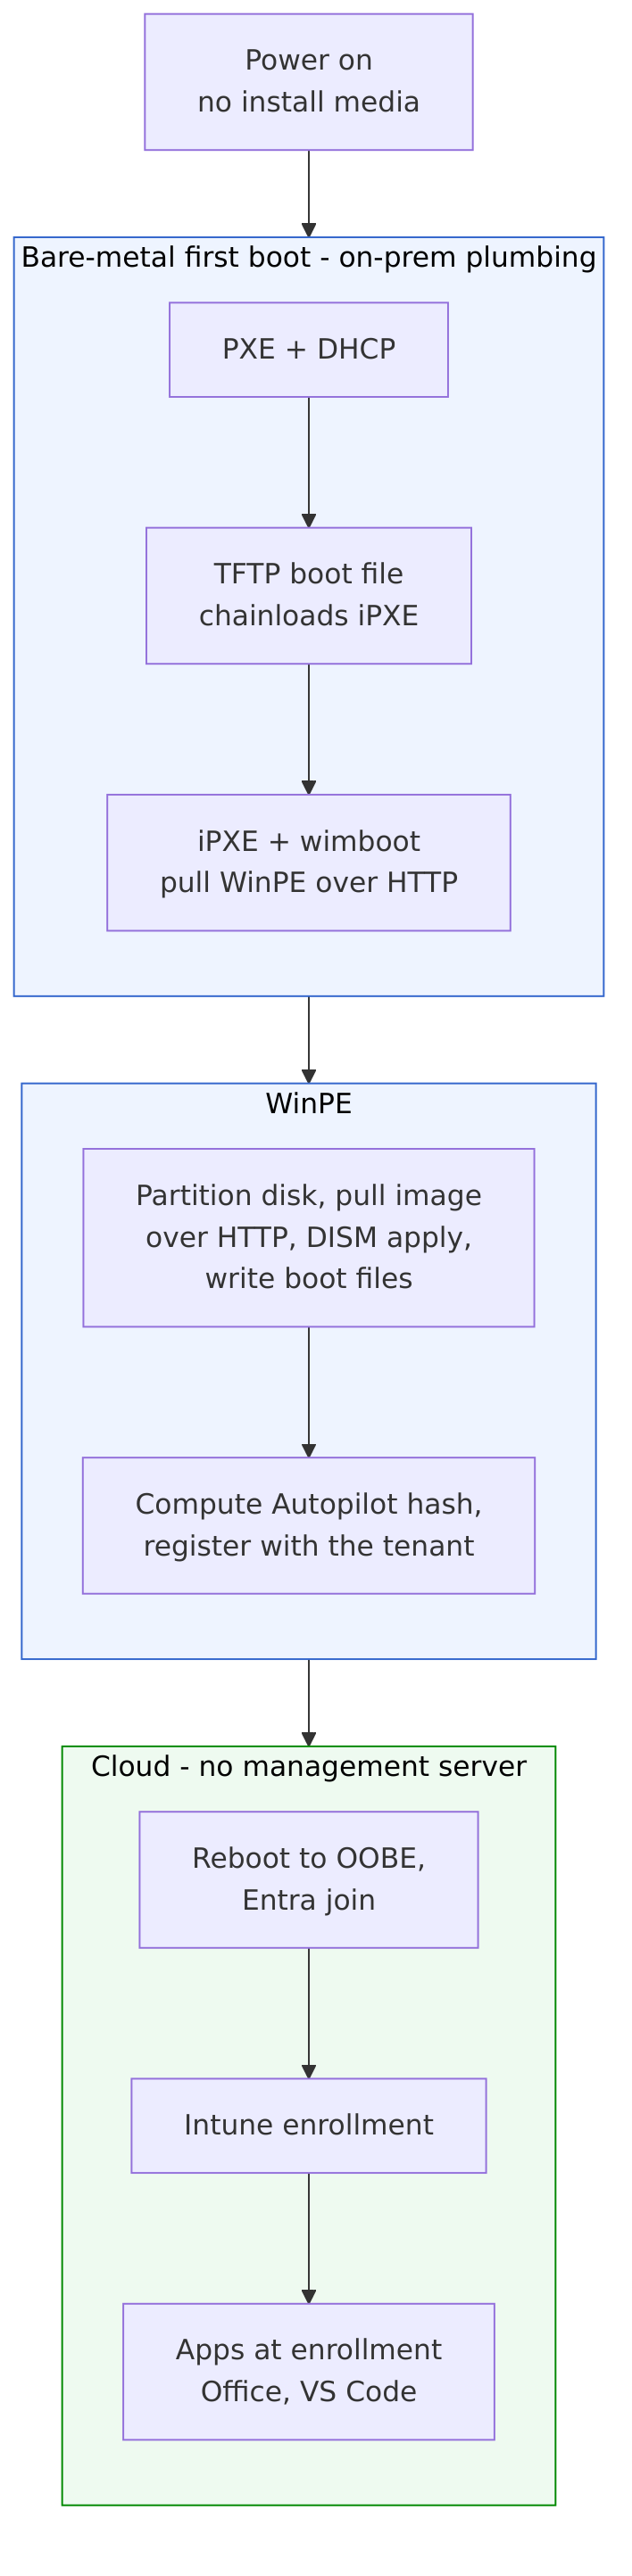
<p>A Windows 11 machine that PXE-boots with no install media attached and provisions itself end to end. The chain: PXE and DHCP hand the machine a boot file over TFTP; that chainloads iPXE, which uses wimboot to pull WinPE over HTTP; WinPE partitions the disk, pulls the Windows image over HTTP, applies it with DISM, writes the boot files – and, before it reboots, computes the machine’s Autopilot hardware hash and registers it with the tenant itself. The machine then reboots into the out-of-box experience, joins Entra, enrolls in Intune, and installs its apps. No distribution point, no site server, no client agent, and no one collecting a hardware hash by hand.</p>
<figure><img decoding="async" style="max-width:100%;height:auto" src="https://www.jbmurphy.com/wp-content/uploads/2026/07/autopilot-provisioning-chain-vertical.png" alt="Bare-metal Windows 11 provisioning chain, top to bottom, from power-on through PXE, WinPE and DISM to cloud Entra join, Intune enrollment and apps"/><figcaption>Power-on to a managed machine, top to bottom: on-prem boot plumbing, then WinPE, then cloud provisioning – no management server in the middle.</figcaption></figure>
<h3>The old-to-new mapping</h3>
<p>This is the part I actually wanted to see, and most of the pieces I knew are still here – they just moved. The OSD task sequence became a WinPE script doing a DISM apply, or, for the cloud path, Autopilot; the task sequence engine is gone and what is left is the primitives it was wrapping. The boot image I used to build inside Configuration Manager is still WinPE, still a boot.wim, but now I serve it over HTTP with wimboot instead of staging it on a distribution point – the same idea as my old <a href="https://www.jbmurphy.com/2012/01/13/powershell-scripts-to-create-a-winpe-4-0-wimiso/">WinPE wim/ISO post</a>, fifteen years on. Driver injection is still a real problem: I hit the modern version of my own <a href="https://www.jbmurphy.com/2015/08/26/sccm-2012-osd-task-sequence-windows-10-drivers-missing/">drivers-missing post</a> when WinPE could not see the disk because the virtual SCSI controller had no inbox driver. The rest mostly maps one to one:</p>
<table style="border-collapse:collapse;width:100%;margin:1em 0">
<thead>
<tr>
<th style="text-align:left;border-bottom:2px solid #bbb;padding:8px 10px">Configuration Manager</th>
<th style="text-align:left;border-bottom:2px solid #bbb;padding:8px 10px">Modern equivalent</th>
</tr>
</thead>
<tbody>
<tr>
<td style="border-bottom:1px solid #eee;padding:8px 10px">Domain join and client push</td>
<td style="border-bottom:1px solid #eee;padding:8px 10px">Entra join, Autopilot, Intune</td>
</tr>
<tr>
<td style="border-bottom:1px solid #eee;padding:8px 10px">Group Policy</td>
<td style="border-bottom:1px solid #eee;padding:8px 10px">Intune configuration profiles</td>
</tr>
<tr>
<td style="border-bottom:1px solid #eee;padding:8px 10px">WSUS and the software update point</td>
<td style="border-bottom:1px solid #eee;padding:8px 10px">Windows Update for Business and update rings</td>
</tr>
<tr>
<td style="border-bottom:1px solid #eee;padding:8px 10px">Collections and advertisements</td>
<td style="border-bottom:1px solid #eee;padding:8px 10px">Intune groups and policies</td>
</tr>
<tr>
<td style="border-bottom:1px solid #eee;padding:8px 10px">Software distribution</td>
<td style="border-bottom:1px solid #eee;padding:8px 10px">Intune apps delivered at enrollment</td>
</tr>
</tbody>
</table>
<h3>Apps moved out of the image</h3>
<p>This was the biggest practical change. In the SCCM days I either baked applications into the image – the thick image – or laid them down in the task sequence. Now the image is just the operating system. Intune installs the applications after the machine enrolls: I deployed Office and Visual Studio Code, and the Enrollment Status Page holds the desktop until the required apps finish, which is the closest modern thing to a task sequence installing software before handing the machine over. One snag worth recording: the tenant did not have the Microsoft Store integration turned on, so Visual Studio Code could not go in as a Store app. It had to be a Win32 app, which meant building the .intunewin package and its encrypted upload myself instead of using the packaging tool. The primitives are still here, you just assemble them.</p>
<h3>What is the same, and what is not</h3>
<p>The same: under everything, bare-metal first boot is still DHCP, TFTP, and WinPE. If you want a machine to image itself from power-on, you are still standing up the same plumbing I was standing up in 2010. That surprised me – I expected the cloud to have absorbed more of it. I even had to add PowerShell to the WinPE boot image to make the registration call, the same optional-component surgery I did on boot images years ago.</p>
<p>What is not: the server in the middle is gone. SMS and then SCCM were one big box that did imaging, software, updates, inventory, and reporting. The modern version is disaggregated – PXE and WinPE for first boot, Autopilot for provisioning, Intune for management – and most of it is cloud-side. You assemble it from parts instead of installing one product, and you still need something to orchestrate the parts; mine is a CI pipeline. The other shift is identity: a device used to be identified after the fact by a client push, and now it is identified up front by a hardware hash you register before it ever boots. BIOS and MBR also gave way to UEFI, GPT, and a TPM, which Autopilot requires, and that bit me with a boot-loader detail that did not exist in the BIOS world.</p>
<h3>Where I landed</h3>
<p>It works end to end – power-on to a managed, Entra-joined Windows 11 machine with Office and VS Code installed, no management server in the path. The only manual step left is a single sign-in at the out-of-box experience with a work account; that is user-driven Autopilot. Self-deploying mode removes even that, but it needs a real, attestable TPM, which my virtual machine does not have – on physical hardware it would. Coming back to this after a decade, the surprise was not how much changed but how much did not: it is still WinPE and a boot.wim and DISM at the bottom, with the one big server in the middle replaced by a handful of cloud services you wire together yourself.</p>
</div>
    </content>
    <summary type="xhtml">
      <div xmlns="http://www.w3.org/1999/xhtml">I started on SMS 2.0 when it was rumored for cancellation, did endpoint for years, then stepped away. I rebuilt a Windows 11 bare-metal install by hand to see how endpoint management is done now.</div>
    </summary>
    <id>https://www.jbmurphy.com/?p=8138</id>
    <published>2026-06-10T02:50:08Z</published>
    <category term="SCCM"/>
    <author>
      <name>Jeffrey B. Murphy</name>
    </author>
    <title>Jeffrey B. Murphy: Coming back to endpoint management: from SMS 2.0 to Autopilot</title>
  </entry>
  <entry xml:base="http://www.jbmurphy.com/">
    <link rel="alternate" href="https://www.jbmurphy.com/2026/06/05/june-3-4-2026-azure-updates-roundup/" type="text/html"/>
    <content type="xhtml">
      <div xmlns="http://www.w3.org/1999/xhtml"><p class="wp-block-paragraph">On June 3 through 5, Microsoft pushed about 40 Azure updates. Microsoft Foundry IQ went GA, Microsoft Discovery went GA, HorizonDB and DocumentDB kept extending, Azure Monitor kept closing the OpenTelemetry gap, and a cluster of agent-side updates landed that line up directly with the Agent Framework posts from June 1 and June 2. The Agent Framework follow-on is the most useful framing for the drop, so it goes first.</p>
<h3 class="wp-block-heading">Follow-on to the Agent Framework posts</h3>
<p class="wp-block-paragraph">If you followed the Agent Framework posts last week, six of these updates are direct follow-ons. <a href="https://www.jbmurphy.com/2026/06/01/">Part 1</a> walked from a single ChatClientAgent to one wired up to a remote MCP server. <a href="https://www.jbmurphy.com/2026/06/02/">Part 2</a> ran three of them in a debate and gated a Jenkins deploy on the verdict. This week Microsoft shipped first-class versions of most of the moving parts those posts hand-rolled.</p>
<h4 class="wp-block-heading">Agent-to-agent (A2A) for Prompt and Hosted agents in Foundry (preview)</h4>
<p class="wp-block-paragraph">The Part 2 debate was hand-rolled: three ChatClientAgents sharing a transcript across three rounds, with a judge persona constrained by a strict-format prompt. A2A is Microsoft formalizing exactly that pattern as a first-class Foundry primitive for prompt agents and hosted agents. Worth watching whether the preview converges on the same multi-round, single-transcript shape the debate post used, or on a different topology.</p>
<h4 class="wp-block-heading">Rubric evaluator and Intelligent Trace Sampling evaluations (preview)</h4>
<p class="wp-block-paragraph">The judge persona in Part 2 was a hand-built rubric (VERDICT: APPROVE / BLOCK / NEEDS_HUMAN plus a confidence score). The rubric evaluator is the productized version of that pattern. Intelligent trace sampling is the answer to the question that breaks most agent-eval pipelines: how do you score the runs without paying to evaluate every single one. It picks representative traces instead of evaluating wall-to-wall.</p>
<h4 class="wp-block-heading">Foundry for VS Code (GA, June Build 2026 refresh), code-first observability for Foundry Agents in VS Code (preview), and observability developer experience in Azure Developer CLI (preview)</h4>
<p class="wp-block-paragraph">Both Agent Framework posts were code-first Python against an agent-framework==1.0 install, run from a terminal. This week is Microsoft shipping the IDE and CLI dev loop for that exact workflow. The VS Code refresh is GA; the in-editor agent observability and the azd observability experience are both in preview. Pair them and the local agent dev loop in VS Code starts to look like the local API loop did five years ago.</p>
<h4 class="wp-block-heading">Tool search in Foundry toolboxes (preview)</h4>
<p class="wp-block-paragraph">Part 1, example 3 connected to the Microsoft Learn remote MCP server as a tool source. Tool search is the catalog UX for that pattern once a Foundry toolbox holds more than one MCP server. Useful the moment a team has more than two or three.</p>
<h4 class="wp-block-heading">Microsoft Foundry IQ (GA) and two new knowledge sources (preview)</h4>
<p class="wp-block-paragraph">Foundry IQ is the managed knowledge layer for grounding agents in enterprise data: connect SharePoint, OneLake, Azure Blob, and other sources, and Foundry IQ handles the retrieval pipeline that previously had to be rebuilt for each project. The MCP-server-as-tool-source pattern from Part 1 covers half of grounding; Foundry IQ packages the retrieval half behind one managed surface. The two new sources land alongside the GA: Azure SQL Database becomes a first-class knowledge source, and a Microsoft Fabric Ontology can be queried as a federated source. The Fabric Ontology one is the more interesting half. Agents query the semantic layer Fabric customers already curate, instead of a parallel definition built only for retrieval.</p>
<h4 class="wp-block-heading">User feedback logging in Microsoft Foundry (preview)</h4>
<p class="wp-block-paragraph">Part 2 writes a PR comment and exits 0, 1, or 2. The Jenkins gate decides the next step; the eventual human verdict on whether the gate was right never makes it back into the agent. Feedback logging is the Foundry-native equivalent for capturing that verdict so the next evaluator run has a ground-truth signal to train against.</p>
<p class="wp-block-paragraph">The pattern across all six is the one the agent space has been on for a year. A community or hand-rolled approach gets validated, then absorbed into a managed surface.</p>
<h3 class="wp-block-heading">Microsoft Discovery (GA)</h3>
<p class="wp-block-paragraph">Microsoft Discovery is generally available as an enterprise platform for building and governing agentic AI workflows for R&amp;D organizations across scientific and engineering disciplines. This was previewed earlier in the year. The GA is the signal that the agentic-workflow surface inside Microsoft is no longer just the Foundry Agent Service.</p>
<h3 class="wp-block-heading">Foundry and AI Search platform updates</h3>
<p class="wp-block-paragraph">Four more Foundry and AI Search items that are not Agent Framework follow-ons but are worth knowing.</p>
<h4 class="wp-block-heading">Private connectivity for AI Search and Foundry Knowledge Bases (GA)</h4>
<p class="wp-block-paragraph">Ingestion, enrichment, retrieval, and agent traffic between AI Search and Foundry Knowledge Bases can now stay on Shared Private Link or Network Security Perimeter end-to-end. Together with the Purview integration that went GA in the June 2 drop, the retrieval layer is closing the same governance and networking gaps the data-plane services closed years ago.</p>
<h4 class="wp-block-heading">APIM support for Foundry Models in Azure AI Search (preview)</h4>
<p class="wp-block-paragraph">Azure API Management can now front all Foundry model integrations used by Azure AI Search. The reason this matters for platform teams: it puts a single throttling, key-vault, and observability surface between AI Search and the underlying model deployments, instead of each search workload calling models directly.</p>
<h4 class="wp-block-heading">Content Understanding chunking and image verbalization in AI Search (preview)</h4>
<p class="wp-block-paragraph">The Content Understanding pipeline can now chunk and verbalize images as part of AI Search indexing. The output is searchable text derived from images, which lets a single retrieval query span text and visual content.</p>
<h4 class="wp-block-heading">Domain filter in the Foundry model catalog (preview)</h4>
<p class="wp-block-paragraph">The Foundry model catalog adds a domain filter that narrows the 1,900-plus models to the ones trained for a specific industry or use case, with filters for domains like robotics and biomedical sciences. A small UX change, but the catalog crossed the size where browse-by-name stopped scaling a while ago. This is the model-catalog equivalent of the tool search update above – the same problem (too many things in the catalog) solved one layer down.</p>
<h3 class="wp-block-heading">Databases</h3>
<h4 class="wp-block-heading">HorizonDB AI pipelines (preview)</h4>
<p class="wp-block-paragraph">HorizonDB, the Postgres-compatible database introduced in the June 2 drop, now lets you describe an AI ingestion workflow (chunking, embedding, extraction, generation, ranking) declaratively in SQL and run it as a fault-tolerant pipeline inside the engine. Same play as the rest of HorizonDB: keep the RAG pipeline on the operational database instead of stitching together a separate service per stage.</p>
<h4 class="wp-block-heading">DocumentDB advanced full-text search (preview)</h4>
<p class="wp-block-paragraph">Advanced full-text search lands in DocumentDB, alongside the instant free-tier clusters that shipped on June 2. HorizonDB and DocumentDB are clearly the two databases Microsoft wants to push for new workloads.</p>
<h4 class="wp-block-heading">Postgres Flexible Server DuckDB extension (GA)</h4>
<p class="wp-block-paragraph">The DuckDB extension is now GA in Azure Database for PostgreSQL Flexible Server. DuckDB-in-Postgres turns the operational instance into a competent analytics endpoint for parquet and CSV in blob storage without moving the data. For the small-to-medium analytics that do not justify a Fabric or Synapse footprint, this is the simplest viable answer.</p>
<h3 class="wp-block-heading">Azure Monitor</h3>
<p class="wp-block-paragraph">Three Monitor updates landed together and all went GA.</p>
<p class="wp-block-paragraph">OTLP ingestion is GA: send OpenTelemetry Protocol signals straight from instrumented applications and platforms to Azure Monitor with no Application Insights SDK in between. Dynamic thresholds for log search alerts went GA, so the platform calculates the threshold instead of asking the operator to guess. And Azure Monitor Service Level Indicators reached GA. Combined with the simple log alerts and OpenTelemetry metrics that shipped on June 2, Azure Monitor is methodically closing the gap with the open observability stack.</p>
<p class="wp-block-paragraph">A day later, on June 5, Metrics Usage Insights added an Ingestion Volume Change dashboard in preview, for comparing ingestion volume over time and spotting spikes or drops in time-series counts and event ingestion rates. It is a cost-and-noise control surface more than an observability one – the dashboard you open when the Monitor bill jumps and you need to know which stream moved.</p>
<h3 class="wp-block-heading">Confidential computing</h3>
<p class="wp-block-paragraph">Three updates on the confidential side. Confidential Clean Rooms gets a preview of multiparty analytics, a managed service for partners to jointly analyze privacy-sensitive datasets with Apache Spark without exposing the underlying data. Confidential live migration for Intel TDX VMs is in development, which is the last big operational gap separating confidential VMs from regular ones. And Azure Confidential Ledger gains a GA backup tool for audit retention of ledger files.</p>
<h3 class="wp-block-heading">GitHub Copilot modernization agent (GA)</h3>
<p class="wp-block-paragraph">The GitHub Copilot modernization agent is GA. It coordinates application assessments and upgrades across a whole portfolio, not just a single repo. For the Java-on-old-Spring or .NET-Framework migration backlog most enterprises still carry, this is the first serious estate-wide automation Microsoft has shipped.</p>
<h3 class="wp-block-heading">Migration</h3>
<h4 class="wp-block-heading">Azure Files assessments worldwide in Azure Migrate (GA)</h4>
<p class="wp-block-paragraph">Azure Migrate now discovers and assesses SMB and NFS file shares hosted on Windows and Linux servers, worldwide. File shares were the awkward gap in most migrate-to-Azure-Files plans: you could assess the servers but had to size and plan the share targets by hand. This closes that gap and gives a data-driven view of the file-share estate. Read it alongside the Copilot modernization agent above – one is the estate-level story for application code, this is the estate-level story for file data.</p>
<h3 class="wp-block-heading">App Service Flex Consumption: rolling updates (GA)</h3>
<p class="wp-block-paragraph">Rolling updates are GA in the Flex Consumption plan. Instead of restarting all instances during a deploy, the platform rolls them. Zero-downtime deploys on Flex no longer need a slot-swap or external front door.</p>
<h3 class="wp-block-heading">Compute</h3>
<h4 class="wp-block-heading">Lasv5 and Laosv5 storage-optimized VMs (preview)</h4>
<p class="wp-block-paragraph">Storage-optimized VM series based on the 5th-generation AMD EPYC (Turin). Lasv5 targets high disk capacity, throughput, and I/O. Laosv5 targets the same shape with a different storage profile.</p>
<h4 class="wp-block-heading">Azure Infrastructure Resiliency Manager (preview)</h4>
<p class="wp-block-paragraph">A new preview service for orchestrating resiliency testing and recovery across an Azure estate. It sits in the same conversation as Chaos Studio but framed for the resiliency-program owner rather than the SRE writing fault-injection experiments.</p>
<h4 class="wp-block-heading">Guest RDMA on Azure Boost (private preview)</h4>
<p class="wp-block-paragraph">Landing on June 5, Guest RDMA is in preview on Azure Boost, starting in UK South, bringing high-throughput, ultra-low-latency RDMA networking directly into guest VMs within a region. Offloaded to Azure Boost, this is the kind of networking that used to require specialized HPC SKUs showing up as a general guest-VM capability – the part that matters for tightly-coupled HPC and AI-training traffic that is sensitive to latency between nodes.</p>
<h3 class="wp-block-heading">Speech, voice, and language</h3>
<p class="wp-block-paragraph">MAI-Voice-2 is in preview in Foundry. Custom Voice portal and self-serve custom photo avatar creation both went GA. Voice Live API also picks up avatar voice sync with custom voices in preview, pairing a branded or persona-specific text-to-speech voice with a real-time avatar – the piece that ties the custom-voice and custom-avatar tracks together. On the language side, Text Analytics for Health NextGen Playground is GA, and the Conversational and Text PII NextGen playgrounds shipped updates. The pattern: the NextGen playgrounds are now the default front door for the language services.</p>
<h3 class="wp-block-heading">Region</h3>
<p class="wp-block-paragraph">Azure Red Hat OpenShift is GA in Belgium Central.</p>
</div>
    </content>
    <summary type="xhtml">
      <div xmlns="http://www.w3.org/1999/xhtml">On June 3 through 5, Microsoft pushed about 40 Azure updates. Microsoft Foundry IQ went GA, Microsoft Discovery went GA, HorizonDB and DocumentDB kept extending, Azure Monitor kept closing the OpenTelemetry gap, and a cluster of agent-side updates landed that line up directly with the Agent Framework posts from June 1 and June 2. The […]</div>
    </summary>
    <id>https://www.jbmurphy.com/?p=8137</id>
    <published>2026-06-05T15:15:32Z</published>
    <category term="Azure"/>
    <author>
      <name>Jeffrey B. Murphy</name>
    </author>
    <title>Jeffrey B. Murphy: Azure Build Update Part 2</title>
  </entry>
  <entry xml:base="http://www.reversengineered.com/">
    <link rel="alternate" href="https://littleknife.dev/blog/2022/08/02/pxe-booting-on-the-steam-deck/" type="text/html"/>
    <content type="xhtml">
      <div xmlns="http://www.w3.org/1999/xhtml">PXE Booting on the Steam Deck</div>
    </content>
    <id>https://littleknife.dev/blog/2022/08/02/pxe-booting-on-the-steam-deck/</id>
    <published>2022-08-02T00:00:00Z</published>
    <category term="pxe"/>
    <category term="ipxe"/>
    <category term="howto"/>
    <category term="steamdeck"/>
    <category term="netboot.xyz"/>
    <category term="netbootxyz"/>
    <author>
      <name>Antony Messerli</name>
    </author>
    <title>Antony Messerli: PXE Booting on the Steam Deck</title>
  </entry>
  <entry xml:base="http://blog.toreanderson.no/">
    
    <link href="https://toreanderson.github.io/2021/02/23/ipv6-support-in-the-playstation-5.html" rel="alternate" type="text/html" title="IPv6 support in the PlayStation 5"/>
    <published>2021-02-23T00:00:00+00:00</published>
    <updated>2021-02-23T00:00:00+00:00</updated>
    <id>https://toreanderson.github.io/2021/02/23/ipv6-support-in-the-playstation-5</id>
    <content type="html" xml:base="https://toreanderson.github.io/2021/02/23/ipv6-support-in-the-playstation-5.html">&lt;p&gt;Almost five years after I &lt;a href="/2016/06/15/ipv6-support-in-the-playstation-4.html"&gt;wrote about the PlayStation 4’s lacklustre IPv6
support&lt;/a&gt;, I have finally
managed to get my hands on the PlayStation 5 – and I have of course taken a
close look at its IPv6 capabilities.&lt;/p&gt;

&lt;h2 id="does-the-playstation-5-support-ipv6-at-all"&gt;Does the PlayStation 5 support IPv6 at all?&lt;/h2&gt;

&lt;p&gt;It does indeed! In the &lt;em&gt;View Connection Status&lt;/em&gt; page of the network settings,
it displays any assigned IPv6 address, gateway and DNS server; right next to
their IPv4 counterparts.&lt;/p&gt;

&lt;p&gt;&lt;img src="/images//ipv6-support-in-the-playstation-5/connection-status.jpg" alt="Connection Status" /&gt;&lt;/p&gt;

&lt;p&gt;This is a clear improvement over the PS4, whose IPv6 support was not
acknowledged by the user interface at all.&lt;/p&gt;

&lt;h2 id="what-does-the-the-ps5-use-ipv6-for"&gt;What does the the PS5 use IPv6 for?&lt;/h2&gt;

&lt;p&gt;Not much, really. I have seen it use IPv6 for the following:&lt;/p&gt;

&lt;ul&gt;
  &lt;li&gt;&lt;code class="language-plaintext highlighter-rouge"&gt;IN AAAA&lt;/code&gt; DNS queries.&lt;/li&gt;
  &lt;li&gt;A HTTP &lt;code class="language-plaintext highlighter-rouge"&gt;GET&lt;/code&gt; request towards &lt;code class="language-plaintext highlighter-rouge"&gt;http://ena.net.playstation.net/netstart/ps4&lt;/code&gt;
&lt;em&gt;[sic]&lt;/em&gt; immediately after connecting to the network. The response from the
server is &lt;code class="language-plaintext highlighter-rouge"&gt;403 Forbidden&lt;/code&gt;. As I observed back in 2016, the PS4 did the exact
same thing.&lt;/li&gt;
  &lt;li&gt;HTTPS requests towards &lt;code class="language-plaintext highlighter-rouge"&gt;https://image.api.playstation.com&lt;/code&gt; while browsing the
PlayStation Store app.&lt;/li&gt;
  &lt;li&gt;The Netflix app uses IPv6 for both API/metadata and video traffic.
Interestingly enough the Netflix app appears to use its own built-in stub
resolver with 8.8.8.8 as its upstream, so its &lt;code class="language-plaintext highlighter-rouge"&gt;IN AAAA&lt;/code&gt; queries are using
IPv4 transport.&lt;/li&gt;
&lt;/ul&gt;

&lt;p&gt;I have also seen it perform &lt;code class="language-plaintext highlighter-rouge"&gt;IN AAAA&lt;/code&gt; DNS queries for several IPv4-only
&lt;code class="language-plaintext highlighter-rouge"&gt;*.playstation.com&lt;/code&gt; and &lt;code class="language-plaintext highlighter-rouge"&gt;*.playstation.net&lt;/code&gt; domain names.&lt;/p&gt;

&lt;p&gt;Some other things that appear to be IPv4-only include:&lt;/p&gt;

&lt;ul&gt;
  &lt;li&gt;&lt;code class="language-plaintext highlighter-rouge"&gt;IN A&lt;/code&gt; DNS queries.&lt;/li&gt;
  &lt;li&gt;Logging in to the PlayStation Network.&lt;/li&gt;
  &lt;li&gt;Browsing the PlayStation Store (except for images as previously noted).&lt;/li&gt;
  &lt;li&gt;Downloading games and media apps from the PlayStation Store.&lt;/li&gt;
  &lt;li&gt;Syncing game trophy lists.&lt;/li&gt;
  &lt;li&gt;Playing videos with the NRK TV, Twitch and YouTube media apps.&lt;/li&gt;
  &lt;li&gt;Online multiplayer with Fortnite.&lt;/li&gt;
  &lt;li&gt;The built-in Internet speed test.&lt;/li&gt;
&lt;/ul&gt;

&lt;h2 id="technical-implementation-details"&gt;Technical implementation details&lt;/h2&gt;

&lt;ul&gt;
  &lt;li&gt;It does not realy support IPv6-only networks. If there’s no DHCPv4 service on
the network, it will claim that the network connection failed. But Netflix
works regardless, see below.&lt;/li&gt;
  &lt;li&gt;It supports SLAAC, the RA &lt;em&gt;RDNSS Option&lt;/em&gt; and DHCPv6 – both stateful and
stateless.&lt;/li&gt;
  &lt;li&gt;If no IPv6 DNS server is being provided by the RA &lt;em&gt;RDNSS Option&lt;/em&gt; or DHCPv6 it
will not configure IPv6 addressing or routing either. This is probably
because…&lt;/li&gt;
  &lt;li&gt;…it uses its IPv4 DNS server for all &lt;code class="language-plaintext highlighter-rouge"&gt;IN A&lt;/code&gt; DNS queries, and its IPv6 DNS
server for all &lt;code class="language-plaintext highlighter-rouge"&gt;IN AAAA&lt;/code&gt; queries.&lt;/li&gt;
  &lt;li&gt;When using SLAAC, the Interface ID appears to be randomised and changes on
every reconnect.&lt;/li&gt;
  &lt;li&gt;If &lt;code class="language-plaintext highlighter-rouge"&gt;OnLink=0&lt;/code&gt; is present in the RA &lt;em&gt;Prefix Information Option&lt;/em&gt;, it will not
configure an address using SLAAC even though &lt;code class="language-plaintext highlighter-rouge"&gt;Autonomous=1&lt;/code&gt;. This is probably
a bug.&lt;/li&gt;
  &lt;li&gt;If &lt;code class="language-plaintext highlighter-rouge"&gt;Managed=1&lt;/code&gt; in the RA, it will use stateful DHCPv6 to obtain an address
using &lt;code class="language-plaintext highlighter-rouge"&gt;IA_NA&lt;/code&gt;. It will also request DNS servers in the same exchange.&lt;/li&gt;
  &lt;li&gt;Stateful DHCPv6 address assignment through &lt;code class="language-plaintext highlighter-rouge"&gt;IA_NA&lt;/code&gt; works fine even though
there is no &lt;em&gt;Prefix Information Option&lt;/em&gt; in the RAs.&lt;/li&gt;
  &lt;li&gt;If addresses are available from both stateful DHCPv6 and SLAAC, it will
prefer the one from DHCPv6. The UI only shows a single globally scoped IPv6
address.&lt;/li&gt;
  &lt;li&gt;If &lt;code class="language-plaintext highlighter-rouge"&gt;Managed=0&lt;/code&gt; and &lt;code class="language-plaintext highlighter-rouge"&gt;OtherConfig=1&lt;/code&gt; in the RA, it will use stateless DHCPv6 to
obtain DNS servers.&lt;/li&gt;
  &lt;li&gt;If &lt;code class="language-plaintext highlighter-rouge"&gt;OtherConfig=1&lt;/code&gt;, it will prefer DNS servers learned from DHCPv6 over any
learned from the RA RDNSS Option. If &lt;code class="language-plaintext highlighter-rouge"&gt;OtherConfig=0&lt;/code&gt;, the opposite is true.&lt;/li&gt;
&lt;/ul&gt;

&lt;p&gt;The PS5 was running system software version 20.02-2.50.00.08-00.00.00.0.1
during my testing.&lt;/p&gt;

&lt;h2 id="ipv6-only-and-dns64nat64"&gt;IPv6-only and DNS64/NAT64&lt;/h2&gt;

&lt;p&gt;If there is no DHCPv4 service on the LAN, the network settings UI will say
&lt;strong&gt;Failed&lt;/strong&gt; for both &lt;em&gt;Wired LAN 1&lt;/em&gt; and &lt;em&gt;Internet connection&lt;/em&gt;. In spite of that,
the &lt;em&gt;View Connection Status&lt;/em&gt; page does show an IPv6 address, DNS server and
gateway. Not much work in this state, I mostly encounter errors saying &lt;em&gt;You’re
offline&lt;/em&gt;, &lt;em&gt;No Internet connection available&lt;/em&gt;, and so forth. The exception is the
Netflix app, which continues to work just fine! (It is now using the system IPv6
DNS server instead of 8.8.8.8.)&lt;/p&gt;

&lt;p&gt;If I keep DHCPv4 disabled but start advertising a DNS64-enabled DNS server, the
PS5 still claims that &lt;em&gt;Wired LAN 1&lt;/em&gt; and &lt;em&gt;Internet connection&lt;/em&gt; is &lt;strong&gt;Failed&lt;/strong&gt;.
However the &lt;em&gt;View PlayStation Network Status&lt;/em&gt; page has begun working (this is
just an embed of
&lt;a href="https://status.playstation.com"&gt;https://status.playstation.com&lt;/a&gt;). Twitch also
starts working (using NAT64 for its Internet traffic). Fortnite, NRK TV,
PlayStation Store and YouTube, on the other hand, still do not work.&lt;/p&gt;

&lt;p&gt;Lastly, if I re-enable DHCPv4 while leaving DNS64/NAT64 in place, it does not
seem to be using IPv6 via NAT64 for much. PlayStation Store downloads, Fortnite,
NRK TV and YouTube continue to use IPv4 only.&lt;/p&gt;

&lt;h2 id="conclusion"&gt;Conclusion&lt;/h2&gt;

&lt;p&gt;The PS5 does support IPv6, and the Netflix app proves that IPv6 connectivity is
available for use. Apart from Netflix, though, there is not much use of IPv6.
That goes both for the system software and its bundled apps, as well as for
third-party apps and games.&lt;/p&gt;

&lt;p&gt;Some of that might be attributable to a lack of IPv6 support on the server side,
as evidenced by &lt;code class="language-plaintext highlighter-rouge"&gt;IN AAAA&lt;/code&gt; queries for hostnames that have no IPv6 addresses. On
the other hand, when I use DNS64 to make those &lt;code class="language-plaintext highlighter-rouge"&gt;IN AAAA&lt;/code&gt; queries be answered, it
doesn’t really make much of a difference – IPv4 is still preferred most of the
time.&lt;/p&gt;

&lt;p&gt;Furthermore, most of the PS5 apps and games I tested do not make any &lt;code class="language-plaintext highlighter-rouge"&gt;IN AAAA&lt;/code&gt;
queries in the first place, so DNS64/NAT64 would not help in any case.&lt;/p&gt;

&lt;p&gt;Thus software upgrades would be necessary to make these apps and games fully
IPv6 capable. The YouTube app is a good example of this; it is well known that
the YouTube servers supports IPv6, but their PS5 app never issues any &lt;code class="language-plaintext highlighter-rouge"&gt;IN AAAA&lt;/code&gt;
queries, so it ends up using IPv4 for its video traffic.&lt;/p&gt;</content>
    
    <summary type="html">Almost five years after I wrote about the PlayStation 4’s lacklustre IPv6 support, I have finally managed to get my hands on the PlayStation 5 – and I have of course taken a close look at its IPv6 capabilities.</summary>
  <author><name>Tore Anderson</name></author><title>Tore Anderson: IPv6 support in the PlayStation 5</title></entry>
  <entry xml:base="http://blog.zorinaq.com/">
   
   <link href="http://blog.zorinaq.com/boot-win10-over-usb/" rel="alternate" type="text/html"/>
   <id>http://blog.zorinaq.com/boot-win10-over-usb/</id>
   <updated>2020-05-29T00:00:00+02:00</updated>
   <content type="html">&lt;p&gt;When I buy a laptop, the first thing I do is netboot into a PXE Linux
environment and make a full raw disk image backup of the pre-installed
Windows OS. I pipe &lt;code class="language-plaintext highlighter-rouge"&gt;dd if=/dev/sda&lt;/code&gt; or &lt;code class="language-plaintext highlighter-rouge"&gt;dd if=/dev/nvme0n1&lt;/code&gt; into &lt;code class="language-plaintext highlighter-rouge"&gt;lz4&lt;/code&gt;
(much faster than &lt;code class="language-plaintext highlighter-rouge"&gt;gzip&lt;/code&gt;) and write the image on a fileserver. No matter
how large the disk is, the image usually shrinks down to 20-30 GB because,
well, there are usually only 20-30 GB of files on the drive. The empty NTFS
blocks compress very well.&lt;/p&gt;

&lt;p&gt;I then wipe Windows and install a Linux distribution.&lt;/p&gt;

&lt;p&gt;Years later when I donate or sell the laptop, I restore the raw disk image.
Not only does this restore the Windows OEM image, but because all sectors are
overwritten, it &lt;em&gt;securely wipes&lt;/em&gt; the disk. Very good for security.&lt;/p&gt;

&lt;p&gt;The image backup I made turned out very useful today. I needed to
update the firmware for the trackpoint of my ThinkPad X1 Carbon
laptop. However the firmware update is &lt;em&gt;only&lt;/em&gt; possible using a &lt;a href="https://pcsupport.lenovo.com/us/en/products/laptops-and-netbooks/thinkpad-x-series-laptops/thinkpad-x1-carbon-type-20hr-20hq/downloads/ds122148"&gt;Windows 10
utility&lt;/a&gt;.&lt;/p&gt;

&lt;h2 id="booting-from-usb"&gt;Booting from USB&lt;/h2&gt;

&lt;p&gt;Here is how I got Windows running on my laptop, without reimaging or
swapping or repartitioning the internal drive.&lt;/p&gt;

&lt;h3 id="write-the-image-to-a-usb-drive"&gt;Write the image to a USB drive&lt;/h3&gt;

&lt;p&gt;I wrote the factory Windows 10 disk image to an external USB drive
(&lt;code class="language-plaintext highlighter-rouge"&gt;unlz4 &amp;lt;image.lz4 &amp;gt;/dev/sda&lt;/code&gt;). Being a full disk image, it includes 4
partitions: EFI System partition, Microsoft Reserved partition, Basic data
partition, Recovery partition.&lt;/p&gt;

&lt;h3 id="set-bootdriverflags-to-0x14"&gt;Set BootDriverFlags to 0x14&lt;/h3&gt;

&lt;p&gt;If you try to boot from the external USB drive as is, Windows 10
will error out during boot (INACCESSIBLE_BOOT_DEVICE).&lt;/p&gt;

&lt;p&gt;The key to make it work is to edit the obscure registry value
BootDriverFlags to change it from 0x0 to 0x14. The value is located under
&lt;code class="language-plaintext highlighter-rouge"&gt;HKLM\SYSTEM\HardwareConfig\{...uuid...}&lt;/code&gt; and can be edited by
mounting the C: partition in Linux, and using the &lt;code class="language-plaintext highlighter-rouge"&gt;chntpw&lt;/code&gt; utility:&lt;/p&gt;

&lt;div class="language-plaintext highlighter-rouge"&gt;&lt;div class="highlight"&gt;&lt;pre class="highlight"&gt;&lt;code&gt;$ chntpw -e /path/to/mounted/Windows/System32/config/SYSTEM
&lt;/code&gt;&lt;/pre&gt;&lt;/div&gt;&lt;/div&gt;

&lt;p&gt;List the &lt;code class="language-plaintext highlighter-rouge"&gt;{...uuid...}&lt;/code&gt; subkey under &lt;code class="language-plaintext highlighter-rouge"&gt;HardwareConfig&lt;/code&gt;:&lt;/p&gt;

&lt;div class="language-plaintext highlighter-rouge"&gt;&lt;div class="highlight"&gt;&lt;pre class="highlight"&gt;&lt;code&gt;&amp;gt; ls HardwareConfig
Node has 1 subkeys and 2 values
  key name
  &amp;lt;{ca7bc4cc-350d-11b2-a85c-95cecf0de0fa}&amp;gt;
  size     type              value name             [value if type DWORD]
    78  1 REG_SZ             &amp;lt;LastConfig&amp;gt;
     4  4 REG_DWORD          &amp;lt;LastId&amp;gt;                   0 [0x0]
&lt;/code&gt;&lt;/pre&gt;&lt;/div&gt;&lt;/div&gt;

&lt;p&gt;Edit BootDriverFlags with &lt;code class="language-plaintext highlighter-rouge"&gt;ed&lt;/code&gt; to set it to 0x14:&lt;/p&gt;

&lt;div class="language-plaintext highlighter-rouge"&gt;&lt;div class="highlight"&gt;&lt;pre class="highlight"&gt;&lt;code&gt;&amp;gt; ed HardwareConfig\{ca7bc4cc-350d-11b2-a85c-95cecf0de0fa}\BootDriverFlags
EDIT: &amp;lt;HardwareConfig\{ca7bc4cc-350d-11b2-a85c-95cecf0de0fa}\BootDriverFlags&amp;gt; of type REG_DWORD (4) with length 4 [0x4]
DWORD: Old value 0 [0x0], enter new value (prepend 0x if hex, empty to keep old value)
-&amp;gt; 0x14
DWORD: New value 20 [0x14], 
&lt;/code&gt;&lt;/pre&gt;&lt;/div&gt;&lt;/div&gt;

&lt;p&gt;Finally save the changes with &lt;code class="language-plaintext highlighter-rouge"&gt;q&lt;/code&gt;:&lt;/p&gt;

&lt;div class="language-plaintext highlighter-rouge"&gt;&lt;div class="highlight"&gt;&lt;pre class="highlight"&gt;&lt;code&gt;&amp;gt; q
&lt;/code&gt;&lt;/pre&gt;&lt;/div&gt;&lt;/div&gt;

&lt;p&gt;BootDriverFlags is so obscure that it is barely documented. Some online
resources say the value is under &lt;code class="language-plaintext highlighter-rouge"&gt;HKLM\System\CurrentControlSet\Control&lt;/code&gt;
or &lt;code class="language-plaintext highlighter-rouge"&gt;HKLM\SYSTEM\HardwareConfig\&lt;/code&gt; but they are wrong. The value is under
&lt;code class="language-plaintext highlighter-rouge"&gt;HKLM\SYSTEM\HardwareConfig\{...uuid...}&lt;/code&gt;.&lt;/p&gt;

&lt;p&gt;That is it. Changing a single registry key is all that is needed to make
an OEM Windows 10 image boot from a USB drive.&lt;/p&gt;

</content>
 <published>2020-05-29T00:00:00+02:00</published><author><name>Marc Bevand</name></author><title>Marc Bevand: Booting unmodified Windows 10 over USB</title></entry>
  <entry xml:base="http://blog.toreanderson.no/">
    
    <link href="https://toreanderson.github.io/2020/01/11/get-ipv6-ftth.html" rel="alternate" type="text/html" title="IPv6 on Get FTTH"/>
    <published>2020-01-11T00:00:00+00:00</published>
    <updated>2020-01-11T00:00:00+00:00</updated>
    <id>https://toreanderson.github.io/2020/01/11/get-ipv6-ftth</id>
    <content type="html" xml:base="https://toreanderson.github.io/2020/01/11/get-ipv6-ftth.html">&lt;p&gt;&lt;a href="https://www.get.no"&gt;Get&lt;/a&gt; (&lt;a href="https://www.telia.no"&gt;Telia&lt;/a&gt;’s fixed broadbrand
brand in Norway) has recently launched an opt-in IPv6 pilot available to their
their fibre customers. I am happy to report that it works great and scores 10/10
on &lt;a href="https://test-ipv6.com"&gt;test-ipv6.com&lt;/a&gt;.&lt;/p&gt;

&lt;p&gt;I first learned about this in &lt;a href="https://www.digi.no/artikler/innsikt-har-du-bare-gammeldags-internett-her-er-ipv6-planene-til-flere-norske-internettleverandorer/480306?key=Phnt5PTg"&gt;this
article&lt;/a&gt;
(Norwegian), where Get states that they provide IPv6 to a handful of test
customers on fibre.&lt;/p&gt;

&lt;p&gt;To join the pilot I simply had to ask their customer service. Shortly after I
received an e-mail with the new configuration settings: static IPv4 /30 and IPv6
/64 WAN link networks plus a static IPv6 /56 prefix for use on the LAN side.
(They do not use Neighbour Discovery or DHCPv6 for automatic configuration.)&lt;/p&gt;

&lt;p&gt;My understanding is that Get can currently not configure their own CPE to act as
an IPv6 router, so it is necessary to bring your own HGW and leave the Get CPE
in bridge mode.&lt;/p&gt;

&lt;p&gt;I am very happy to have native IPv6 at home again, and really hope that Get will
roll this out to all of their other FTTH customers in the near future.&lt;/p&gt;</content>
    
    <summary type="html">Get (Telia’s fixed broadbrand brand in Norway) has recently launched an opt-in IPv6 pilot available to their their fibre customers. I am happy to report that it works great and scores 10/10 on test-ipv6.com.</summary>
  <author><name>Tore Anderson</name></author><title>Tore Anderson: IPv6 on Get FTTH</title></entry>
  <entry xmlns:gd="http://schemas.google.com/g/2005" xmlns:thr="http://purl.org/syndication/thread/1.0" xml:base="http://blogoless.blogspot.it/">
    <id>tag:blogger.com,1999:blog-8009822662942276789.post-5126831580586440512</id>
    <published>2017-07-14T19:31:00.000+02:00</published>
    <updated>2017-07-15T11:49:42.724+02:00</updated>
    <category scheme="http://www.blogger.com/atom/ns#" term="cns"/>
    <category scheme="http://www.blogger.com/atom/ns#" term="fedora"/>
    <category scheme="http://www.blogger.com/atom/ns#" term="firefox"/>
    <category scheme="http://www.blogger.com/atom/ns#" term="linux"/>
    <category scheme="http://www.blogger.com/atom/ns#" term="regione toscana"/>
    <category scheme="http://www.blogger.com/atom/ns#" term="smartcard"/>
    <category scheme="http://www.blogger.com/atom/ns#" term="spid"/>
    
    <content type="html">La presente &lt;i&gt;guida&lt;/i&gt; ha funzionato per me, su &lt;b&gt;Fedora 26&lt;/b&gt;. Probabilmente è valida per altre distribuzioni di GNU/Linux (usando il gestore di pacchetti opportuno).&lt;br /&gt;
Guida per modo di dire, poiché i passi da seguire sono veramente semplici.&lt;br /&gt;
Alla fine del conto per installare il lettore e la Carta Nazionale dei Servizi (o Tessera Sanitaria), la &lt;a href="http://www.regione.toscana.it/servizi-online/servizi-sicuri/carta-sanitaria-elettronica/guida-all-uso"&gt;procedura descritta sul sito della Regione Toscana&lt;/a&gt;&amp;nbsp; si rivela macchinosa e inutile.&lt;br /&gt;
Viene qui usato un lettore di smartcard B4ID&lt;br /&gt;
La carta invece è quella che sul sito della Regione viene identificata come &lt;i&gt;modello 2&lt;/i&gt; (AT2012).&lt;br /&gt;
&lt;br /&gt;
&lt;div class="separator" style="clear: both; text-align: center;"&gt;
&lt;a href="https://blogger.googleusercontent.com/img/b/R29vZ2xl/AVvXsEivYY4iC5wLIkTXCs7g5Dg0gX7lzcYhqsWuig6OAXd3tw03ovXe6fKSZhggHDbyJLBGiYakHohibygc4M60eMB_H8PeP0_v2fTz0-RVf17_zK45cMW9P4UeruWG6pLDEsUKOPbdwWzGCqY/s1600/IMG_20170714_104124.jpg" imageanchor="1" style="margin-left: 1em; margin-right: 1em;"&gt;&lt;img border="0" data-original-height="1600" data-original-width="1422" height="320" src="https://blogger.googleusercontent.com/img/b/R29vZ2xl/AVvXsEivYY4iC5wLIkTXCs7g5Dg0gX7lzcYhqsWuig6OAXd3tw03ovXe6fKSZhggHDbyJLBGiYakHohibygc4M60eMB_H8PeP0_v2fTz0-RVf17_zK45cMW9P4UeruWG6pLDEsUKOPbdwWzGCqY/s320/IMG_20170714_104124.jpg" width="284" /&gt;&lt;/a&gt;&lt;/div&gt;
&lt;br /&gt;
&lt;h2&gt;
Installare i pacchetti&lt;/h2&gt;
Installate PC/SC Lite (Middleware to access a smart card using SCard API)&lt;br /&gt;
&lt;br /&gt;
&lt;span style="font-family: &amp;quot;courier new&amp;quot; , &amp;quot;courier&amp;quot; , monospace;"&gt;sudo dnf install pcsc-tools&lt;/span&gt;&lt;br /&gt;
&lt;br /&gt;
Collegate il lettore e lanciare il comando:&lt;br /&gt;
&lt;br /&gt;
&lt;span style="font-family: &amp;quot;courier new&amp;quot; , &amp;quot;courier&amp;quot; , monospace;"&gt;pcsc_scan -n&lt;/span&gt;&lt;br /&gt;
&lt;br /&gt;
Inserite la carta nel lettore. Dovrebbe apparire qualcosa del genere:&lt;br /&gt;
&lt;br /&gt;
&lt;span style="font-family: &amp;quot;courier new&amp;quot; , &amp;quot;courier&amp;quot; , monospace;"&gt;Fri Jul 14 19:51:49 2017&lt;br /&gt;Reader 0: ACS ACR 38U-CCID 00 00&lt;br /&gt;&amp;nbsp; Card state: Card inserted, &lt;br /&gt;&amp;nbsp; ATR: XX XX XX XX XX XX XX XX XX XX XX XX XX XX XX XX XX XX X&lt;/span&gt;&lt;br /&gt;
&lt;br /&gt;
Quindi ok, il lettore funziona. &lt;br /&gt;
Se non funziona: SPIPPOLATE.&lt;br /&gt;
&lt;br /&gt;
Abilitate il servizio e fatelo partire:&lt;br /&gt;
&lt;span style="font-family: &amp;quot;courier new&amp;quot; , &amp;quot;courier&amp;quot; , monospace;"&gt;&lt;br /&gt;&lt;/span&gt;
&lt;span style="font-family: &amp;quot;courier new&amp;quot; , &amp;quot;courier&amp;quot; , monospace;"&gt;sudo systemctl start pcscd&lt;br /&gt;sudo systemctl enable pcscd.service&lt;/span&gt;&lt;br /&gt;
&lt;br /&gt;
Installate OpenSC (&lt;span class="col-11 text-gray-dark mr-2" itemprop="about"&gt;Open source smart card tools and middleware):&lt;/span&gt;&lt;br /&gt;
&lt;br /&gt;
&lt;span style="font-family: &amp;quot;courier new&amp;quot; , &amp;quot;courier&amp;quot; , monospace;"&gt;sudo dnf install opensc&lt;/span&gt;&lt;br /&gt;
&lt;br /&gt;
&lt;h2&gt;
Firefox &lt;/h2&gt;
Andate in Preferenze -&amp;gt; Avanzate -&amp;gt; Certificati&lt;br /&gt;
Quindi Dispositivi di Sicurezza&lt;br /&gt;
Pigiate sul tasto Carica&lt;br /&gt;
Come nome del modulo mettete quel che vi pare&lt;br /&gt;
&lt;span style="line-height: 1.4;"&gt;Specificate quindi il percorso della libreria: &lt;span style="font-family: &amp;quot;courier new&amp;quot; , &amp;quot;courier&amp;quot; , monospace;"&gt;/usr/lib64/opensc-pkcs11.so&lt;/span&gt;&lt;/span&gt;&lt;br /&gt;
&lt;span style="line-height: 1.4;"&gt;Premete ok.&lt;/span&gt;&lt;br /&gt;
&lt;br /&gt;
&lt;span style="line-height: 1.4;"&gt;A questo punto dovreste vedere un nuovo device.&lt;/span&gt;&lt;br /&gt;
&lt;br /&gt;
&lt;div class="separator" style="clear: both; text-align: center;"&gt;
&lt;a href="https://blogger.googleusercontent.com/img/b/R29vZ2xl/AVvXsEhASqCdu1giiVlD04Jcl7BzOBHPwKQwXN7aFEydrB3ewTj1XI3B0CcXdDrNYZ6pPH1wtG34ccQ4guSgmCyb-YV-TYYDv4XVKWxweLsr2Ja8fkHYPcERpdFke3vkUyJcCFBeFMOEqdVWAFI/s1600/Screenshot+from+2017-07-14+11-10-14.png" imageanchor="1" style="clear: left; float: left; margin-bottom: 1em; margin-right: 1em;"&gt;&lt;img border="0" data-original-height="723" data-original-width="1464" height="315" src="https://blogger.googleusercontent.com/img/b/R29vZ2xl/AVvXsEhASqCdu1giiVlD04Jcl7BzOBHPwKQwXN7aFEydrB3ewTj1XI3B0CcXdDrNYZ6pPH1wtG34ccQ4guSgmCyb-YV-TYYDv4XVKWxweLsr2Ja8fkHYPcERpdFke3vkUyJcCFBeFMOEqdVWAFI/s640/Screenshot+from+2017-07-14+11-10-14.png" width="640" /&gt;&lt;/a&gt;&lt;/div&gt;
&lt;span style="line-height: 1.4;"&gt;&lt;/span&gt;&lt;br /&gt;
&lt;span style="line-height: 1.4;"&gt;Inserendo la carta dovrebbe apparire il nominativo e il codice fiscale.&lt;/span&gt;&lt;br /&gt;
&lt;span style="line-height: 1.4;"&gt;&lt;br /&gt;&lt;/span&gt;
&lt;br /&gt;
&lt;div class="separator" style="clear: both; text-align: center;"&gt;
&lt;a href="https://blogger.googleusercontent.com/img/b/R29vZ2xl/AVvXsEhTqVDYpeDp96rNFS78vzoor2-7nkygxDp9QQG3Odu6MADzileZAP-GvdOb9_mZ4sHdznbiErU3kfftzFAXeghNOTfsYplysaQakhVaGpsP_kT-qJweI83hnkdiCoDiByUGJ56YL20Qs-o/s1600/Screenshot+from+2017-07-14+11-10-30.png" imageanchor="1" style="clear: left; float: left; margin-bottom: 1em; margin-right: 1em;"&gt;&lt;img border="0" data-original-height="768" data-original-width="1520" height="322" src="https://blogger.googleusercontent.com/img/b/R29vZ2xl/AVvXsEhTqVDYpeDp96rNFS78vzoor2-7nkygxDp9QQG3Odu6MADzileZAP-GvdOb9_mZ4sHdznbiErU3kfftzFAXeghNOTfsYplysaQakhVaGpsP_kT-qJweI83hnkdiCoDiByUGJ56YL20Qs-o/s640/Screenshot+from+2017-07-14+11-10-30.png" width="640" /&gt;&lt;/a&gt;&lt;/div&gt;
&lt;span style="line-height: 1.4;"&gt;Premendo su Login dovrebbe venire richiesto il PIN della carta.&lt;/span&gt;&lt;br /&gt;
&lt;span style="line-height: 1.4;"&gt;&lt;br /&gt;Ora potete&lt;/span&gt;&lt;span style="line-height: 1.4;"&gt; provare l'effettivo funzionamento collegandovi a un sito che richiede l'autenticazione via CNS, come per esempio &lt;a href="https://accessosicuro.rete.toscana.it/"&gt;https://accessosicuro.rete.toscana.it&lt;/a&gt; (dove trovate, fra l'altro, il Fascicolo Sanitario elettronico), oppure &lt;a href="https://iris.rete.toscana.it/"&gt;https://iris.rete.toscana.it/&lt;/a&gt; (per i pagamenti online della Regione Toscana). oppure il sito dell'INPS.&lt;/span&gt;&lt;br /&gt;
&lt;span class="col-11 text-gray-dark mr-2" itemprop="about"&gt;&lt;br /&gt;&lt;/span&gt;
&lt;span class="col-11 text-gray-dark mr-2" itemprop="about"&gt;Con la tessera sanitaria è anche possibile richiedere le &lt;/span&gt;credenziali &lt;b&gt;SPID&lt;/b&gt;, il Sistema Pubblico di Identità Digitale: &lt;a href="https://www.spid.gov.it/richiedi-spid#altre-modalita"&gt;https://www.spid.gov.it/richiedi-spid#altre-modalita&lt;/a&gt;</content>
    <link rel="replies" type="application/atom+xml" href="http://blogoless.blogspot.com/feeds/5126831580586440512/comments/default" title="Post Comments"/>
    <link rel="replies" type="text/html" href="http://blogoless.blogspot.com/2017/07/firefox-usare-la-cns-su-fedora.html#comment-form" title="1 Comments"/>
    <link rel="edit" type="application/atom+xml" href="http://www.blogger.com/feeds/8009822662942276789/posts/default/5126831580586440512"/>
    <link rel="self" type="application/atom+xml" href="http://www.blogger.com/feeds/8009822662942276789/posts/default/5126831580586440512"/>
    <link rel="alternate" type="text/html" href="http://blogoless.blogspot.com/2017/07/firefox-usare-la-cns-su-fedora.html" title="Firefox: usare la CNS su Fedora"/>
    
    <media:thumbnail xmlns:media="http://search.yahoo.com/mrss/" url="https://blogger.googleusercontent.com/img/b/R29vZ2xl/AVvXsEivYY4iC5wLIkTXCs7g5Dg0gX7lzcYhqsWuig6OAXd3tw03ovXe6fKSZhggHDbyJLBGiYakHohibygc4M60eMB_H8PeP0_v2fTz0-RVf17_zK45cMW9P4UeruWG6pLDEsUKOPbdwWzGCqY/s72-c/IMG_20170714_104124.jpg" height="72" width="72"/>
    <thr:total>1</thr:total>
  <author><name>Al Cir</name></author><title>Al Cir: Firefox: usare la CNS su Fedora</title></entry>
  <entry xmlns:gd="http://schemas.google.com/g/2005" xmlns:thr="http://purl.org/syndication/thread/1.0" xml:base="http://blogoless.blogspot.it/">
    <id>tag:blogger.com,1999:blog-8009822662942276789.post-1119143540077071419</id>
    <published>2017-07-12T18:30:00.001+02:00</published>
    <updated>2017-07-12T18:36:26.558+02:00</updated>
    <category scheme="http://www.blogger.com/atom/ns#" term="fedora"/>
    <category scheme="http://www.blogger.com/atom/ns#" term="headless"/>
    <category scheme="http://www.blogger.com/atom/ns#" term="linux"/>
    <category scheme="http://www.blogger.com/atom/ns#" term="raspberry"/>
    <category scheme="http://www.blogger.com/atom/ns#" term="serial"/>
    
    <content type="html">&lt;h2&gt;
&lt;/h2&gt;
&lt;h3&gt;
&lt;/h3&gt;
The Raspberry Pi is the most famous SBC (Single-Board Computer). It is a recent news that over five millions of units were sold since it came out.&lt;br /&gt;
&lt;br /&gt;
There are a lot of Linux-based and not Linux-based operating systems that runs on the Raspberry: Fedora is one of the latest landed in this platform. Due to this fact, many things still don’t work: for instance, according to what you can read on the Fedora wiki, expansion HATs, composite TV out, analog sound port and the add-on camera are not yet supported; support for displays other than the official one is not currently planned, GPIO isn't  well supported. In addition Fedora supports only Pi version 2 and later.&lt;br /&gt;
Obviously the Raspberry Pi Foundation recommends the use of Raspbian, a Debian-based Linux operating system. And as stated before, there are many distributions that have been around for a long time, therefore they probably work better on such platform. Compared to the rest of the world Fedora on ARM could look at early stages of development.&lt;br /&gt;
Then, due to these facts the question could be: why using Fedora on the Raspberry Pi when there are more feature rich and widely used distributions? The answer is: isn’t Fedora our favorite distro? So let’s give a try to the ARM version.&lt;br /&gt;
Side note: ARM is an architecture officially supported by Fedora.&lt;br /&gt;
&lt;br /&gt;
Let’s get started.&lt;br /&gt;
&lt;br /&gt;
&lt;div class="separator" style="clear: both; text-align: center;"&gt;
&lt;a href="https://blogger.googleusercontent.com/img/b/R29vZ2xl/AVvXsEhNheKtixDDxCoECsyXoR2vfW_XNKw3wCmVt3v-um_8NaAWZY7BqZhyphenhyphenP0yJ4_CanpqZuw83n6P65-pY_E4GpH87xRMqlg_2mH8Bs9XvWtE9yPSvmxEkfqUOQCu0fXeCnMc31xnf_ickYYM/s1600/Screenshot+from+2017-07-12+15-58-34.png" imageanchor="1" style="margin-left: 1em; margin-right: 1em;"&gt;&lt;img border="0" data-original-height="374" data-original-width="1196" height="200" src="https://blogger.googleusercontent.com/img/b/R29vZ2xl/AVvXsEhNheKtixDDxCoECsyXoR2vfW_XNKw3wCmVt3v-um_8NaAWZY7BqZhyphenhyphenP0yJ4_CanpqZuw83n6P65-pY_E4GpH87xRMqlg_2mH8Bs9XvWtE9yPSvmxEkfqUOQCu0fXeCnMc31xnf_ickYYM/s640/Screenshot+from+2017-07-12+15-58-34.png" width="640" /&gt;&lt;/a&gt;&lt;/div&gt;
&lt;br /&gt;
&lt;h2&gt;
Preparing the SD card&lt;/h2&gt;
The installation of the Fedora ARM image on an SD card is simple as these two steps:&lt;br /&gt;
&lt;br /&gt;
- download the raw image of your choice (in this case Minimal) from &lt;a href="https://arm.fedoraproject.org/"&gt;https://arm.fedoraproject.org/&lt;/a&gt;&lt;br /&gt;
&lt;br /&gt;
- run this command (supposing you are running Fedora on your PC and that you have installed the fedora-arm-installer package via DNF)&lt;br /&gt;
&lt;br /&gt;
&lt;span style="font-family: &amp;quot;courier new&amp;quot; , &amp;quot;courier&amp;quot; , monospace;"&gt;sudo arm-image-installer --image=Fedora-Minimal-armhfp-26-1.5-sda.raw.xz --target=rpi3 --norootpass --resizefs --media=/dev/mmcblk0 -y&lt;/span&gt;&lt;br /&gt;
&lt;span style="font-family: &amp;quot;courier new&amp;quot; , &amp;quot;courier&amp;quot; , monospace;"&gt;&lt;br /&gt;&lt;/span&gt;
Please refer to &lt;a href="https://fedoraproject.org/wiki/Architectures/ARM/Raspberry_Pi?rd=Raspberry_Pi#Preparing_the_SD_card"&gt;the Fedora wiki&lt;/a&gt;.&lt;br /&gt;
&lt;br /&gt;
Such command will blanks the root password (remember to subsequently set one during first setup) and it will automatically resize the root partition in order to fill up the SD card size.&lt;br /&gt;
&lt;br /&gt;
Once done, remove the SD card from your PC.&lt;br /&gt;
&lt;br /&gt;
&lt;h2&gt;
The serial console&lt;/h2&gt;
If you do not have an HDMI screen to connect to the Raspberry Pi, or if you want to run a completely &lt;b&gt;headless&lt;/b&gt; box, you have to enable the serial console.&lt;br /&gt;
&lt;br /&gt;
The task is different between the Raspberry 2 and 3. These steps are for the version 3:&lt;br /&gt;
&lt;br /&gt;
- insert the SD card in your PC, it should automatically mount three partitions&lt;br /&gt;
&lt;br /&gt;
- edit the file extlinux.conf&lt;br /&gt;
&lt;br /&gt;
&lt;span style="font-family: &amp;quot;courier new&amp;quot; , &amp;quot;courier&amp;quot; , monospace;"&gt;sudo vim /run/media/&lt;i&gt;youruser&lt;/i&gt;/__boot/extlinux/extlinux.conf&lt;/span&gt;&lt;br /&gt;
&lt;br /&gt;
add "&lt;span style="font-family: &amp;quot;courier new&amp;quot; , &amp;quot;courier&amp;quot; , monospace;"&gt;console=tty0 console=ttyAMA0,115200&lt;/span&gt;" to the end of the append line&lt;br /&gt;
&lt;br /&gt;
&lt;span style="font-family: &amp;quot;courier new&amp;quot; , &amp;quot;courier&amp;quot; , monospace;"&gt;append ro root=UUID=&lt;i&gt;&amp;lt;uuid-uuid&amp;gt;&lt;/i&gt; console=tty0 console=ttyS0,115200&lt;/span&gt;&lt;br /&gt;
&lt;br /&gt;
- edit the &lt;span style="font-family: &amp;quot;courier new&amp;quot; , &amp;quot;courier&amp;quot; , monospace;"&gt;config.txt&lt;/span&gt; file in the root partiton&lt;br /&gt;
&lt;br /&gt;
&lt;span style="font-family: &amp;quot;courier new&amp;quot; , &amp;quot;courier&amp;quot; , monospace;"&gt;sudo vim /run/media/&lt;i&gt;youruser&lt;/i&gt;/&lt;i&gt;sometinglike-4AC9-BABE&lt;/i&gt;/config.txt&lt;/span&gt;&lt;br /&gt;
uncomment the &lt;span style="font-family: &amp;quot;courier new&amp;quot; , &amp;quot;courier&amp;quot; , monospace;"&gt;enable_uart&lt;/span&gt; line:&lt;br /&gt;
&lt;br /&gt;
enable_uart=1&lt;br /&gt;
&lt;br /&gt;
&lt;h2&gt;
The onboard wifi adapter&lt;/h2&gt;
If you want to enable the onboard WiFi adapter, you have to download a file that Fedora can not currently redistribute in the raw image:&lt;br /&gt;
&lt;br /&gt;
&lt;span style="font-family: &amp;quot;courier new&amp;quot; , &amp;quot;courier&amp;quot; , monospace;"&gt;sudo
 curl 
https://raw.githubusercontent.com/RPi-Distro/firmware-nonfree/master/brcm80211/brcm/brcmfmac43430-sdio.txt
 -o /run/media/youruser/__/lib/firmware/brcm/brcmfmac43430-sdio.txt&lt;/span&gt;&lt;br /&gt;
&lt;span style="font-family: &amp;quot;courier new&amp;quot; , &amp;quot;courier&amp;quot; , monospace;"&gt;&amp;nbsp;&lt;/span&gt; &lt;br /&gt;
&lt;h2&gt;
Booting the Raspberry&lt;/h2&gt;
Umount the three partitions, using something like&lt;br /&gt;
&lt;br /&gt;
&lt;span style="font-family: &amp;quot;courier new&amp;quot; , &amp;quot;courier&amp;quot; , monospace;"&gt;umount /run/media/&lt;i&gt;youruser&lt;/i&gt;/__boot ; umount /run/media/&lt;i&gt;youruser&lt;/i&gt;/__ ; umount /run/media/&lt;i&gt;youruser&lt;/i&gt;/&lt;/span&gt;&lt;span style="font-family: &amp;quot;courier new&amp;quot; , &amp;quot;courier&amp;quot; , monospace;"&gt;&lt;i&gt;sometinglike-4AC9-BABE&lt;/i&gt;&lt;/span&gt;&lt;br /&gt;
&lt;br /&gt;
Then insert the SD card in the Raspberry Pi, connect an Usb to Serial/TTL Adapter (the pin 8 on the Raspberry is the TX and pin 10 is the RX). Then power up the device.&lt;br /&gt;
&lt;br /&gt;
You can look at the boot process using a terminal emulator program like minicom or GTKterm, or even the simple screen command:&lt;br /&gt;
&lt;br /&gt;
&lt;span style="font-family: &amp;quot;courier new&amp;quot; , &amp;quot;courier&amp;quot; , monospace;"&gt;screen&amp;nbsp; /dev/ttyUSB0 115200&lt;/span&gt;&lt;br /&gt;
&lt;br /&gt;
&lt;script async="" id="asciicast-KsNYUBmTfWOCYmcWha6yRrpvb" src="https://asciinema.org/a/KsNYUBmTfWOCYmcWha6yRrpvb.js" type="text/javascript"&gt;&lt;/script&gt;

Once the boot process will reach the end, you should see the Fedora initial setup where you can create an account, set the root password, configure the timezone, etc.&lt;br /&gt;
&lt;br /&gt;
As soon as you log in, if the Raspberry is connected to the network using the Ethernet interface, and there is a DHCP server in the LAN, you are almost done. Check if you are really online and perform a system update:&lt;br /&gt;
&lt;br /&gt;
&lt;span style="font-family: &amp;quot;courier new&amp;quot; , &amp;quot;courier&amp;quot; , monospace;"&gt;sudo dnf update&lt;/span&gt;&lt;br /&gt;
&lt;br /&gt;
&lt;h2&gt;
Setup the wifi&lt;/h2&gt;
If for some reason you can’t use the Ethernet interface and you need to connect to the WiFi network, you have to configure the wireless interface using the Network Manager command line interface (nmcli).&lt;br /&gt;
&lt;br /&gt;
For instance, if your network uses WPA or WPA2, and there is a DHCP this task is pretty simple:&lt;br /&gt;
&lt;br /&gt;
&lt;span style="font-family: &amp;quot;courier new&amp;quot; , &amp;quot;courier&amp;quot; , monospace;"&gt;nmcli radio&lt;/span&gt;&lt;br /&gt;
&lt;br /&gt;
&lt;span style="font-family: &amp;quot;courier new&amp;quot; , &amp;quot;courier&amp;quot; , monospace;"&gt;nmcli device wifi connect &lt;i&gt;YOURSSID&lt;/i&gt; password &lt;i&gt;secretpassword&lt;/i&gt;&lt;/span&gt;&lt;br /&gt;
&lt;br /&gt;
If you need to set up a static IP there are instead various steps to perform:&lt;br /&gt;
&lt;br /&gt;
Add a connection profile and set the IP/netmask and the default gateway&lt;br /&gt;
&lt;br /&gt;
&lt;span style="font-family: &amp;quot;courier new&amp;quot; , &amp;quot;courier&amp;quot; , monospace;"&gt;nmcli con add con-name &lt;i&gt;ConnectionName&lt;/i&gt; ifname wlan0 type wifi ssid &lt;i&gt;YOURSSID&lt;/i&gt; ip4 &lt;i&gt;192.168.100.200/24&lt;/i&gt; gw4 &lt;i&gt;192.168.100.1&lt;/i&gt;&lt;/span&gt;&lt;br /&gt;
&lt;br /&gt;
Set up the DNS&lt;br /&gt;
&lt;br /&gt;
&lt;span style="font-family: &amp;quot;courier new&amp;quot; , &amp;quot;courier&amp;quot; , monospace;"&gt;nmcli con modify &lt;i&gt;ConnectionName&lt;/i&gt; ipv4.dns "&lt;i&gt;8.8.8.8 8.8.4.4&lt;/i&gt;"&lt;/span&gt;&lt;br /&gt;
&lt;br /&gt;
Configure the wireless security (in this case wpa-psk) and the password&lt;br /&gt;
&lt;br /&gt;
&lt;span style="font-family: &amp;quot;courier new&amp;quot; , &amp;quot;courier&amp;quot; , monospace;"&gt;nmcli con modify &lt;i&gt;ConnectionName&lt;/i&gt; wifi-sec.key-mgmt wpa-psk&lt;/span&gt;&lt;br /&gt;
&lt;br /&gt;
&lt;span style="font-family: &amp;quot;courier new&amp;quot; , &amp;quot;courier&amp;quot; , monospace;"&gt;nmcli con modify &lt;i&gt;ConnectionName&lt;/i&gt; wifi-sec.psk &lt;i&gt;verysecurepassword&lt;/i&gt;&lt;/span&gt;&lt;br /&gt;
&lt;br /&gt;
Now you can bring up the connection:&lt;br /&gt;
&lt;br /&gt;
&lt;span style="font-family: &amp;quot;courier new&amp;quot; , &amp;quot;courier&amp;quot; , monospace;"&gt;nmcli con up ConnectionName&lt;/span&gt;&lt;br /&gt;
&lt;br /&gt;
&lt;h2&gt;
Conclusion&lt;/h2&gt;
Here we have an headless and wireless Raspberry Pi 3 running our favorite GNU/Linux distribution! &lt;br /&gt;
&lt;br /&gt;
Please refer to the Fedora Project wiki for more and up to date informations:&lt;br /&gt;
&lt;a href="https://fedoraproject.org/wiki/Raspberry_Pi"&gt;https://fedoraproject.org/wiki/Raspberry_Pi &lt;/a&gt;</content>
    <link rel="replies" type="application/atom+xml" href="http://blogoless.blogspot.com/feeds/1119143540077071419/comments/default" title="Post Comments"/>
    <link rel="replies" type="text/html" href="http://blogoless.blogspot.com/2017/07/how-to-install-fedora-26-on-raspberry.html#comment-form" title="0 Comments"/>
    <link rel="edit" type="application/atom+xml" href="http://www.blogger.com/feeds/8009822662942276789/posts/default/1119143540077071419"/>
    <link rel="self" type="application/atom+xml" href="http://www.blogger.com/feeds/8009822662942276789/posts/default/1119143540077071419"/>
    <link rel="alternate" type="text/html" href="http://blogoless.blogspot.com/2017/07/how-to-install-fedora-26-on-raspberry.html" title="How to install Fedora 26 on the Raspberry Pi (Headless and Wireless)"/>
    
    <media:thumbnail xmlns:media="http://search.yahoo.com/mrss/" url="https://blogger.googleusercontent.com/img/b/R29vZ2xl/AVvXsEhNheKtixDDxCoECsyXoR2vfW_XNKw3wCmVt3v-um_8NaAWZY7BqZhyphenhyphenP0yJ4_CanpqZuw83n6P65-pY_E4GpH87xRMqlg_2mH8Bs9XvWtE9yPSvmxEkfqUOQCu0fXeCnMc31xnf_ickYYM/s72-c/Screenshot+from+2017-07-12+15-58-34.png" height="72" width="72"/>
    <thr:total>0</thr:total>
  <author><name>Al Cir</name></author><title>Al Cir: How to install Fedora 26 on the Raspberry Pi (Headless and Wireless)</title></entry>
  <entry xml:base="http://www.reversengineered.com/">
    <link rel="alternate" href="https://littleknife.dev/blog/2016/01/07/booting-linux-isos-with-memdisk-and-ipxe/" type="text/html"/>
    <content type="xhtml">
      <div xmlns="http://www.w3.org/1999/xhtml">Booting Linux ISOs with Memdisk and iPXE</div>
    </content>
    <id>https://littleknife.dev/blog/2016/01/07/booting-linux-isos-with-memdisk-and-ipxe/</id>
    <published>2016-01-07T00:00:00Z</published>
    <category term="code"/>
    <category term="debian"/>
    <category term="esx"/>
    <category term="linux"/>
    <category term="ipxe"/>
    <category term="live"/>
    <category term="netboot"/>
    <category term="netboot.xyz"/>
    <category term="vmware"/>
    <category term="xenserver"/>
    <author>
      <name>Antony Messerli</name>
    </author>
    <title>Antony Messerli: Booting Linux ISOs with Memdisk and iPXE</title>
  </entry>
  <entry xml:base="http://www.reversengineered.com/">
    <link rel="alternate" href="https://littleknife.dev/blog/2015/11/25/netboot-xyz/" type="text/html"/>
    <content type="xhtml">
      <div xmlns="http://www.w3.org/1999/xhtml">netboot.xyz</div>
    </content>
    <id>https://littleknife.dev/blog/2015/11/25/netboot-xyz/</id>
    <published>2015-11-25T00:00:00Z</published>
    <category term="code"/>
    <category term="linux"/>
    <category term="ipxe"/>
    <category term="live"/>
    <category term="netboot"/>
    <category term="netboot.xyz"/>
    <category term="windows"/>
    <author>
      <name>Antony Messerli</name>
    </author>
    <title>Antony Messerli: netboot.xyz</title>
  </entry>
  <entry xml:base="http://www.reversengineered.com/">
    <link rel="alternate" href="https://littleknife.dev/blog/2015/02/11/booting-vmware-esxi-in-ipxe/" type="text/html"/>
    <content type="xhtml">
      <div xmlns="http://www.w3.org/1999/xhtml">Booting VMware ESXi in iPXE</div>
    </content>
    <id>https://littleknife.dev/blog/2015/02/11/booting-vmware-esxi-in-ipxe/</id>
    <published>2015-02-11T00:00:00Z</published>
    <category term="esx"/>
    <category term="ipxe"/>
    <category term="openstack"/>
    <category term="vmware"/>
    <author>
      <name>Antony Messerli</name>
    </author>
    <title>Antony Messerli: Booting VMware ESXi in iPXE</title>
  </entry>
  <entry xml:base="http://blog.devicenull.org">
			
			<link href="http://blog.devicenull.org/2014/06/03/reattaching-ipmi-memory-to-a-x8sil-f.html"/>
			<updated>2014-06-03T00:00:00+00:00</updated>
			<id>http://litanyagainstfear.com/2014/06/03/reattaching-ipmi-memory-to-a-x8sil-f</id>
			<content type="html">&lt;p&gt;So, in my last post I had sucessfully removed a flash memory chip from my X8SIL-F.  The next step was to attach the &amp;#8216;emulator&amp;#8217; to the motherboard, and attach the connector to another flash chip.  This requires lots of t&lt;br /&gt;
iny little soldering, which is quite annoying to do.  I was ultimately successful, though it took a good 6 hours to accomplish.&lt;/p&gt;
&lt;ul&gt;
	&lt;li&gt;Attach some small wires to the socket.  These will eventually be connected to the flash chip.  I used bits of the conductor from some stranded speaker wire I had.  Lacking any sort of third hard, I just hot glue&lt;br /&gt;
d the wires and the socket to my desk.  You don&amp;#8217;t actually need to connect all the pins, it&amp;#8217;s safe to just connect the outer three on each side. (Look at the &lt;a href="http://datasheet.octopart.com/MX25L12845EMI-10G-Macronix-datasheet-12526005.pdf"&gt;datasheet&lt;/a&gt; for the pinout).&lt;/li&gt;
&lt;/ul&gt;
&lt;p&gt;&lt;img src="/files/ipmi_socket.jpg" title="Half soldered IPMI socket"&gt;&lt;/p&gt;
&lt;ul&gt;
	&lt;li&gt;Bend the legs up, reinforce them with hot glue.&lt;/li&gt;
&lt;/ul&gt;
&lt;ul&gt;
	&lt;li&gt;Solder the flash chip on&lt;/li&gt;
&lt;/ul&gt;
&lt;p&gt;You&amp;#8217;ll end up with something that looks like this&lt;/p&gt;
&lt;p&gt;&lt;img src="/files/removable_ipmi.jpg" title="Removable IPMI flash"&gt;&lt;/p&gt;
&lt;p&gt;If you solder somewhat carefully and don&amp;#8217;t cover up the pins on the top you can still fit a Pomona clip on top.  This makes it easy to program.&lt;/p&gt;
&lt;ul&gt;
	&lt;li&gt;Solder the &amp;#8216;emulator&amp;#8217; onto the motherboard.  This looks terrible, but works.  I needed magnification to find all the tiny solder bridges I created.&lt;/li&gt;
&lt;/ul&gt;
&lt;p&gt;&lt;img src="/files/motherboard_header.jpg" title="X8SIL Motherboard Header"&gt;&lt;/p&gt;
&lt;ul&gt;
	&lt;li&gt;Program the new memory chip with the standard firmware, attach to header.&lt;/li&gt;
&lt;/ul&gt;
&lt;p&gt;&lt;img src="/files/flash_attached.jpg" title="Flash memory attached"&gt;&lt;/p&gt;
&lt;ul&gt;
	&lt;li&gt;Moment of truth! Power on the board.  If you&amp;#8217;ve done everything correctly, the &lt;span class="caps"&gt;IPMI&lt;/span&gt; controler should boot up.  The &amp;#8216;&lt;span class="caps"&gt;IPMI&lt;/span&gt; Health Indicator&amp;#8217; (that green circle in the previous image) should start flashing, and the controller should pull a &lt;span class="caps"&gt;DHCP&lt;/span&gt; leasse.&lt;/li&gt;
&lt;/ul&gt;
&lt;p&gt;If your controller doesn&amp;#8217;t work, make sure you haven&amp;#8217;t created any solder bridges.  Also make sure that everything is properly attached.&lt;/p&gt;
&lt;p&gt;After all this, I now have the ability to flash whatever firmware I want and not have to worry about bricking the controller.  I can just remove the chip and reflash it if something doesn&amp;#8217;t work.  Ultimately, I&amp;#8217;m hoping to find a hidden serial port (the bootloader and kernel are both configured to output things on a serial port, I just don&amp;#8217;t know where it is) which would let me program things in circut.&lt;/p&gt;
&lt;p&gt;Of course, getting the &amp;#8216;&lt;span class="caps"&gt;SDK&lt;/span&gt;&amp;#8217; to compile properly, and emit a usable flash image is a whole other story&amp;#8230; one I&amp;#8217;m still &lt;a href="https://github.com/devicenull/supermicro_ipmi_firmware"&gt;working on&lt;/a&gt;&lt;/p&gt;</content>
		<published>2014-06-03T00:00:00Z</published><author><name>Brian Rak</name></author><title>Brian Rak: Reattaching IPMI Memory to a X8SIL-F</title></entry>
  <entry xml:base="http://www.reversengineered.com/">
    <link rel="alternate" href="https://littleknife.dev/blog/2014/05/17/building-and-booting-debian-live-over-the-network/" type="text/html"/>
    <content type="xhtml">
      <div xmlns="http://www.w3.org/1999/xhtml">Building and Booting Debian Live Over the Network</div>
    </content>
    <id>https://littleknife.dev/blog/2014/05/17/building-and-booting-debian-live-over-the-network/</id>
    <published>2014-05-17T00:00:00Z</published>
    <category term="debian"/>
    <category term="ipxe"/>
    <category term="linux"/>
    <category term="live"/>
    <category term="netboot"/>
    <author>
      <name>Antony Messerli</name>
    </author>
    <title>Antony Messerli: Building and Booting Debian Live Over the Network</title>
  </entry>
  <entry xml:base="http://blog.devicenull.org">
			
			<link href="http://blog.devicenull.org/2014/02/02/supermicro-ipmi-firmware-x8sil-f-analysis.html"/>
			<updated>2014-02-02T00:00:00+00:00</updated>
			<id>http://litanyagainstfear.com/2014/02/02/supermicro-ipmi-firmware-x8sil-f-analysis</id>
			<content type="html">&lt;p&gt;I&amp;#8217;ve been looking into modifying the SuperMicro &lt;span class="caps"&gt;IPMI&lt;/span&gt; firmware.  It&amp;#8217;s full of bugs and lacks some features that would make it useful to manage many servers at once.  Step one was figuring out what the existing firmware looks like.  For this, I&amp;#8217;m using the X8SIL-F board (This was the cheapest board w/&lt;span class="caps"&gt;IPMI&lt;/span&gt; controller that I could find).&lt;/p&gt;
&lt;p&gt;So, I downloaded the firmware image (SMT_313.bin inside SMT_313.zip) and ran it through binwalk:&lt;/p&gt;
&lt;pre class="highlight"&gt;
$ binwalk SMT_313.bin

DECIMAL         HEX             DESCRIPTION
-------------------------------------------------------------------------------------------------------------------
59700           0xE934          Copyright string: " (c) Winbond Limited 2001 - 2006. All rights reserved.6. All rights reserved."
60835           0xEDA3          Copyright string: " 1995-1998 Mark Adler  termination"
1572864         0x180000        CramFS filesystem, little endian size 8118272 version #2 sorted_dirs CRC 0x9236f037, edition 0, 5000 blocks, 1012 files
9961472         0x980000        Zip archive data, at least v2.0 to extract, compressed size: 1124880,  uncompressed size: 2331112, name: "kernel.bin"
11086482        0xA92A92        End of Zip archive
12058624        0xB80000        CramFS filesystem, little endian size 1970176 version #2 sorted_dirs CRC 0xc7723bfb, edition 0, 948 blocks, 210 files
&lt;/pre&gt;
&lt;p&gt;These are some interesting results, we have two CramFS filesystems as well as a kernel image.  There&amp;#8217;s also a whole bunch of unknown data at the beginning of the image.  Using the binwalk data, I looked through the entire image with hexdump.  It turns out there&amp;#8217;s a custom bootloader at the beginning of the image, as well as a whole bunch of empty space.&lt;/p&gt;
&lt;p&gt;This is what I came up with:&lt;br /&gt;
&lt;pre class="highlight"&gt;0&amp;#215;0        0xfa40: Looks like a winbound bootloader &amp;#8220;W90P710 Command Shell&amp;#8221;&lt;br /&gt;
0xfa40     0&amp;#215;180000: empty&lt;br /&gt;
0&amp;#215;180000   0&amp;#215;93dea0: cramfs filesystem (root filesystem)&lt;br /&gt;
0&amp;#215;93dea0   0&amp;#215;93e000: empty&lt;br /&gt;
0&amp;#215;93e000   ff ff ff ff ff ff ff ff  ff ff ff ff ff ff ff ff  |&amp;#8230;&amp;#8230;&amp;#8230;&amp;#8230;&amp;#8230;.|&lt;br /&gt;
0&amp;#215;93e010   0&amp;#215;93ffc0: empty&lt;br /&gt;
0093ffc0   ff ff ff ff ff ff ff ff  ff ff ff ff 02 00 00 00  |&amp;#8230;&amp;#8230;&amp;#8230;&amp;#8230;&amp;#8230;.|&lt;br /&gt;
0093ffd0   00 00 18 40 00 e0 7b 00  00 00 d0 00 00 00 d0 00  |&amp;#8230;&lt;code&gt;..{.........|
0093ffe0   31 73 74 46 53 00 00 00  00 00 00 00 00 00 00 00  |1stFS...........|
0093fff0   0a 2c c1 ae 9f ff ff a0  08 00 00 00 c7 80 96 27  |.,.............'|
00940000   ff ff ff ff ff ff ff ff  ff ff ff ff ff ff ff ff  |................|
0x940010   0x980000: empty
0x980000   0xa92ac0: kernel image
0xa92ac0   0xa9ffc0: empty
0xa9ffc0   ff ff ff ff ff ff ff ff  ff ff ff ff 03 00 00 00  |................|
0xa9ffd0   00 00 98 40 a8 2a 11 00  00 80 00 00 00 80 00 00  |...&lt;/code&gt;.*&amp;#8230;&amp;#8230;&amp;#8230;.|&lt;br /&gt;
0xa9ffe0   6b 65 72 6e 65 6c 00 00  00 00 00 00 00 00 00 00  |kernel&amp;#8230;&amp;#8230;&amp;#8230;.|&lt;br /&gt;
0xa9fff0   23 f5 cc 9c 9f ff ff a0  17 00 00 00 aa 0e 16 13  |#&amp;#8230;&amp;#8230;&amp;#8230;&amp;#8230;&amp;#8230;|&lt;br /&gt;
0xaa0000   ff ff ff ff ff ff ff ff  ff ff ff ff ff ff ff ff  |&amp;#8230;&amp;#8230;&amp;#8230;&amp;#8230;&amp;#8230;.|&lt;br /&gt;
0xaa0010   0xb80000: empty&lt;br /&gt;
0xb80000   0xd604d0: cramfs filesystem (web ui)&lt;br /&gt;
0xd604d0   0xd61000: empty&lt;br /&gt;
0xd61000   ff ff ff ff ff ff ff ff  ff ff ff ff ff ff ff ff  |&amp;#8230;&amp;#8230;&amp;#8230;&amp;#8230;&amp;#8230;.|&lt;br /&gt;
0xd61010   0xd6ffb0: empty&lt;br /&gt;
0xd6ffb0   ff ff ff 41 54 45 4e 73  5f 46 57 03 13 71 8c 61  |&amp;#8230;ATENs_FW..q.a|&lt;br /&gt;
0xd6ffc0   29 9f 17 ff ff ff ff ff  ff ff ff ff 04 00 00 00  |)&amp;#8230;&amp;#8230;&amp;#8230;&amp;#8230;&amp;#8230;|&lt;br /&gt;
0xd6ffd0   00 00 b8 40 00 10 1e 00  00 00 d0 00 00 00 d0 00  |&amp;#8230;@&amp;#8230;&amp;#8230;&amp;#8230;&amp;#8230;|&lt;br /&gt;
0xd6ffe0   32 6e 64 46 53 00 00 00  00 00 00 00 00 00 00 00  |2ndFS&amp;#8230;&amp;#8230;&amp;#8230;..|&lt;br /&gt;
0xd6fff0   ac 1c 9c 9a 9f ff ff a0  08 00 00 00 22 65 89 3b  |&amp;#8230;&amp;#8230;&amp;#8230;&amp;#8230;&amp;quot;e.;|&lt;br /&gt;
0xd70000   ff ff ff ff ff ff ff ff  ff ff ff ff ff ff ff ff  |&amp;#8230;&amp;#8230;&amp;#8230;&amp;#8230;&amp;#8230;.|&lt;br /&gt;
0xd70010   0&amp;#215;1000000: empty&lt;/pre&gt;&lt;/p&gt;
&lt;p&gt;It seems that the root linux image (aka 1stFS) is entirely separate from the web UI fiels (aka 2ndFS).  I suspect that this firmware is based on the &lt;span class="caps"&gt;ATEN&lt;/span&gt; &lt;span class="caps"&gt;SDK&lt;/span&gt;, and that it was meant to be easy to customize the web UI (so that different manufacturers can use the same code, but have different looks).  This means it should be quite easy to replace the entire frontend.  However, the kinds of issues that I&amp;#8217;m aiming to fix run far deeper then that.&lt;/p&gt;
&lt;p&gt;Before looking at what&amp;#8217;s actually in the firmware, I decided to check out the &amp;#8220;&lt;span class="caps"&gt;SDK&lt;/span&gt;&amp;#8221; SuperMicro gave me.  I&amp;#8217;d been harassing them to give me an updated package of &lt;span class="caps"&gt;GPL&lt;/span&gt; code for their firmware, and they finally came through a couple weeks ago.  This file is named &lt;a href="ftp://ftp.supermicro.com/GPL/SMT/SDK_SMT_X9_317.tar.gz"&gt;SDK_SMT_X9_317.tar.gz&lt;/a&gt;, and can be found on ftp.supermicro.com (though, that link seems pretty constant).&lt;/p&gt;
&lt;p&gt;They provide a Makefile, which compiles most of whats there.  That&amp;#8217;s not entirely useful to us, but some of the other files they include are.&lt;/p&gt;
&lt;p&gt;images/bootloader_pcb_rev_b.bin this looks suspiciously like the bootloader from our image.  Let&amp;#8217;s extract it and find out!&lt;/p&gt;
&lt;div class="highlight"&gt;&lt;pre&gt;&lt;code class="language-bash" data-lang="bash"&gt;&lt;span class="nv"&gt;$ &lt;/span&gt;dd &lt;span class="k"&gt;if&lt;/span&gt;&lt;span class="o"&gt;=&lt;/span&gt;SMT_313.bin &lt;span class="nv"&gt;of&lt;/span&gt;&lt;span class="o"&gt;=&lt;/span&gt;bootloader &lt;span class="nv"&gt;bs&lt;/span&gt;&lt;span class="o"&gt;=&lt;/span&gt;&lt;span class="m"&gt;1&lt;/span&gt; &lt;span class="nv"&gt;count&lt;/span&gt;&lt;span class="o"&gt;=&lt;/span&gt;64040
64040+0 records in
64040+0 records out
&lt;span class="m"&gt;64040&lt;/span&gt; bytes &lt;span class="o"&gt;(&lt;/span&gt;&lt;span class="m"&gt;64&lt;/span&gt; kB&lt;span class="o"&gt;)&lt;/span&gt; copied, 0.0795194 s, &lt;span class="m"&gt;805&lt;/span&gt; kB/s
&lt;span class="nv"&gt;$ &lt;/span&gt;md5sum bootloader
166162c6c9f21d7a710dfd62a3452684  bootloader
&lt;span class="nv"&gt;$ &lt;/span&gt;md5sum images/bootloader_pcb_rev_b.bin
166162c6c9f21d7a710dfd62a3452684  images/bootloader_pcb_rev_b.bin&lt;/code&gt;&lt;/pre&gt;&lt;/div&gt;&lt;p&gt;Awesome, this bootloader appears to be some pretty standard software, so we shouldn&amp;#8217;t have to worry about any customizations that may have been made to it.  A quick look inside the bootloader (with `strings`) shows some interesting things:&lt;/p&gt;
&lt;pre class="highlight"&gt;
WPCM450 Boot Loader [ Version:1.0.14 ]
W90P710 Command Shell v1.0 Rebuilt on Mar 23 2012 at 17:48:54
usage: D -[w,h,b,s] &amp;lt;taddr&amp;gt;
       -w, -W   Word alignment
       -h, -H   Half-word alignment
       -b, -B   Byte alignment
       -s, -S   Swap target
       &amp;lt;taddr&amp;gt;  Target memory address.
Displaying memory at 0x%X
usage: E -[w,h,b,s] &amp;lt;taddr&amp;gt;
        -a              Active image
        -c              Image needs to be copy to RAM
        -x              Executable image
        -f              File system image
        -z              Compressed image
        -nofooter       No footer be written
Usage: DEL [ImageNo.] [b{blockNo.}] [-all]
       [ImageNo.]       Delete the image
       [b{blockNo.}]    Delete the block
       -all             Delete all blocks
 -net_mac  [0,1]      Set active MAC  number
 -mac[0,1] [addr]     Set MAC  Address
 -ip[0,1]  [ip addr]  IP Address
 -dhcp     [1,0]      Enable/Disable Dhcp client
 -baudrate [baud rate setting] Set the default baud rate
 -sn       [serial number]  Set the serial number
Program the flash by TFTP. FT -? for help
Program the flash by Xmodem. FX -? for help
&lt;/pre&gt;
&lt;p&gt;So, it looks like there&amp;#8217;s a serial console here that we can use to reprogram the flash.  That&amp;#8217;s pretty handy, though I currently have no idea how to access the serial console (there&amp;#8217;s no obvious headers on the board).  It also looks like we can just grab the images via &lt;span class="caps"&gt;TFTP&lt;/span&gt;, which is nice.  I&amp;#8217;d rather not try to get Xmodem working.&lt;/p&gt;
&lt;p&gt;Poking around the image some more, I came across MKIMG_Tool/Host/&lt;span class="caps"&gt;HERMON&lt;/span&gt;/Board/SuperMicro_X7SB3/mkbin.inf, which further confirmed the flash layout I had manually discovered:&lt;br /&gt;
&lt;pre class="highlight"&gt;bootloader_pcb_rev_b.bin = 0&lt;br /&gt;
out_rootfs_img.bin = 0&amp;#215;180000&lt;br /&gt;
out_kernel.bin = 0&amp;#215;980000&lt;br /&gt;
out_webfs_img.bin = 0xB80000&lt;/pre&gt;&lt;/p&gt;
&lt;p&gt;There&amp;#8217;s also a binary in here (mkbin), though it segfaults whenever I try to run it.  Looking at `strings` output again, I suspect we can replicate all the functionality with dd and not a whole lot of effort.&lt;/p&gt;
&lt;p&gt;Though it doesn&amp;#8217;t help us, you can also find the default ntp.conf file (&lt;span class="caps"&gt;NTP&lt;/span&gt;/etc/ntp.conf).  This lacks the correct configuration, which is why we see &lt;span class="caps"&gt;IPMI&lt;/span&gt; controllers taking part in &lt;span class="caps"&gt;NTP&lt;/span&gt; reflection attacks.&lt;/p&gt;
&lt;p&gt;While it&amp;#8217;s interesting they&amp;#8217;ve implemented a new bootloader (rather then using something like U-Boot), that&amp;#8217;s not exactly helpful to us. The bootloader isn&amp;#8217;t part of any of the bugs that need fixing, so let&amp;#8217;s move on the root filesystem.  We need to pull it from the image and extract it:&lt;/p&gt;
&lt;div class="highlight"&gt;&lt;pre&gt;&lt;code class="language-bash" data-lang="bash"&gt;&lt;span class="nv"&gt;$ &lt;/span&gt;dd &lt;span class="k"&gt;if&lt;/span&gt;&lt;span class="o"&gt;=&lt;/span&gt;SMT_313.bin &lt;span class="nv"&gt;of&lt;/span&gt;&lt;span class="o"&gt;=&lt;/span&gt;cramfs1 &lt;span class="nv"&gt;skip&lt;/span&gt;&lt;span class="o"&gt;=&lt;/span&gt;&lt;span class="m"&gt;1572864&lt;/span&gt; &lt;span class="nv"&gt;count&lt;/span&gt;&lt;span class="o"&gt;=&lt;/span&gt;&lt;span class="k"&gt;$((&lt;/span&gt;&lt;span class="m"&gt;9961472&lt;/span&gt;&lt;span class="o"&gt;-&lt;/span&gt;&lt;span class="m"&gt;1572864&lt;/span&gt;&lt;span class="k"&gt;))&lt;/span&gt; &lt;span class="nv"&gt;bs&lt;/span&gt;&lt;span class="o"&gt;=&lt;/span&gt;1
8388608+0 records in
8388608+0 records out
&lt;span class="m"&gt;8388608&lt;/span&gt; bytes &lt;span class="o"&gt;(&lt;/span&gt;8.4 MB&lt;span class="o"&gt;)&lt;/span&gt; copied, 9.49599 s, &lt;span class="m"&gt;883&lt;/span&gt; kB/s

&lt;span class="nv"&gt;$ &lt;/span&gt;file cramfs1
cramfs1: Linux Compressed ROM File System data, little endian size &lt;span class="m"&gt;8118272&lt;/span&gt; version &lt;span class="c"&gt;#2 sorted_dirs CRC 0x9236f037, edition 0, 5000 blocks, 1012 files&lt;/span&gt;

&lt;span class="nv"&gt;$ &lt;/span&gt;mkdir mount cramfs1_extract

&lt;span class="nv"&gt;$ &lt;/span&gt;sudo mount -o loop ./cramfs1 mount&lt;span class="p"&gt;;&lt;/span&gt; &lt;span class="nb"&gt;cd &lt;/span&gt;mount
mount: warning: mount seems to be mounted &lt;span class="nb"&gt;read&lt;/span&gt;-only.

&lt;span class="nv"&gt;$ &lt;/span&gt;sudo tar -cf - . &lt;span class="p"&gt;|&lt;/span&gt; sudo tar -C ../cramfs1_extract/ -xpf -&lt;/code&gt;&lt;/pre&gt;&lt;/div&gt;&lt;p&gt;This copies everything to cramfs1_extract (you could look through everything in mount, but you can&amp;#8217;t make any changes that way).  Looking around, there are various bits of standard linux software:&lt;/p&gt;
&lt;ul&gt;
&lt;li&gt;BusyBox v1.12.0 (2014-01-02 18:15:33 &lt;span class="caps"&gt;PST&lt;/span&gt;) &amp;#8211; This version of BusyBox is from 2008&lt;/li&gt;
&lt;li&gt;lighttpd/1.4.23 (Jan  2 2014 18:16:36) &amp;#8211; Lighttpd from 2009&lt;/li&gt;
&lt;li&gt;Dropbear 2013.60 &amp;#8211; It&amp;#8217;s interesting that this is so much newer&lt;/li&gt;
&lt;li&gt;Openwsman 2.1.0 &amp;#8211; 2008 again&lt;/li&gt;
&lt;li&gt;ntpd 4.2.4p4@1.1520 Fri Jan  3 02:24:48 &lt;span class="caps"&gt;UTC&lt;/span&gt; 2014 (55) &amp;#8211; From 2007, not 2014!&lt;/li&gt;
&lt;li&gt;sfcbd 1.3.2 &amp;#8211; 2008&lt;/li&gt;
&lt;/ul&gt;
&lt;p&gt;There&amp;#8217;s also a whole bunch of custom software:&lt;/p&gt;
&lt;ul&gt;
&lt;li&gt;/bin/ivkmserver &amp;#8211; Remote &lt;span class="caps"&gt;KVM&lt;/span&gt;, most likely&lt;/li&gt;
&lt;li&gt;/bin/uiso &amp;#8211; This is probably the &amp;#8220;virtual media&amp;#8221; daemon&lt;/li&gt;
&lt;li&gt;/bin/LanNotifier&lt;/li&gt;
&lt;li&gt;Various kernel modules: usb_hid, vcddev&lt;/ul&gt;
&lt;p&gt;And, we can see it mount the web UI files:&lt;br /&gt;
&lt;pre class="highlight"&gt;mount -t cramfs /dev/mtdblock4 /web&lt;/pre&gt;&lt;/p&gt;
&lt;p&gt;Only one user has a password by default (though, I&amp;#8217;m not sure what this auth is used for other then ssh):&lt;br /&gt;
&lt;pre class="highlight"&gt;root:$1$9X8dqhm3$zuZISagav2MF3yWHBrWQ8/:14396:0:99999:7:::&lt;/pre&gt;&lt;/p&gt;
&lt;p&gt;Google shows that this is apparently the hash for &amp;#8216;atenuser&amp;#8217;.  Not surprising.&lt;/p&gt;
&lt;p&gt;At this point, we know we have a standard &lt;span class="caps"&gt;ARM&lt;/span&gt; Linux system, and we know the basic structure of the flash image.  I&amp;#8217;m still waiting on my board to be delivered, so I can&amp;#8217;t currently test modifying the image.&lt;/p&gt;</content>
		<published>2014-02-02T00:00:00Z</published><author><name>Brian Rak</name></author><title>Brian Rak: SuperMicro IPMI Firmware (X8SIL-F) Analysis</title></entry>
  <entry xml:base="http://blog.devicenull.org">
			
			<link href="http://blog.devicenull.org/2013/11/25/edgemax-and-ipxe.html"/>
			<updated>2013-11-25T00:00:00+00:00</updated>
			<id>http://litanyagainstfear.com/2013/11/25/edgemax-and-ipxe</id>
			<content type="html">&lt;p&gt;Recently, I needed to reinstall one of my machines at home.  My choices were find a &lt;span class="caps"&gt;USB&lt;/span&gt; drive and setup the installer or finally get around to setting up network installs.  At this point I can setup network installs in my sleep, so that was the better choice.  I use an Edgemax router at home, which is based on Vyatta.  Figuring out the configuration necessary to do this took longer then anything else.&lt;/p&gt;
&lt;p&gt;For reference:&lt;/p&gt;
&lt;pre class="highlight"&gt;

set service dhcp-server global-parameters "if exists user-class and option user-class = &amp;amp;quot;iPXE&amp;amp;quot; {"
set service dhcp-server global-parameters "filename &amp;amp;quot;/iPXE.conf&amp;amp;quot;;"
set service dhcp-server global-parameters " } else { "
set service dhcp-server global-parameters "filename &amp;amp;quot;ipxe.pxe&amp;amp;quot;;"
set service dhcp-server global-parameters "}"
set service dhcp-server global-paramters "next-server TFTPSERVERIP;"

&lt;/pre&gt;
&lt;p&gt;I&amp;#8217;m only using &lt;span class="caps"&gt;TFTP&lt;/span&gt; here, but it&amp;#8217;s just as easy to use &lt;span class="caps"&gt;HTTP&lt;/span&gt;.&lt;/p&gt;</content>
		<published>2013-11-25T00:00:00Z</published><author><name>Brian Rak</name></author><title>Brian Rak: Edgemax and iPXE</title></entry>
  <entry xml:base="http://blog.devicenull.org">
			
			<link href="http://blog.devicenull.org/2013/11/14/ipxe-wimboot-and-windows-server-2012r2.html"/>
			<updated>2013-11-14T00:00:00+00:00</updated>
			<id>http://litanyagainstfear.com/2013/11/14/ipxe-wimboot-and-windows-server-2012r2</id>
			<content type="html">&lt;p&gt;Recently, I&amp;#8217;ve been trying to get iPXE and wimboot to boot the Windows Server 2012R2 installer.  This uses WinPE 5.0, which is still very new at this point.  In this version of WinPE, the compression scheme used for bootmgr has changed, and iPXE no longer recognizes it.  This leads to errors such as &amp;#8216;no embedded bootmgr.exe found&amp;#8217;, and ultimately &amp;#8216;&lt;span class="caps"&gt;FATAL&lt;/span&gt;: no bootmgr.exe&amp;#8217;.&lt;/p&gt;
&lt;p&gt;The fix for this is pretty easy, you want to use bootmgr.exe directly, instead of relying on wimboot to extract it from bootmgr.  You can find bootmgr.exe inside the &amp;#8216;boot.wim&amp;#8217; file you get from WinPE.  Mount this (using the Windows &lt;span class="caps"&gt;ADK&lt;/span&gt;) and bootmgr.exe can be found in mount\Windows\Boot\&lt;span class="caps"&gt;PXE&lt;/span&gt;\bootmgr.exe.  Make sure you update your initrd line to contain bootmgr.exe instead of just bootmgr, so you&amp;#8217;d end up with:&lt;/p&gt;
&lt;pre class="highlight"&gt;

kernel wimboot
initrd bootmgr.exe              bootmgr.exe
initrd boot/bcd                 BCD
initrd boot/fonts/wgl4_boot.ttf wgl4_boot.ttf
initrd boot/fonts/chs_boot.ttf  chs_boot.ttf
initrd boot/fonts/cht_boot.ttf  cht_boot.ttf
initrd boot/fonts/jpn_boot.ttf  jpn_boot.ttf
initrd boot/fonts/kor_boot.ttf  kor_boot.ttf
initrd boot/boot.sdi            boot.sdi
initrd sources/boot.wim         boot.wim

&lt;/pre&gt;</content>
		<published>2013-11-14T00:00:00Z</published><author><name>Brian Rak</name></author><title>Brian Rak: iPXE, wimboot and Windows Server 2012R2</title></entry>
  <entry xml:base="http://blog.devicenull.org">
			
			<link href="http://blog.devicenull.org/2013/11/05/lessons-learned-from-a-very-large-server-deployment.html"/>
			<updated>2013-11-05T00:00:00+00:00</updated>
			<id>http://litanyagainstfear.com/2013/11/05/lessons-learned-from-a-very-large-server-deployment</id>
			<content type="html">&lt;p&gt;It&amp;#8217;s that time of year again for us.  The time of year where we deploy massive numbers of servers in a very short period of time.  This year we deployed around 1000 servers to 23 locations.  That&amp;#8217;s a &lt;strong&gt;lot&lt;/strong&gt; of work to get done in two weeks, but we&amp;#8217;ve managed to do it.  There are things that went very well, things that merely went ok, and things that were terrible.&lt;/p&gt;
&lt;p&gt;We&amp;#8217;re on our third generation (well, third generation since I&amp;#8217;ve been here) OS installation system.  I&amp;#8217;ve talked about how this works in other posts, but the short version is that without iPXE, none of this would have been possible.  We ended up having a central image server per location, which made all the installs speedy (though we did manage to peg the install servers gigabit ethernet link multiple times).  This also isolated us from any transient network issues that may have occured.  This entire system worked wonderfully.  For a very large majority of servers, we didn&amp;#8217;t have to do anything other then turn them on.  The entire process from bare metal to fully configured machine was automated, and all the time spent refining that process was well spent.&lt;/p&gt;
&lt;p&gt;More recently then I would have liked, we&amp;#8217;ve also developed similar systems to automatically configure all the &lt;span class="caps"&gt;IPMI&lt;/span&gt; controllers, and provide us with the ability to manage them all centrally.  Having a &amp;#8216;View &lt;span class="caps"&gt;KVM&lt;/span&gt;&amp;#8217; button within our server management system made troubleshooting broken installs that much simpler.  There was no tracking down which &lt;span class="caps"&gt;IPMI&lt;/span&gt; controller went to which machine, nor remembering to firewall off all the &lt;span class="caps"&gt;IPMI&lt;/span&gt; controllers from the internet.  Having a list of all the new machines in a location, and their status (configured or not) made confirming the physical installs were done simple.&lt;/p&gt;
&lt;p&gt;While we use local mirrors for the initial OS install, we were still relying on one central mirror for our other software.  This ended up being a source of delays (23 locations remember, the vast majority of them were not close enough to get great download speeds), as well as causing some failures.  Next year we&amp;#8217;ll definitely have to distribute this content globally.  I&amp;#8217;ll probably end up investigating geo-replicated file systems to make this a more transparent process.&lt;/p&gt;
&lt;p&gt;Speaking of other software, we were surprised mid-deployment by a Cygwin update that broke sshd.  We heavily rely on sshd for mangagement and configuration, so this led to a paniced debugging session.  We ended up rolling back to the previous Cygwin release by using the &amp;#8216;Cygwin Time Machine&amp;#8217;.  The lesson here is to freeze all your software dependencies before starting a large rollout.  This only ended up breaking around 50 machines, so it wasn&amp;#8217;t a ton of wasted work.&lt;/p&gt;
&lt;p&gt;Unsurprisingly, the other big source of issues was the physical hardware itself.  Most of our deployment was Supermicro.  Supermicro (at least from our reseller) doesn&amp;#8217;t seem to believe in issuing unique serial numbers for their hardware.  Dell, for example, has the service tag prominently displayed on the outside of the machine.  This means you can retrieve it from the OS, and go tell remote hands to look for it.  Or, you can retrieve a list of all the known ones, and tell remote hands to go investigate any missing ones.  With Supermicro, we ended up tracking all this by &lt;span class="caps"&gt;MAC&lt;/span&gt; address.  We keep track of the &lt;span class="caps"&gt;MAC&lt;/span&gt; addresses of all the servers, and use our networking gear to tell us which &lt;span class="caps"&gt;MAC&lt;/span&gt; is on which switch port.  We can then tell which switch ports the broken machines are on, and make remote hands trace cables.  This process has it&amp;#8217;s uses, but it&amp;#8217;s not great for this kind of setup.  I&amp;#8217;m not certain how we can fix this in the future, it still requires some thought.&lt;/p&gt;
&lt;p&gt;This has been the quickest and easiest deployment we&amp;#8217;ve done so far.  It&amp;#8217;s not as quick and easy as I&amp;#8217;d like, but we&amp;#8217;re definitely moving in the right direction. We&amp;#8217;ve come a long way from manually imaging, configuring, and shipping boxes.  The only way forward is more automation!&lt;/p&gt;</content>
		<published>2013-11-05T00:00:00Z</published><author><name>Brian Rak</name></author><title>Brian Rak: Lessons learned from a very large server deployment</title></entry>
  <entry xml:base="http://blog.devicenull.org">
			
			<link href="http://blog.devicenull.org/2013/09/04/network-booting-with-sr-iov.html"/>
			<updated>2013-09-04T00:00:00+00:00</updated>
			<id>http://litanyagainstfear.com/2013/09/04/network-booting-with-sr-iov</id>
			<content type="html">&lt;p&gt;I&amp;#8217;ve been doing some research into using &lt;span class="caps"&gt;KVM&lt;/span&gt; to virtualize some of our machines.  Our workloads are very latency sensitive, and require excellent network performance.  We have hardware (Intel I350 Chipset) that supports SR-&lt;span class="caps"&gt;IOV&lt;/span&gt;.  SR-&lt;span class="caps"&gt;IOV&lt;/span&gt; is pretty cool, each network card exposes 7 different &amp;#8216;virtual functions&amp;#8217; (virtual network cards), as well as one &amp;#8216;physical function&amp;#8217; (used by the host).  Each of these VFs can be mapped to an individual virtual machine.  This isn&amp;#8217;t emulation, the VM is communicating directly with the network card.  This decreases latency (one less emulation step) and increases performance.  We&amp;#8217;ve seen significant performance gains from using this, despite the extra complexity it adds.&lt;/p&gt;
&lt;p&gt;As part of our virtualization setup, we rely on iPXE to get the machine running and installed.  We&amp;#8217;re currently doing fresh installs for each virtual machine, so network booting is essential.  Virtual functions, however, do not have any access to the onboard option rom, so they have no way of &lt;span class="caps"&gt;PXE&lt;/span&gt; booting.  This is actually pretty easy to fix by making qemu load iPXE.&lt;/p&gt;
&lt;p&gt;Step 1) Compile a rom for your network card. iPXE has this process pretty &lt;a href="http://ipxe.org/howto/romburning"&gt;well documented&lt;/a&gt; .  For my card, I had a &lt;span class="caps"&gt;PCI&lt;/span&gt; ID of 8086:1520.  I used &lt;a href="http://rom-o-matic.eu"&gt;rom-o-matic&lt;/a&gt; to compile my rom file.  Copy this file to the host somewhere&lt;/p&gt;
&lt;p&gt;Step 2) Edit your libvirt interface definition to include a &lt;rom&gt; entry, like so:&lt;/p&gt;
&lt;div class="highlight"&gt;&lt;pre&gt;&lt;code class="language-xml" data-lang="xml"&gt;&lt;span class="nt"&gt;&amp;lt;interface&lt;/span&gt; &lt;span class="na"&gt;type=&lt;/span&gt;&lt;span class="s"&gt;&amp;#39;network&amp;#39;&lt;/span&gt;&lt;span class="nt"&gt;&amp;gt;&lt;/span&gt;
	&lt;span class="nt"&gt;&amp;lt;source&lt;/span&gt; &lt;span class="na"&gt;network=&lt;/span&gt;&lt;span class="s"&gt;&amp;#39;sriov&amp;#39;&lt;/span&gt;&lt;span class="nt"&gt;/&amp;gt;&lt;/span&gt;
	&lt;span class="nt"&gt;&amp;lt;rom&lt;/span&gt; &lt;span class="na"&gt;bar=&lt;/span&gt;&lt;span class="s"&gt;&amp;#39;on&amp;#39;&lt;/span&gt; &lt;span class="na"&gt;file=&lt;/span&gt;&lt;span class="s"&gt;&amp;#39;/root/80861520.rom&amp;#39;&lt;/span&gt;&lt;span class="nt"&gt;/&amp;gt;&lt;/span&gt;
&lt;span class="nt"&gt;&amp;lt;/interface&amp;gt;&lt;/span&gt;&lt;/code&gt;&lt;/pre&gt;&lt;/div&gt;&lt;p&gt;Reboot, and you should see iPXE start up.  This was actually a lot easier then I was expecting it to be.&lt;/p&gt;</content>
		<published>2013-09-04T00:00:00Z</published><author><name>Brian Rak</name></author><title>Brian Rak: Network booting with SR-IOV</title></entry>
  <entry xml:base="http://blog.devicenull.org">
			
			<link href="http://blog.devicenull.org/2013/08/09/the-evolution-of-our-windows-installation-methods.html"/>
			<updated>2013-08-09T00:00:00+00:00</updated>
			<id>http://litanyagainstfear.com/2013/08/09/the-evolution-of-our-windows-installation-methods</id>
			<content type="html">&lt;p&gt;In the beginning there was G4L (Ghost for Linux).  Lacking any sort of &lt;span class="caps"&gt;PXE&lt;/span&gt; system, we shipped a cdrom in each server.  Reimaging a server meant rebooting it from the cd drive, and grabbing the image via &lt;span class="caps"&gt;FTP&lt;/span&gt;.  This was actually an effective hack, and appears to have worked quite well.  Next, we went to a basic pxelinux setup (still using G4L).  While better in some regards (no shipping cds in every drive), it was not quite optimal.  G4L suffers from the problem of not understanding &lt;span class="caps"&gt;NTFS&lt;/span&gt;, so you end up with a 1:1 copy of every sector of the hard disk.  This means restores take forever, and take longer the bigger your disks.&lt;/p&gt;
&lt;p&gt;After awhile, we switched to Clonezilla. This was a significant improvement, as it uses Partimage to create the images.  Partimage can tell the difference between unused and in use blocks.  This significantly decreased the amount of time needed to image a server (we were now able to image multiple batches of servers in a day, limited only by the amount of power available).  Clonezilla was nice, as it offered an all in one setup, and didn&amp;#8217;t require that you understand how everything was working.  This is where I got hooked on &lt;span class="caps"&gt;PXE&lt;/span&gt;.  At this point, we still had minimal automation for the setup process.  We had a simple batch script that would prompt you for the IP/hostname of a machine, and do the necessary configs.  This script was on a &lt;span class="caps"&gt;USB&lt;/span&gt; drive that moved from machine to machine.&lt;/p&gt;
&lt;p&gt;Our initial deployment of Clonezilla used it as part of &lt;span class="caps"&gt;DRBL&lt;/span&gt;.  &lt;span class="caps"&gt;DRBL&lt;/span&gt; has some fancy scripts that guide you through the entire setup process, and abstract away a lot of what&amp;#8217;s going on.  &lt;span class="caps"&gt;DRBL&lt;/span&gt; lasted awhile, as it took me some time to understand all the different moving parts that go along with network bootring.  The main reason we dropped &lt;span class="caps"&gt;DRBL&lt;/span&gt; was because it would blow away the entire pxelinux.cfg menu every time you made a change.&lt;/p&gt;
&lt;p&gt;Up next was your basic PXELinux stack.  We had a &lt;span class="caps"&gt;DHCP&lt;/span&gt; server, &lt;span class="caps"&gt;TFTP&lt;/span&gt;, and &lt;span class="caps"&gt;NFS&lt;/span&gt; (for images).  This was what we deployed worldwide, and is still in use in some of our locations.  We still use Clonezilla for Windows images, but we boot the &lt;span class="caps"&gt;PXE&lt;/span&gt; version, and no longer rely on &lt;span class="caps"&gt;DRBL&lt;/span&gt; to set things up for us.  We also started to use public IPs for the setup process.  This gave us a significant advantage during mass deployments, as it means you can directly connect to the servers from a remote location to finish the setup process.&lt;/p&gt;
&lt;p&gt;I developed some automation here, but it was fairly fragile.  A &lt;span class="caps"&gt;PHP&lt;/span&gt; script was launched on the first login to the machine (and the machine was configured to automatically login on the first boot).  This would attempt to pull down network configurations from a central machine, and would configure the network, then wait for someone to acknowledge the configuration before restarting.  The acknowledgement was important, as the machine needed to be properly labeled and sent to the correct location.  We&amp;#8217;d often be configuring the machines for multiple locations at a time, so labeling was important.&lt;/p&gt;
&lt;p&gt;Somewhat later, I developed a batch script that did all the necessary software configuration with minimal human interaction.  This was significant as before we would manually follow a checklist when setting up machines.  That was moderately effective, but you would always end up with machines where some critical step had been missed.  We ended up with various scripts that checked for various pieces of software over and over again (as you couldn&amp;#8217;t rely on any software being present).&lt;/p&gt;
&lt;p&gt;Next up comes iPXE.  This replaces PXELinux, and gives us a couple advantages.  One big one is we can now generate configuration files on the fly.  This lets us keep track of what machines have already been imaged and default to booting from the local drive instead of overwriting the drive.  It also lets us improve our Linux install process (we pull down an IP via &lt;span class="caps"&gt;DHCP&lt;/span&gt;, and statically configure that on the machine).  We&amp;#8217;re still relying on Clonezilla to restore the images, but we&amp;#8217;re pushing down IP configurations to make it more automated (and reliable).&lt;/p&gt;
&lt;p&gt;That&amp;#8217;s where we are today.  My current plan is to get rid of all the images, and switch to doing Windows installs via the network.  iPXE has enough documentation on this to get you to booting the Windows installer successfully.  From there, unattend.xml will get you through the rest of the Windows installer.  The big advantage with this is that hardware configuration no longer matters.  There&amp;#8217;s no need to maintain a ton of different images for each different hardware configuration.  There&amp;#8217;s no keeping track of which image works where.  It&amp;#8217;s just start the installer and go.  I&amp;#8217;m also developing a Python app to grab relevant software configurations.  Python works a bit better in this case, as I can compile it to a single exe (yay PyInstaller) which makes it easier to copy over and launch from unattend.xml.&lt;/p&gt;
&lt;p&gt;I&amp;#8217;ve looked into various Windows specific solutions (&lt;span class="caps"&gt;AIK&lt;/span&gt;, &lt;span class="caps"&gt;RDS&lt;/span&gt;, etc), but they all seem to want too much control over the process.   I wouldn&amp;#8217;t have nearly as much control over the installation process if I switched. Somewhat more importantly, I can deploy our entire iPXE system automatically with Puppet.  I can&amp;#8217;t do that with the Windows specific systems (well, &lt;span class="caps"&gt;SCCM&lt;/span&gt; might be able to, but that&amp;#8217;s an extra license fee and a significant amount of work.  I have heard that &lt;span class="caps"&gt;SCCM&lt;/span&gt; is only worth it if you have people to devote to it).&lt;/p&gt;</content>
		<published>2013-08-09T00:00:00Z</published><author><name>Brian Rak</name></author><title>Brian Rak: The evolution of our Windows installation methods</title></entry>
  <entry xml:base="http://blog.robin.smidsrod.no/">
    <link rel="alternate" href="https://blog.robin.smidsrod.no/2013/07/17/ipxe-hackathon/" type="text/html"/>
    <content type="html">&lt;p&gt;So, a while ago I decided that I wanted to invite the core developers of the &lt;a href="https://ipxe.org/"&gt;iPXE project&lt;/a&gt; to my home for an extended weekend of hacking on the project. The agenda was to try and merge as many outstanding patches and pull requests that we knew about. The work the various students did as part of GSoC 2012 was on the priority list. The three people that were able to come were Michael Brown, Thomas Miletich and Marin Hannache.&lt;/p&gt;&lt;p&gt;&lt;strong&gt;TL;DR: Skip down to the summary at the bottom.&lt;/strong&gt;&lt;/p&gt;&lt;h3 id="thursday-11th-of-july"&gt;Thursday 11th of July&lt;/h3&gt;&lt;p&gt;After a busy day cleaning the house and making things ready for the arrival of the guests I headed down to Sandefjord airport (TRF) to pick up Michael. His plane was scheduled to arrive around midnight. He had brought a test machine padded in a large suitcase which packed the car quite full. Luckily Marin and Thomas missed the planned train from Oslo airport, so they arrived an hour later, which was just enough time to get Michael settled in before I had to pick them up. After everyone had arrived we ensured the sleeping arrangements were appropriate and test equipment was unpacked and set up. We finished up the evening around 3AM with strawberries with cream and sugar accompanied by white wine (brought by Marin). Finally people crashed and burned after a &lt;em&gt;long&lt;/em&gt; day.&lt;/p&gt;&lt;h3 id="friday-12th-of-july"&gt;Friday 12th of July&lt;/h3&gt;&lt;p&gt;Since the day before was quite late, people slept in a bit and woke up a little bit before noon. I had solicited food preferences in advance, which was received favorably when we had breakfast out on the patio in the sun/shade.&lt;/p&gt;&lt;p&gt;After the breakfast Thomas started working on the code review of the &lt;a href="https://ipxe.org/gsoc/via"&gt;VIA Velocity Gigabit driver&lt;/a&gt; written from scratch by Adrian Jamr&amp;#xF3;z as part of GSoC 2012. I guess we should&amp;apos;ve merged this code a long time ago, but better late than never.&lt;/p&gt;&lt;p&gt;Michael continued working on his code to allow iPXE scripts to pull out information from PCI configuration space. This is useful for e.g. including the PCI vendor/device IDs in embedded menus or sending it off to a server-side script somewhere, either for inventory purposes or dynamic driver loading. The code was merged and pushed out later the same day. Documentation on how to use it is expected to show up at &lt;a href="https://ipxe.org/settings/pci"&gt;https://ipxe.org/settings/pci&lt;/a&gt; eventually.&lt;/p&gt;&lt;p&gt;Marin worked hard on cleaning up his &lt;a href="https://ipxe.org/gsoc/nfs"&gt;NFS protocol support&lt;/a&gt; code. There were some bugs around that caused the downloaded image name to be NULL, and the URL format was a bit odd. After some discussion we decided on a new URL format and a way to derive the required mount point. Marin worked actively on that piece for the rest of the day.&lt;/p&gt;&lt;p&gt;I was performing initial testing on the new &lt;a href="https://ipxe.org/gsoc/bnx2"&gt;Broadcom NetXtreme II driver&lt;/a&gt; written by Daniel Wyatt as part of GSoC 2012. Preliminary testing indicated there was something strange with the loopback test between this card and the Intel 82541pi used as a reference. Except for performance, most of the driver seemed to be working more or less as it should, but the loopback failure required more hardcore debugging. I decided to let it rest until Michael could help me out.&lt;/p&gt;&lt;figure class="kg-card kg-image-card"&gt;&lt;a href="https://www.flickr.com/photos/robinsmidsrod/9276159642/"&gt;&lt;img src="https://live.staticflickr.com/5537/9276159642_3475d2ac80_n.jpg" class="kg-image" alt="Hacking on iPXE" loading="lazy" width="320" height="213"&gt;&lt;/a&gt;&lt;/figure&gt;&lt;p&gt;Some time during the day we all went to the supermarket and bought various food we were planning on eating during the weekend. That avoided the trouble of trying to translate all of the names of things from Norwegian to English.&lt;/p&gt;&lt;p&gt;Later in the evening I organized a traditional Norwegian barbecue with potato salad, fresh watermelon summer salad and burgers, hot dogs and some tender beef. The guys seemed to like it. After the dinner we ate marzipan cake, which is something Michael decided to buy at the supermarket. Michael also made a traditional English drink called Pimm&amp;apos;s with lemonade to top it off. It tasted quite good, all of it, in my opinion.&lt;/p&gt;&lt;p&gt;After a break which included a few episodes of Futurama some more hacking got done, until we eventually succumbed to sleep deprivation.&lt;/p&gt;&lt;h3 id="saturday-13th-of-july"&gt;Saturday 13th of July&lt;/h3&gt;&lt;p&gt;Even before breakfast was served, Marin was hard at work with the changes on his NFS project. I helped him test it out and eventually he was able to finish it up and hand it over to Michael for final code review and merging.&lt;/p&gt;&lt;p&gt;Also before breakfast Michael rewrote the support for &lt;code&gt;netX&lt;/code&gt; by implementing symlink support between settings blocks. The &lt;code&gt;netX&lt;/code&gt; settings block now shows up first in the list of network adapters, and it directly points to the last opened network device. This now enables a clean way of abstracting out the &lt;code&gt;netX&lt;/code&gt; feature to be used in e.g. &lt;code&gt;autoboot&lt;/code&gt; and other places you can specify a network device. It also fixes a bug with &lt;code&gt;${mac}&lt;/code&gt;, &lt;code&gt;${chip}&lt;/code&gt; and &lt;code&gt;${busid}&lt;/code&gt; not representing the currently opened device if you have more than one network device, but always the first network device.&lt;/p&gt;&lt;p&gt;Thomas was still working hard on the VIA Velocity driver. It seemed like never-ending work.&lt;/p&gt;&lt;p&gt;Breakfast we enjoyed outside this day as well. I had bought cold burgers, heated in the microwave, and put them on the table together with the other normal things. Since the first meal of the day was quite late (2PM), everyone ate like the hungry wolves they were. :)&lt;/p&gt;&lt;p&gt;After looking through some iPXE configuration menu I suggested to Marin that he should add support for Home/End/PgUp/PgDown to the &lt;a href="https://ipxe.org/cmd/config"&gt;config TUI&lt;/a&gt;. It didn&amp;apos;t take him much time to shake that out of his right arm. It&amp;apos;s currently waiting for merging. After he did that he started looking into a shutdown command someone had mentioned they wanted. He spent some time trying to figure out how APM works, and sometime in the middle of the day Shao Miller showed up on IRC and helped him out, and he was able to complete a patch for that feature. It is currently lingering in the merge queue.&lt;/p&gt;&lt;p&gt;Michael started reviewing the &lt;a href="https://ipxe.org/gsoc/via"&gt;VIA Rhine driver&lt;/a&gt;, first cleaning it up and then hitting several obstacles with the loopback test not giving him what he expected. He continued figuratively banging his head against the wall for the rest of the day.&lt;/p&gt;&lt;p&gt;Sometimes it is good to take a break when you just can&amp;apos;t find any good answers. He started making a typical Asian dish called watercress &amp;amp; chicken stir-fry with rice for dinner (we couldn&amp;apos;t find watercress in the store, but he substituted with some other appropriate vegetables). Once he was done with that we sat down and enjoyed a good meal at a late hour (almost 10PM).&lt;/p&gt;&lt;p&gt;I had mentioned earlier in the day that Matthew Helton wanted a way to make the iPXE version string available to scripts. Michael encouraged me to try to write the support myself, considering it was just a few lines of code in &lt;code&gt;core/settings.c&lt;/code&gt;. While Michael was busy making dinner I had a look at it, and with some insight from Marin and Thomas I was able to push out &lt;a href="https://git.ipxe.org/ipxe.git/blobdiff/eba6bb38f2d6642efcb20d43e8b4c6c20406dd32..7016164056fb1065c1379d6ac58d1e9cc475c4db:/src/core/settings.c"&gt;my second commit&lt;/a&gt; in the C parts of the iPXE codebase. I felt so proud of myself, even though it was mostly copy and paste and two lines of changed code.&lt;/p&gt;&lt;p&gt;After a long day of extensive hacking and a good meal, we sat down with some ice cream for dessert. While we were eating we fired up the old MAME emulator and had some fun playing games like Street Fighter II, Mortal Kombat and Bubble Bobble with an authentic arcade joystick from X-Arcade. Michael even tried it!&lt;/p&gt;&lt;p&gt;Although most of us was ready for bed Michael and Thomas ended up back at the computers hacking on the troublesome VIA drivers while Marin and myself continued beating each other to a pulp in Mortal Kombat. Michael found a page with the special moves earlier which made it so much more funny.&lt;/p&gt;&lt;p&gt;At 3AM the last of us figured it was getting way too late and decided to just stop what we were doing and try again the next day with fresh eyes.&lt;/p&gt;&lt;h3 id="sunday-14th-of-july"&gt;Sunday 14th of July&lt;/h3&gt;&lt;p&gt;I had mentioned to the guys earlier that I was planning on making eggs and bacon for breakfast one morning, and this was indeed the day for that. Everything went well and my favorite brunch was served the way it was supposed to. We ate it indoors because the wind was a bit chilly. It seemed to go down very well after a long evening hacking the night before.&lt;/p&gt;&lt;p&gt;After the breakfast we went on a tour around the center of T&amp;#xF8;nsberg. We started at Slottsfjell museum where we saw the viking ship and the large whale skeletons. Both things impressed the guys. After that we walked up to Tallak and had a look around the old buildings there. The place was very busy, because a lot of construction workers were preparing for the Slottsfjell festival that is happening the next weekend. After that we walked up to the tower and had a look out over the city. For the first time in years I could see the changes in the city from an aerial view. The next stop on our route was the pier, which was reasonably active with people. We stopped at Parad-is for some long-awaited ice-cream and a walking break. Finally we walked back up to where the car was parked by the museum. All along the route me and Marin were busy hacking &lt;a href="https://www.ingress.com/"&gt;Ingress&lt;/a&gt; portals.&lt;/p&gt;&lt;figure class="kg-card kg-image-card"&gt;&lt;a href="https://www.flickr.com/photos/robinsmidsrod/9304717985/"&gt;&lt;img src="https://live.staticflickr.com/7397/9304717985_5cb979eba7_n.jpg" class="kg-image" alt="Overlooking T&amp;#xF8;nsberg" loading="lazy" width="320" height="213"&gt;&lt;/a&gt;&lt;/figure&gt;&lt;figure class="kg-card kg-image-card"&gt;&lt;a href="https://www.flickr.com/photos/robinsmidsrod/9304729801/"&gt;&lt;img src="https://live.staticflickr.com/3666/9304729801_531120a2f4_n.jpg" class="kg-image" alt="Cannons are fun" loading="lazy" width="320" height="213"&gt;&lt;/a&gt;&lt;/figure&gt;&lt;figure class="kg-card kg-image-card"&gt;&lt;a href="https://www.flickr.com/photos/robinsmidsrod/9307518772/"&gt;&lt;img src="https://live.staticflickr.com/3737/9307518772_74c3d887eb_n.jpg" class="kg-image" alt="Hand-built viking ship" loading="lazy" width="320" height="240"&gt;&lt;/a&gt;&lt;/figure&gt;&lt;p&gt;Once we came back Michael continued working on his VIA Rhine reviewing, in which he had an epiphany and found out there was an interrupt bug in the Intel driver which caused packets to be lost for some reason. Once that was taken care of he was able to finally push the new &lt;code&gt;rhine&lt;/code&gt; driver.&lt;/p&gt;&lt;p&gt;Thomas continued working on the VIA Velocity driver, getting more and more annoyed at the poor quality of the data sheet and the odd behavior of the test hardware.&lt;/p&gt;&lt;p&gt;Marin said he wanted to make potatoes baked in cream for dinner one of the days, so he started preparing that after we got back, and after a good amount of time in the stove the dinner was ready. Together with some left-over watermelon salad, some sausages, burgers, grilled chicken and other goodies it was time for a feast. And boy was it true!&lt;/p&gt;&lt;p&gt;After the dinner everyone was feeling a bit sleepy after a long day with more than just hacking, so we sat back and watched an episode of Futurama and MacGyver, during which some of us fell asleep for shorter bits of time. It&amp;apos;s really nice to see that people enjoy themselves and feel like they&amp;apos;re at home. While we were cleaning the plates off the table Marin was eating out of the almost empty pot of left-over potatoes. I guess he&amp;apos;s just as much a sucker for food as I am.&lt;/p&gt;&lt;p&gt;The guys went back to hacking the code, while I decided to go to bed a bit earlier than the other days.&lt;/p&gt;&lt;h3 id="monday-15th-of-july"&gt;Monday 15th of July&lt;/h3&gt;&lt;p&gt;When I woke up I got some good news from Thomas. It seems the machine he had been using for testing the VIA Velocity driver had some hardware issues. Once he moved to another machine, all the tests passed and he was very happy with the outcome. The driver could finally be merged.&lt;/p&gt;&lt;p&gt;Once everyone was up and around we had breakfast out in the sun again. The weather had improved a bit from the day before.&lt;/p&gt;&lt;p&gt;After the breakfast Michael was busy merging all of the other outstanding patches mentioned earlier before he started in the NFS feature from Marin. After several back-and-forth bug fixes by Marin the patch was finally in a mergeable state and we could all rejoice over a job well done.&lt;/p&gt;&lt;p&gt;While the others were busy doing code reviewing, I tried to figure out why my dual-NIC test machine didn&amp;apos;t want to exit properly back to my embedded menu from my main menu script. After a lot of testing we found out that &lt;code&gt;autoboot&lt;/code&gt; had an issue with its getopt implementation which caused it to go in a loop if you specified a network adapter, but worked fine if you didn&amp;apos;t specify an adapter list.&lt;/p&gt;&lt;p&gt;We had already decided on going out to eat dinner one of the days, so this was definitely the day to do that. We went to the restaurant in the city which is supposed to have the best kitchen, La Barca. Most of us ordered reindeer, and the dish was outstanding, as usual.&lt;/p&gt;&lt;figure class="kg-card kg-image-card"&gt;&lt;a href="https://www.flickr.com/photos/robinsmidsrod/9304737691/"&gt;&lt;img src="https://live.staticflickr.com/3738/9304737691_ae59ea5ae0_n.jpg" class="kg-image" alt="Well deserved dinner" loading="lazy" width="320" height="240"&gt;&lt;/a&gt;&lt;/figure&gt;&lt;p&gt;After we got back from the city Marin and Michael worked more on getting the file license Makefile target to work properly. They actually got it working, but it also revealed a lot of manual work that needs to be done (basically going through each source file, figuring out which license it is under and then tagging it with a single line of code - if you want to help out with this, please get it touch).&lt;/p&gt;&lt;p&gt;Thomas was at this point getting tired of the review work on the bnx2 driver, so he decided to start looking at a driver for the IC+ 1000 Gigabit Ethernet adapter he&amp;apos;s had around for a while.&lt;/p&gt;&lt;p&gt;At 1AM we started getting hungry, so we pulled out the rest of the strawberries and enjoyed (most likely) the last desert of the hackathon.&lt;/p&gt;&lt;p&gt;While eating people got grandiose ideas about implementing Pong using iPXE scripting. It was pretty obvious the sleep deprivation was starting to get to us.&lt;/p&gt;&lt;h3 id="tuesday-16th-of-july"&gt;Tuesday 16th of July&lt;/h3&gt;&lt;p&gt;The day had finally arrived when everyone had to pack up and get back home. People woke up quite late, which meant we had to eat breakfast in a hurry to avoid Thomas and Marin missing their train to the airport.&lt;/p&gt;&lt;p&gt;While I drove Thomas and Marin to the train, Michael was still hacking around on a new increment command for the iPXE scripting language. It is going to be a neat feature that should enable us to easily loop through e.g. network adapters in embedded menus and probe hardware or other information using the &lt;code&gt;pci&lt;/code&gt; or &lt;code&gt;smbios&lt;/code&gt; settings blocks.&lt;/p&gt;&lt;p&gt;When I got back we sat down and chatted a bit, watched a couple of episodes (introduced Michael to The Big Bang Theory) and I suggested to him to get in touch with Randal Schwartz to appear on &lt;a href="https://twit.tv/floss"&gt;FLOSS Weekly&lt;/a&gt;. This could give us a decent PR boost and get the word out a bit more, and hopefully grow our community.&lt;/p&gt;&lt;p&gt;Later I dropped Michael off at the airport and hacked some more Ingress portals on my way home.&lt;/p&gt;&lt;h3 id="summary"&gt;Summary&lt;/h3&gt;&lt;p&gt;Overall these new features and drivers where published to mainline during the hackathon:&lt;/p&gt;&lt;ul&gt;&lt;li&gt;New &lt;code&gt;hexraw&lt;/code&gt; variable format. Useful for using MAC addresses without separators.&lt;/li&gt;&lt;li&gt;A network interface&amp;apos;s PCI location can be used from scripts.&lt;/li&gt;&lt;li&gt;PCI vendor/device IDs (and more) can be used from scripts.&lt;/li&gt;&lt;li&gt;&lt;code&gt;netX&lt;/code&gt; is now a symlink settings block to most recently opened interface.&lt;/li&gt;&lt;li&gt;Version string available to scripts.&lt;/li&gt;&lt;li&gt;New VIA Rhine 100Mbit driver.&lt;/li&gt;&lt;li&gt;Backslash (like bash) continuation to break long script lines.&lt;/li&gt;&lt;li&gt;New VIA Velocity Gigabit driver.&lt;/li&gt;&lt;li&gt;Home/End/PgUp/PgDown keys now work in &lt;code&gt;config&lt;/code&gt;.&lt;/li&gt;&lt;li&gt;APM computer shutdown command, &lt;code&gt;poweroff&lt;/code&gt;.&lt;/li&gt;&lt;li&gt;Downloading of files using NFS protocol.&lt;/li&gt;&lt;li&gt;Building the license targets now work (although we miss license info for lots of files).&lt;/li&gt;&lt;li&gt;Several minor bug fixes that have been reported and some we discovered during the weekend.&lt;/li&gt;&lt;/ul&gt;&lt;p&gt;These are the items on the agenda we weren&amp;apos;t able to complete because of lack of time:&lt;/p&gt;&lt;ul&gt;&lt;li&gt;Merge the &lt;code&gt;bnx2&lt;/code&gt; driver.&lt;/li&gt;&lt;li&gt;Make &lt;code&gt;ipxe.kpxe&lt;/code&gt; work (aka UNDI fallback).&lt;/li&gt;&lt;li&gt;Make iPXE as an EFI application work.&lt;/li&gt;&lt;li&gt;New Intel wireless driver.&lt;/li&gt;&lt;/ul&gt;&lt;p&gt;All in all it was a great event, and I&amp;apos;m happy that everyone enjoyed it as much as I did hosting it. I&amp;apos;m quite up for doing it again some time in the future, it was a blast! You can find some photos from the event on my &lt;a href="https://www.flickr.com/photos/robinsmidsrod/sets/72157634671915481/"&gt;Flickr set for the hackathon&lt;/a&gt;.&lt;/p&gt;&lt;p&gt;If you want to participate in the iPXE community, join us on &lt;a href="https://ipxe.org/contact"&gt;IRC, the mailing-list or the forum&lt;/a&gt;. If you&amp;apos;re a beginner to network booting, you might also find the website &lt;a href="https://networkboot.org/"&gt;https://networkboot.org/&lt;/a&gt; useful.&lt;/p&gt;&lt;p&gt;If you want to get in touch with me there are links at the top of my blog with links to Twitter, Facebook and Google+. Talk to you later!&lt;/p&gt;</content>
    <summary type="xhtml">
      <div xmlns="http://www.w3.org/1999/xhtml">
        <p>So, a while ago I decided that I wanted to invite the core developers of the <a href="https://ipxe.org/">iPXE project</a> to my home for an extended weekend of hacking on the project. The agenda was to try and merge as many outstanding patches and pull requests that we knew about. The work</p>
      </div>
    </summary>
    <id>64b0753f1c914a000180deec</id>
    <published>2013-07-17T11:09:09Z</published>
    <category term="Software"/>
    <category term="hackathon"/>
    <category term="ipxe"/>
    <category term="netboot"/>
    <category term="pxe"/>
    <category term="network booting"/>
    <category term="American English"/>
    <author>
      <name>Robin Smidsrød</name>
    </author>
    <title>Robin Smidsrød: iPXE hackathon in Tønsberg, Norway</title>
  </entry>
  <entry xml:base="http://www.reversengineered.com/">
    <link rel="alternate" href="https://littleknife.dev/blog/2013/06/26/xenserver-6-2-automated-install-for-openstack/" type="text/html"/>
    <content type="xhtml">
      <div xmlns="http://www.w3.org/1999/xhtml">XenServer 6.2 Automated Install for Openstack</div>
    </content>
    <id>https://littleknife.dev/blog/2013/06/26/xenserver-6-2-automated-install-for-openstack/</id>
    <published>2013-06-26T00:00:00Z</published>
    <category term="netboot"/>
    <category term="openstack"/>
    <category term="xenserver"/>
    <author>
      <name>Antony Messerli</name>
    </author>
    <title>Antony Messerli: XenServer 6.2 Automated Install for Openstack</title>
  </entry>
  <entry xml:base="http://www.reversengineered.com/">
    <link rel="alternate" href="https://littleknife.dev/blog/2013/05/12/citrix-xenserver-6-1-automated-installer-for-openstack/" type="text/html"/>
    <content type="xhtml">
      <div xmlns="http://www.w3.org/1999/xhtml">A patched XenServer 6.1 (Tampa) installer prebuilt for OpenStack Nova's XenAPI driver — drop in the latest CD, boot via PXE or osimag.es, and skip the manual hotfix dance.</div>
    </content>
    <id>https://littleknife.dev/blog/2013/05/12/citrix-xenserver-6-1-automated-installer-for-openstack/</id>
    <published>2013-05-12T00:00:00Z</published>
    <category term="ipxe"/>
    <category term="linux"/>
    <category term="netboot"/>
    <category term="nova"/>
    <category term="openstack"/>
    <category term="xenserver"/>
    <author>
      <name>Antony Messerli</name>
    </author>
    <title>Antony Messerli: Citrix XenServer 6.1 Automated Installer for Openstack</title>
  </entry>
  <entry xml:base="http://nahamu.github.io/">
   
   <link href="http://nahamu.github.com/2013/04/19/smartos-wiki.html"/>
   <updated>2013-04-19T00:00:00-07:00</updated>
   <id>http://nahamu.github.com/2013/04/19/smartos-wiki</id>
   <content type="html">&lt;h1&gt;SmartOS Wiki Pages&lt;/h1&gt;

&lt;p class="meta"&gt;2013-04-19&lt;/p&gt;


&lt;h2&gt;Just a list of some SmartOS wiki pages I've spent a lot of time working on.&lt;/h2&gt;

&lt;ol&gt;
&lt;li&gt;&lt;a href="http://wiki.smartos.org/display/DOC/Simple+PXE+Server"&gt;Simple PXE Server&lt;/a&gt;&lt;/li&gt;
&lt;li&gt;&lt;a href="http://wiki.smartos.org/display/DOC/Spice+on+SmartOS"&gt;Spice on SmartOS&lt;/a&gt;&lt;/li&gt;
&lt;/ol&gt;


&lt;p&gt;Also, this blog (such as it is) has been added to the &lt;a href="http://networkboot.org/planet/"&gt;NetworkBoot.org blog roll&lt;/a&gt;.&lt;br /&gt;
I probably won't write a whole lot of PXE related posts, but I look forward to the broader exposure if/when I do!&lt;br /&gt;
People finding this post from that avenue might enjoy this page: &lt;a href="http://wiki.smartos.org/display/DOC/PXE+Booting+SmartOS"&gt;PXE Booting SmartOS&lt;/a&gt;&lt;br /&gt;&lt;/p&gt;
</content>
 <published>2013-04-19T00:00:00-07:00</published><author><name>Nahum Shalman</name></author><title>Nahum Shalman: SmartOS Wiki Pages</title></entry>
  <entry xml:base="http://blog.devicenull.org">
			
			<link href="http://blog.devicenull.org/2013/03/04/ipxe-and-dell-r210-ii.html"/>
			<updated>2013-03-04T00:00:00+00:00</updated>
			<id>http://litanyagainstfear.com/2013/03/04/ipxe-and-dell-r210-ii</id>
			<content type="html">&lt;p&gt;Today, I was trying to &lt;span class="caps"&gt;PXE&lt;/span&gt; boot a Dell PowerEdge R210 II system in order to clone the hard drive.  We&amp;#8217;ve settled on iPXE to be our &lt;span class="caps"&gt;PXE&lt;/span&gt; boot system.  We&amp;#8217;ve been using ipxe.pxe (which is iPXE with all it&amp;#8217;s own drivers built in) instead of undionly.kpxe (which makes iPXE try to use the &lt;span class="caps"&gt;UNDI&lt;/span&gt; drive) as it tends to perform a little better.  With the R210&amp;#8217;s there&amp;#8217;s a &lt;span class="caps"&gt;BIOS&lt;/span&gt;/&lt;span class="caps"&gt;EFI&lt;/span&gt; issue that prevents this from working.  If you try to boot with ipxe.pxe, you get an error &amp;#8216;Try to free Memory without Signature&amp;#8217;.&lt;/p&gt;
&lt;p&gt;Based on my research, the only way to fix this currently is to switch to undionly.kpxe.  The iPXE driver doesn&amp;#8217;t seem to handle this case correctly.&lt;/p&gt;
&lt;p&gt;For reference, this was with yesterday&amp;#8217;s build of iPXE (2013-03-04) and with v2.2.3 of the R210 &lt;span class="caps"&gt;BIOS&lt;/span&gt; (which uses Broadcom &lt;span class="caps"&gt;UNDI&lt;/span&gt; &lt;span class="caps"&gt;PXE&lt;/span&gt;-2.1 v7.2.3).&lt;/p&gt;</content>
		<published>2013-03-04T00:00:00Z</published><author><name>Brian Rak</name></author><title>Brian Rak: iPXE and Dell R210 II</title></entry>
  <entry xml:base="http://blog.devicenull.org">
			
			<link href="http://blog.devicenull.org/2013/02/27/foreman-boot-menu.html"/>
			<updated>2013-02-27T00:00:00+00:00</updated>
			<id>http://litanyagainstfear.com/2013/02/27/foreman-boot-menu</id>
			<content type="html">&lt;p&gt;We have a somewhat unique (well, probably not unique but not frequently discussed) hardware build process.  We start with a request to our &lt;span class="caps"&gt;NOC&lt;/span&gt; to build a machine with certain specs.  They do so, and run a couple scripts before handing it over to us.  At this point, we manually undo some of the steps they did, then manually run the tail end of Foreman&amp;#8217;s provisioning script (install &lt;span class="caps"&gt;EPEL&lt;/span&gt;, install Puppet, edit puppet.conf, service puppet start, log in to puppetmaster and `puppet ca sign`, restart puppet again).  This is pretty tedious, and it&amp;#8217;s really time consuming to set up a new machine. This really happens because we&amp;#8217;re using Foreman wrong.  Our network setup is complex enough that Foreman doesn&amp;#8217;t really know how to reserve IPs for individual machines.  We&amp;#8217;ve also got a custom &lt;span class="caps"&gt;PXE&lt;/span&gt; system, so Foreman isn&amp;#8217;t even the default next-host.&lt;/p&gt;
&lt;p&gt;Today, I got tired of dealing with all this.  I spent a bunch of time fixing up our Foreman boot system (it had slowly decayed over time because nothing was actually using it).  I also made some changes to our &lt;span class="caps"&gt;PXE&lt;/span&gt; system so that it generates a list of hosts set to &amp;#8216;Build&amp;#8217; in Foreman, and lets you choose which one the new machine should be.  Once you&amp;#8217;ve chosen, it reconfigures the network adapter (yay, iPXE) and chainloads to Foreman.  This means that I can now setup a machine in Foreman, and tell our &lt;span class="caps"&gt;NOC&lt;/span&gt; staff to netboot the machine, and choose option X.  The rest of it will be handled for them, which means quicker setups, fewer mistakes, and in general everyone is happier.&lt;/p&gt;
&lt;p&gt;We&amp;#8217;ve set our &lt;span class="caps"&gt;PXE&lt;/span&gt; system up so it works across our entire network, so I no longer have to get them to install a machine in one location then drag it across the datacenter to it&amp;#8217;s final location.&lt;/p&gt;
&lt;p&gt;Note: All the code that follows is a reconstruction of what I did earlier.  My actual scripts reference internal systems rather then Foreman, so some of this might be buggy!&lt;/p&gt;
&lt;p&gt;The process looks like this:&lt;/p&gt;
&lt;p&gt;1) Machine boots up and grabs a generic iPXE config.  This contains an option that goes to a custom &lt;span class="caps"&gt;PHP&lt;/span&gt; script.  Basically, it looks like this:&lt;/p&gt;
&lt;div class="highlight"&gt;&lt;pre&gt;&lt;code class="language-bash" data-lang="bash"&gt;&lt;span class="c"&gt;#!ipxe&lt;/span&gt;

menu iPXE boot menu
item localboot          Local boot
item Foreman            Choose foreman options
choose --default localboot --timeout &lt;span class="m"&gt;60000&lt;/span&gt; bootoption &lt;span class="o"&gt;&amp;amp;&amp;amp;&lt;/span&gt; goto &lt;span class="k"&gt;${&lt;/span&gt;&lt;span class="nv"&gt;bootoption&lt;/span&gt;&lt;span class="k"&gt;}&lt;/span&gt; &lt;span class="o"&gt;||&lt;/span&gt;

:localboot
&lt;span class="nb"&gt;exit&lt;/span&gt;

:foreman
chain http://&lt;span class="k"&gt;${&lt;/span&gt;&lt;span class="nv"&gt;next&lt;/span&gt;&lt;span class="p"&gt;-server&lt;/span&gt;&lt;span class="k"&gt;}&lt;/span&gt;/showpendinghosts.php&lt;/code&gt;&lt;/pre&gt;&lt;/div&gt;&lt;p&gt;2) showpendinghosts.php generates a list of all the hosts that are currently in the build state in Foreman.  It looks a little bit like this:&lt;/p&gt;
&lt;div class="highlight"&gt;&lt;pre&gt;&lt;code class="language-php" data-lang="php"&gt;&lt;span class="x"&gt;#!ipxe&lt;/span&gt;

&lt;span class="x"&gt;:start&lt;/span&gt;
&lt;span class="x"&gt;menu Foreman Boot Options&lt;/span&gt;
&lt;span class="x"&gt;item --gap --	-------- Pending Hosts --------&lt;/span&gt;
&lt;span class="cp"&gt;&amp;lt;?php&lt;/span&gt;
	&lt;span class="nv"&gt;$db&lt;/span&gt; &lt;span class="o"&gt;=&lt;/span&gt; &lt;span class="nb"&gt;mysql_connect&lt;/span&gt;&lt;span class="p"&gt;();&lt;/span&gt;
	&lt;span class="nv"&gt;$host&lt;/span&gt; &lt;span class="o"&gt;=&lt;/span&gt; &lt;span class="s1"&gt;&amp;#39;&amp;#39;&lt;/span&gt;&lt;span class="p"&gt;;&lt;/span&gt;
	&lt;span class="nv"&gt;$res&lt;/span&gt; &lt;span class="o"&gt;=&lt;/span&gt; &lt;span class="nb"&gt;mysql_query&lt;/span&gt;&lt;span class="p"&gt;(&lt;/span&gt;&lt;span class="s1"&gt;&amp;#39;select * from hosts where build=1&amp;#39;&lt;/span&gt;&lt;span class="p"&gt;);&lt;/span&gt;
	&lt;span class="k"&gt;while&lt;/span&gt; &lt;span class="p"&gt;(&lt;/span&gt;&lt;span class="nv"&gt;$row&lt;/span&gt; &lt;span class="o"&gt;=&lt;/span&gt; &lt;span class="nb"&gt;mysql_fetch_assoc&lt;/span&gt;&lt;span class="p"&gt;(&lt;/span&gt;&lt;span class="nv"&gt;$res&lt;/span&gt;&lt;span class="p"&gt;))&lt;/span&gt;
	&lt;span class="p"&gt;{&lt;/span&gt;
		&lt;span class="nv"&gt;$res2&lt;/span&gt; &lt;span class="o"&gt;=&lt;/span&gt; &lt;span class="nb"&gt;mysql_query&lt;/span&gt;&lt;span class="p"&gt;(&lt;/span&gt;&lt;span class="s1"&gt;&amp;#39;select * from subnets where inet_aton(&amp;quot;&amp;#39;&lt;/span&gt;&lt;span class="o"&gt;.&lt;/span&gt;&lt;span class="nv"&gt;$row&lt;/span&gt;&lt;span class="p"&gt;[&lt;/span&gt;&lt;span class="s1"&gt;&amp;#39;ip&amp;#39;&lt;/span&gt;&lt;span class="p"&gt;]&lt;/span&gt;&lt;span class="o"&gt;.&lt;/span&gt;&lt;span class="s1"&gt;&amp;#39;&amp;quot;) between inet_aton(from) and inet_aton(to)&amp;#39;&lt;/span&gt;&lt;span class="p"&gt;);&lt;/span&gt;
		&lt;span class="nv"&gt;$subnet&lt;/span&gt; &lt;span class="o"&gt;=&lt;/span&gt; &lt;span class="nb"&gt;mysql_fetch_assoc&lt;/span&gt;&lt;span class="p"&gt;(&lt;/span&gt;&lt;span class="nv"&gt;$res&lt;/span&gt;&lt;span class="p"&gt;);&lt;/span&gt;
		&lt;span class="nv"&gt;$host&lt;/span&gt; &lt;span class="o"&gt;.=&lt;/span&gt; &lt;span class="s2"&gt;&amp;quot;&lt;/span&gt;
&lt;span class="s2"&gt;			:host_&lt;/span&gt;&lt;span class="si"&gt;{&lt;/span&gt;&lt;span class="nv"&gt;$row&lt;/span&gt;&lt;span class="p"&gt;[&lt;/span&gt;&lt;span class="s1"&gt;&amp;#39;id&amp;#39;&lt;/span&gt;&lt;span class="p"&gt;]&lt;/span&gt;&lt;span class="si"&gt;}&lt;/span&gt;&lt;span class="s2"&gt;&lt;/span&gt;
&lt;span class="s2"&gt;			set netX/ip &lt;/span&gt;&lt;span class="si"&gt;{&lt;/span&gt;&lt;span class="nv"&gt;$row&lt;/span&gt;&lt;span class="p"&gt;[&lt;/span&gt;&lt;span class="s1"&gt;&amp;#39;ip&amp;#39;&lt;/span&gt;&lt;span class="p"&gt;]&lt;/span&gt;&lt;span class="si"&gt;}&lt;/span&gt;&lt;span class="s2"&gt;&lt;/span&gt;
&lt;span class="s2"&gt;			set netX/gateway &lt;/span&gt;&lt;span class="si"&gt;{&lt;/span&gt;&lt;span class="nv"&gt;$subnet&lt;/span&gt;&lt;span class="p"&gt;[&lt;/span&gt;&lt;span class="s1"&gt;&amp;#39;gateway&amp;#39;&lt;/span&gt;&lt;span class="p"&gt;]&lt;/span&gt;&lt;span class="si"&gt;}&lt;/span&gt;&lt;span class="s2"&gt;&lt;/span&gt;
&lt;span class="s2"&gt;			set netX/netmask &lt;/span&gt;&lt;span class="si"&gt;{&lt;/span&gt;&lt;span class="nv"&gt;$subnet&lt;/span&gt;&lt;span class="p"&gt;[&lt;/span&gt;&lt;span class="s1"&gt;&amp;#39;mask&amp;#39;&lt;/span&gt;&lt;span class="p"&gt;]&lt;/span&gt;&lt;span class="si"&gt;}&lt;/span&gt;&lt;span class="s2"&gt;&lt;/span&gt;
&lt;span class="s2"&gt;			chain http://your_foreman_server/unattended/gPXE&lt;/span&gt;
&lt;span class="s2"&gt;		&amp;quot;&lt;/span&gt;&lt;span class="p"&gt;;&lt;/span&gt;
		&lt;span class="k"&gt;echo&lt;/span&gt; &lt;span class="s2"&gt;&amp;quot;item host_&lt;/span&gt;&lt;span class="si"&gt;{&lt;/span&gt;&lt;span class="nv"&gt;$row&lt;/span&gt;&lt;span class="p"&gt;[&lt;/span&gt;&lt;span class="s1"&gt;&amp;#39;id&amp;#39;&lt;/span&gt;&lt;span class="p"&gt;]&lt;/span&gt;&lt;span class="si"&gt;}&lt;/span&gt;&lt;span class="s2"&gt;	Install &lt;/span&gt;&lt;span class="si"&gt;{&lt;/span&gt;&lt;span class="nv"&gt;$row&lt;/span&gt;&lt;span class="p"&gt;[&lt;/span&gt;&lt;span class="s1"&gt;&amp;#39;name&amp;#39;&lt;/span&gt;&lt;span class="p"&gt;]&lt;/span&gt;&lt;span class="si"&gt;}&lt;/span&gt;&lt;span class="se"&gt;\n&lt;/span&gt;&lt;span class="s2"&gt;&amp;quot;&lt;/span&gt;&lt;span class="p"&gt;;&lt;/span&gt;
	&lt;span class="p"&gt;}&lt;/span&gt;
&lt;span class="cp"&gt;?&amp;gt;&lt;/span&gt;&lt;span class="x"&gt;&lt;/span&gt;

&lt;span class="x"&gt;choose bootoption &amp;amp;&amp;amp; goto ${bootoption} ||&lt;/span&gt;
&lt;span class="x"&gt;echo Invalid option selected!&lt;/span&gt;
&lt;span class="x"&gt;shell&lt;/span&gt;

&lt;span class="cp"&gt;&amp;lt;?php&lt;/span&gt;
	&lt;span class="k"&gt;echo&lt;/span&gt; &lt;span class="nv"&gt;$host&lt;/span&gt;&lt;span class="p"&gt;;&lt;/span&gt;
&lt;span class="cp"&gt;?&amp;gt;&lt;/span&gt;&lt;span class="x"&gt;&lt;/span&gt;&lt;/code&gt;&lt;/pre&gt;&lt;/div&gt;&lt;p&gt;Prerequsites:&lt;/p&gt;
&lt;p&gt;1) Your &lt;span class="caps"&gt;DHCP&lt;/span&gt; server must be setup to serve &lt;a href="http://ipxe.org/howto/chainloading"&gt;iPXE&lt;/a&gt; instead of pxelinux.&lt;/p&gt;
&lt;p&gt;2) Foreman must have &lt;a href="http://wiki.theforeman.org/projects/foreman/wiki/Fetch_boot_files_via_http_instead_of_TFTP"&gt;gPXE support&lt;/a&gt; enabled&lt;/p&gt;
&lt;p&gt;3) All your subnets in Foreman must have a from/to IP address range set.  You can avoid this with some clever bitmask tricks with the gateway/subnet, but I have not implemented those.&lt;/p&gt;</content>
		<published>2013-02-27T00:00:00Z</published><author><name>Brian Rak</name></author><title>Brian Rak: Foreman boot menu</title></entry>
  <entry xml:base="http://blog.devicenull.org">
			
			<link href="http://blog.devicenull.org/2013/01/28/matching-on-relay-ip-with-isc-dhcpd.html"/>
			<updated>2013-01-28T00:00:00+00:00</updated>
			<id>http://litanyagainstfear.com/2013/01/28/matching-on-relay-ip-with-isc-dhcpd</id>
			<content type="html">&lt;p&gt;We&amp;#8217;ve started using &lt;span class="caps"&gt;DHCP&lt;/span&gt; agent forwarding to run &lt;span class="caps"&gt;DHCP&lt;/span&gt; servers across our network.  For one of our setups, we needed to be able to assign IP addresses based on the IP address of the relay agent.  There isn&amp;#8217;t a built in reference to this that I could find, so you&amp;#8217;re stuck matching against the raw packet contents.  This is pretty straightforward:&lt;/p&gt;
&lt;pre class="highlight"&gt;

class "myclass" {
	match if packet(24,4) = 10:10:10:01;
}

&lt;/pre&gt;
&lt;p&gt;Just make sure to convert the IP you&amp;#8217;re looking for to hex.  If you have the option, it&amp;#8217;s really a lot easier to use a &lt;span class="caps"&gt;DHCP&lt;/span&gt; subscriber tag.  If you go with the relay agent IP, you need to make sure that it&amp;#8217;s consistently one IP (as it may change if you have multiple subnets on the same &lt;span class="caps"&gt;VLAN&lt;/span&gt;).&lt;/p&gt;</content>
		<published>2013-01-28T00:00:00Z</published><author><name>Brian Rak</name></author><title>Brian Rak: Matching on relay IP with ISC DHCPD</title></entry>
  <entry xml:base="http://blog.robin.smidsrod.no/">
    <link rel="alternate" href="https://blog.robin.smidsrod.no/2012/11/04/gsoc-2012-roundup-for-ipxe/" type="text/html"/>
    <content type="html">&lt;p&gt;During the summer season of 2012 (northern hemisphere) I&amp;apos;ve had the pleasure of being the coordinator of &lt;a href="http://ipxe.org/"&gt;the iPXE network boot loader&lt;/a&gt;&amp;apos;s participation in the &lt;a href="http://code.google.com/soc/"&gt;Google Summer of Code&lt;/a&gt; program. This is a summary of what happened during the summer.&lt;/p&gt;&lt;h2 id="what-is-ipxe"&gt;What is iPXE?&lt;/h2&gt;&lt;p&gt;iPXE is a network boot loader. What does that actually mean? Normally when you boot your computer, control is handed over to the boot sector on a local hard drive in your computer and an operating system is loaded. But that is not the only option you have. For a lot of years a standard called PXE (developed by Intel), has been available which allows x86-based computers to boot from the network (using DHCP and TFTP). iPXE&amp;apos;s main goal is to extend that ability to not only boot from TFTP (which is quite slow), but allow computers to boot from HTTP, FTP, iSCSI, AoE and other more esoteric sources. We also have a goal of being the main network boot loader for EFI-based systems (almost working, get in touch for details). We already support more than 60 different network cards, and cards without a native driver are also supported using a feature called &lt;a href="http://ipxe.org/howto/chainloading"&gt;chainloading&lt;/a&gt;.&lt;/p&gt;&lt;h2 id="first-time-participating-in-gsoc"&gt;First time participating in GSoC&lt;/h2&gt;&lt;p&gt;This is the first year iPXE participates in the GSoC program as an organization. Most of the mentors involved have participated earlier years as part of other organizations, such as kernel.org and Etherboot. It was the first time for me, though, and it was quite fun! My job was to keep all the students and mentors on track and ensure no deadlines were forgotten and that communication between everyone flowed smoothly. In total we had three students, which I understand is quite a lot for a first year organization. Thank you to Google for believing in us.&lt;/p&gt;&lt;h2 id="students-and-projects"&gt;Students and projects&lt;/h2&gt;&lt;p&gt;Marin Hannache from EPITA University in France wrote protocol &lt;a href="http://ipxe.org/gsoc/nfs"&gt;support for downloading boot files using NFS&lt;/a&gt;. His work is awaiting review and integration into mainline. From what I&amp;apos;ve tested it still has some issues, but it is working, and I&amp;apos;m most eager to get it in, as it will allow booting directly from an NFS3 server, not even needing a web server. This should be great news for people using small NAS boxes to do their booting, as they don&amp;apos;t always have a way to serve files using HTTP.&lt;/p&gt;&lt;p&gt;Adrian Jamr&amp;#xF3;z from Jan Kochanowski University in Poland &lt;a href="http://ipxe.org/gsoc/via"&gt;reimplemented the drivers for the VIA Rhine and VIA Velocity family of network cards&lt;/a&gt;. The existing drivers were using a deprecated API and was much bigger in size than they really needed to be. Code size is always a big challenge for a project like iPXE, which commonly is burned into ROM chips that have a limit of 64KB. His code was very good and is just awaiting final review and integration. I&amp;apos;ve personally tested it on one of my Rhine2-based cards, and it seems to work reliably.&lt;/p&gt;&lt;p&gt;Daniel Wyatt from Lord Fairfax Community College in the United States &lt;a href="http://ipxe.org/gsoc/bnx2"&gt;reimplemented the driver for the Broadcom NetExtreme II family of network cards&lt;/a&gt;. The problem with the old bnx2 driver was the same as the VIA driver. It used a very large proprietary firmware blob to run the MIPS-based microcontrollers on the card. Most of the summer was used to understand how we could minimize this firmware without losing any functionality. In the end the student got something working, but we&amp;apos;re still having issues with the legality of including the firmware inside the iPXE project. The integration with mainline is currently on the fence awaiting some kind of confirmation from Broadcom that we can actually distribute the firmware blob with iPXE. Luckily we have people from Broadcom participating in the community, so it shouldn&amp;apos;t be too impossible to get this kind of approval. I guess this student got a crash course in how licensing affects what you can do within an open-source project.&lt;/p&gt;&lt;h2 id="other-tidbits"&gt;Other tidbits&lt;/h2&gt;&lt;p&gt;All of the pages linked to above were maintained by the students as they were working on their code during the summer. You can also find links to specific Git repositories that include all of their code if you&amp;apos;re interested in testing it out before it is integrated into mainline. Most of the day-to-day collaboration was done using IRC on the #ipxe channel on irc.freenode.net. Below you can read some of the interesting things said during the summer by the students:&lt;/p&gt;&lt;ul&gt;&lt;li&gt;&lt;code&gt;20120608-010814 &amp;lt;Mareo&amp;gt;&lt;/code&gt; wow, I&amp;apos;m in the black magic part of iPXE codebase :D&lt;/li&gt;&lt;li&gt;&lt;code&gt;20120703-121824 &amp;lt;Mareo&amp;gt;&lt;/code&gt; this gsoc is awesome :D&lt;/li&gt;&lt;li&gt;&lt;code&gt;20120712-203713 &amp;lt;dewyatt&amp;gt;&lt;/code&gt; the bnx2 datasheet is horrible :(&lt;/li&gt;&lt;li&gt;&lt;code&gt;20120720-233044 &amp;lt;dewyatt&amp;gt;&lt;/code&gt; mcb30: okay...I&amp;apos;m eager to get started on the fun stuff&lt;/li&gt;&lt;li&gt;&lt;code&gt;20120728-160956 &amp;lt;budrys&amp;gt;&lt;/code&gt; meteger: but I think it can&amp;apos;t be left as is, it&amp;apos;s a dirty hack for me&lt;/li&gt;&lt;li&gt;&lt;code&gt;20120815-172646 &amp;lt;dewyatt&amp;gt;&lt;/code&gt; mcb30: mouse sent me some ROMs that have firmware in them. This made me take another look at the newest PXE ROM I have and I found compressed firmware. I hackishly extracted this by pausing the broadcom PXE ROM during DHCP and reading from the Debug UART. I can&amp;apos;t do this for RV2P and I don&amp;apos;t really know the bounds of the MIPS firmware so it&amp;apos;s still a work in progress.&lt;/li&gt;&lt;li&gt;&lt;code&gt;20120816-083313 &amp;lt;dewyatt&amp;gt;&lt;/code&gt; I don&amp;apos;t know if I can legally commit this code really :/&lt;/li&gt;&lt;/ul&gt;&lt;h2 id="thanks-to-everyone"&gt;Thanks to everyone&lt;/h2&gt;&lt;p&gt;It is great to have taken part in this journey and seen how much the students have learned over the summer. I want to thank our three mentors, Michael Brown, Joshua Oreman and Thomas Miletich and all the other knowledgable people on the #ipxe IRC channel for the great work they&amp;apos;ve provided during the summer. Participating in GSoC has been a great experience for us all, and I hope we&amp;apos;ll be able to participate next year as well.&lt;/p&gt;&lt;p&gt;If I&amp;apos;ve whet your appetite to learn more about network booting, I invite you to &lt;a href="http://webchat.freenode.net/?channels=#ipxe"&gt;join us on IRC&lt;/a&gt;, participate in the &lt;a href="http://forum.ipxe.org/"&gt;iPXE forums&lt;/a&gt; or &lt;a href="https://lists.ipxe.org/mailman/listinfo/ipxe-devel"&gt;join the mailing-list&lt;/a&gt;.&lt;/p&gt;&lt;p&gt;Until next time,&lt;br&gt;Robin Smidsr&amp;#xF8;d,&lt;br&gt;iPXE GSoC 2012 coordinator&lt;/p&gt;</content>
    <summary type="xhtml">
      <div xmlns="http://www.w3.org/1999/xhtml">
        <p>During the summer season of 2012 (northern hemisphere) I've had the pleasure of being the coordinator of <a href="http://ipxe.org/">the iPXE network boot loader</a>'s participation in the <a href="http://code.google.com/soc/">Google Summer of Code</a> program. This is a summary of what happened during the summer.</p>
        <h2 id="what-is-ipxe">What is iPXE?</h2>
        <p>iPXE is a</p>
      </div>
    </summary>
    <id>64b0753f1c914a000180deea</id>
    <published>2012-11-04T14:25:01Z</published>
    <category term="Software"/>
    <category term="gsoc"/>
    <category term="ipxe"/>
    <category term="google summer of code"/>
    <category term="network boot loader"/>
    <category term="netboot"/>
    <category term="pxe"/>
    <category term="American English"/>
    <author>
      <name>Robin Smidsrød</name>
    </author>
    <title>Robin Smidsrød: GSoC 2012 roundup for iPXE</title>
  </entry>
  <entry xml:base="http://blog.devicenull.org">
			
			<link href="http://blog.devicenull.org/2012/10/20/filtering-ipmi-clients-with-dhcp.html"/>
			<updated>2012-10-20T00:00:00+00:00</updated>
			<id>http://litanyagainstfear.com/2012/10/20/filtering-ipmi-clients-with-dhcp</id>
			<content type="html">&lt;p&gt;If you ever need to run a &lt;span class="caps"&gt;DHCP&lt;/span&gt; server and assign different IP addresses to &lt;span class="caps"&gt;IPMI&lt;/span&gt; clients and actual OS clients, you can use the following:&lt;/p&gt;
&lt;pre class="highlight"&gt;

class "ipmi" {
	match if substring (option vendor-class-identifier,0,5) = "udhcp";
}
class "normal" {
	match if substring (option vendor-class-identifier,0,5) != "udhcp";
}
	subnet 10.0.0.0 netmask 255.255.255.248 {
	pool {
		allow members of "normal";
		deny members of "ipmi";
		range 10.0.0.100 10.0.0.105;
	}
	pool {
		deny members of "ipmi";
		allow members of "normal";
		range 10.0.0.106 10.0.0.110;
	}
}

&lt;/pre&gt;
&lt;p&gt;This code uses the &lt;span class="caps"&gt;DHCP&lt;/span&gt; vendor class identifier to determine what is and is not an &lt;span class="caps"&gt;IPMI&lt;/span&gt; client (this only works if your OS doesn&amp;#8217;t use udhcp!).  From there you can pretty easily use it to restrict IP ranges assigned to &lt;span class="caps"&gt;DHCP&lt;/span&gt; or normal clients.&lt;/p&gt;</content>
		<published>2012-10-20T00:00:00Z</published><author><name>Brian Rak</name></author><title>Brian Rak: Filtering IPMI clients with DHCP</title></entry>
  <entry xml:base="http://blog.devicenull.org">
			
			<link href="http://blog.devicenull.org/2012/10/10/expanding-isc-dhcpd-options.html"/>
			<updated>2012-10-10T00:00:00+00:00</updated>
			<id>http://litanyagainstfear.com/2012/10/10/expanding-isc-dhcpd-options</id>
			<content type="html">&lt;p&gt;I was recently trying to do some tricky things using a &lt;span class="caps"&gt;DHCP&lt;/span&gt; server and the &amp;#8216;subscriber-id&amp;#8217; option (part of option 82).  It turns out that &lt;span class="caps"&gt;ISC&lt;/span&gt; &lt;span class="caps"&gt;DHCPD&lt;/span&gt; doesn&amp;#8217;t support this out of the box.  There&amp;#8217;s two options: recompile the dhcp server, or add support using the config file.  Since I don&amp;#8217;t really have a decent way to maintain custom compiled versions of software (nor do I want to), adding support via the config file was the way to go.&lt;/p&gt;
&lt;p&gt;This is actually pretty straightforward, just add the following to your config file, and use &amp;#8216;myagent.subscriber-id&amp;#8217; to retrieve the value for it.  You shouldn&amp;#8217;t have to do any decoding, it&amp;#8217;s handled automatically.&lt;/p&gt;
&lt;pre class="highlight"&gt;

option space myagent;
option myagent.circuit-id code 1 = text;
option myagent.remote-id code 2 = text;
option myagent.agent-id code 3 = text;
option myagent.DOCSIS-device-class code 4 = unsigned integer 32;
option myagent.link-selection code 5 = ip-address;
option myagent.subscriber-id code 6 = text;
option myagent-encapsulation code 82 = encapsulate myagent;

&lt;/pre&gt;</content>
		<published>2012-10-10T00:00:00Z</published><author><name>Brian Rak</name></author><title>Brian Rak: Expanding ISC DHCPD Options</title></entry>
  <entry xml:base="http://blog.devicenull.org">
			
			<link href="http://blog.devicenull.org/2012/01/22/nfs-booting-using-only-the-kernel.html"/>
			<updated>2012-01-22T00:00:00+00:00</updated>
			<id>http://litanyagainstfear.com/2012/01/22/nfs-booting-using-only-the-kernel</id>
			<content type="html">&lt;p&gt;The Linux kernel has the ability to do a &lt;span class="caps"&gt;DHCP&lt;/span&gt; request on boot and mount the root directory via &lt;span class="caps"&gt;NFS&lt;/span&gt;.  This is all possible using only kernel options, you don&amp;#8217;t need an initrd and a bunch of custom tricks to do this.  Before I go any further, be warned that a lot of the documentation regarding this is out of date or incomplete.  You are unlikely to find one guide that tells you everything you need to know.&lt;/p&gt;
&lt;p&gt;1) You need to setup a minimal linux image.  My &lt;a href="/2011/10/05/diskless-centos-booting.html"&gt;diskless centos booting&lt;/a&gt; entry would be a good start for setting this up.  This step is critical, as you need some tweaks to make this image bootable.&lt;/p&gt;
&lt;p&gt;2) You need to rebuild your kernel (if you are using CentOS).  There&amp;#8217;s a number of options that need to be enabled, and most of them aren&amp;#8217;t enabled by default.  Make sure you have the following options enabled:&lt;/p&gt;
&lt;ul&gt;
	&lt;li&gt;&lt;span class="caps"&gt;NIC&lt;/span&gt; drivers must be included in the kernel (not via a module!)&lt;/li&gt;
	&lt;li&gt;Networking options &amp;#8212;&amp;#8594; IP: kernel level autoconfiguration (CONFIG_IP_PNP=y)&lt;/li&gt;
	&lt;li&gt;Networking options &amp;#8212;&amp;#8594; IP: &lt;span class="caps"&gt;DHCP&lt;/span&gt; support (CONFIG_IP_PNP_DHCP=y)&lt;/li&gt;
	&lt;li&gt;Network File Systems &amp;#8212;&amp;#8594; &lt;span class="caps"&gt;NFS&lt;/span&gt; file system support (CONFIG_NFS_FS=y)&lt;/li&gt;
	&lt;li&gt;Network File Systems &amp;#8212;&amp;#8594; Root file system on &lt;span class="caps"&gt;NFS&lt;/span&gt; (CONFIG_ROOT_NFS=y) &lt;br /&gt;
After rebuiling your kernel, copy the resulting bzImage to your tftpboot directory.&lt;/li&gt;
&lt;/ul&gt;
&lt;p&gt;3) Create a fstab.  This one sets up a 100mb tmpfs based /var.  This is important for things like log files and sockets.&lt;/p&gt;
&lt;pre class="highlight"&gt;

none            /               none    rw      0       0
/proc           /proc           proc    rw      0       0
/sys            /sys            sysfs   rw      0       0
devpts          /dev/pts        devpts  gid=5,mode=620  0       0
tmpfs           /var            tmpfs   size=100M,mode=0755     0       0

&lt;/pre&gt;
&lt;p&gt;4) Once all your packages are setup (install anything else you need before this step, as it will break Yum until you undo it), do the following:&lt;/p&gt;
&lt;pre class="highlight"&gt;

mv var newvar
mkdir var

&lt;/pre&gt;
&lt;p&gt;If you skip this step, you&amp;#8217;re going to end up with a read-only /var .  This will break many, many things, so we will be creating a ramdisk for this.  In order to do this, we need to modify one of the startup scripts to copy everything from /newvar to /var.  I currently do this in /etc/rc.d/rc.sysinit.  Find the &amp;#8220;Mounting local filesystems&amp;#8221; action, and add something like this after it:&lt;/p&gt;
&lt;pre class="highlight"&gt;

action $"Copying contents of var over" cp -R /newvar/* /var/

&lt;/pre&gt;
&lt;p&gt;5) Export your new linux image via &lt;span class="caps"&gt;NFS&lt;/span&gt;.  Add this line to your /etc/exports. Don&amp;#8217;t make this writable unless you are only going to be booting one machine from it.  If you need writable mounts for multiple machines, take a look at the &lt;a href="http://www.mjmwired.net/kernel/Documentation/filesystems/nfsroot.txt"&gt;nfsroot&lt;/a&gt; documentation for some tricks.&lt;/p&gt;
&lt;pre class="highlight"&gt;

label diskless
	MENU LABEL CentOS 6 x64 diskless
	kernel bzImage
	append ip=dhcp rootfstype=nfs root=/dev/nfs ro nfsroot=10.10.10.10:/home/nfsboot/cent6 single

&lt;/pre&gt;
&lt;p&gt;At this point, you should be able to boot the image with no issues.  You may see some errors pop up during boot, but these are generally non-fatal.  I haven&amp;#8217;t had a reason to go and fix them yet, as they don&amp;#8217;t seem to cause any issues.&lt;/p&gt;
&lt;p&gt;Here are some of the references I used in setting this up:&lt;/p&gt;
&lt;ul&gt;
	&lt;li&gt;&lt;a href="http://kernelnewbies.org/FAQ/DisklessImages"&gt;DisklessImages @ KernelNewbies&lt;/a&gt;&lt;/li&gt;
	&lt;li&gt;&lt;a href="http://onesis.sourceforge.net/NFSroot-HOWTO.php"&gt;oneSIS NFSroot &lt;span class="caps"&gt;HOWTO&lt;/span&gt;&lt;/a&gt;&lt;/li&gt;
	&lt;li&gt;&lt;a href="http://www.mjmwired.net/kernel/Documentation/filesystems/nfsroot.txt"&gt;nfsroot documentation&lt;/a&gt;&lt;/li&gt;
&lt;/ul&gt;</content>
		<published>2012-01-22T00:00:00Z</published><author><name>Brian Rak</name></author><title>Brian Rak: NFS Booting using only the kernel</title></entry>
  <entry xml:base="http://blog.devicenull.org">
			
			<link href="http://blog.devicenull.org/2011/10/05/diskless-centos-booting.html"/>
			<updated>2011-10-05T00:00:00+00:00</updated>
			<id>http://litanyagainstfear.com/2011/10/05/diskless-centos-booting</id>
			<content type="html">&lt;p&gt;Recently, one of my projects required the ability to disklessly boot a bunch of machines.  Initally, I was doing this with &lt;span class="caps"&gt;DRBL&lt;/span&gt;, however &lt;span class="caps"&gt;DRBL&lt;/span&gt; has a lot of cruft that was unnecessary for us, and wasn&amp;#8217;t really what we wanted.  &lt;span class="caps"&gt;DRBL&lt;/span&gt; relies on a number of &lt;span class="caps"&gt;NFS&lt;/span&gt; mounts back to the server, so if your &lt;span class="caps"&gt;DRBL&lt;/span&gt; server crashes, all the machines go down. I took a look at &lt;span class="caps"&gt;LTSP&lt;/span&gt;, but the project appears to be msotly dead at this point, and seems to suffer from the same issues as &lt;span class="caps"&gt;DRBL&lt;/span&gt;.&lt;/p&gt;
&lt;p&gt;Thankfully, the actual process for setting up a diskless image to boot from isn&amp;#8217;t terribly difficult.  It took a bit of fiddling with it, but in the end it turned out pretty simple.  Basically, you set up a chrooted environment containing your entire system, then compress that into the inital ramdisk for the system.&lt;/p&gt;
&lt;p&gt;This would be the setup process for a Centos 5 x86_64 OS.  It&amp;#8217;s pretty similar for Centos 6, I&amp;#8217;ve not attempted it with any other operating system.  I run this on another Centos 5 machine.  I&amp;#8217;ve found that it can be very difficult to bootstrap the OS from another OS.  Attempting to create a Centos 6 image on a Centos 5 machine fails due to some missing libraries and incompatible rpm formats.&lt;/p&gt;
&lt;div class="highlight"&gt;&lt;pre&gt;&lt;code class="language-bash" data-lang="bash"&gt;&lt;span class="c"&gt;# This would be needed to get the centos-release RPM.&lt;/span&gt;
&lt;span class="c"&gt;# Alternatively, just wget it from one of the mirrors.&lt;/span&gt;
&lt;span class="c"&gt;# pigz will make compressing the image a lot faster (it&amp;#39;s parallel gzip)&lt;/span&gt;
yum install yumdownloader pigz
yumdownloader centos-release
mkdir /root/diskless
&lt;span class="c"&gt;# centos-release contains things like the yum configs, and is necessary to bootstrap the system&lt;/span&gt;
rpm --root&lt;span class="o"&gt;=&lt;/span&gt;/root/diskless -ivh --nodeps centos-release-5-7.el5.centos.x86_64.rpm
yum --installroot&lt;span class="o"&gt;=&lt;/span&gt;/root/diskless -y install basesystem filesystem bash kernel passwd

&lt;span class="nb"&gt;cd &lt;/span&gt;diskless
&lt;span class="c"&gt;# This next line is important, your system won&amp;#39;t boot without it&lt;/span&gt;
ln -s ./sbin/init ./init 
&lt;span class="nb"&gt;echo &lt;/span&gt;&lt;span class="nv"&gt;NETWORKING&lt;/span&gt;&lt;span class="o"&gt;=&lt;/span&gt;yes &amp;gt; etc/sysconfig/network
chroot .
pwconv
&lt;span class="c"&gt;# Set your root password&lt;/span&gt;
passwd
&lt;span class="nb"&gt;exit&lt;/span&gt;
&lt;span class="nb"&gt;	&lt;/span&gt;
find &lt;span class="p"&gt;|&lt;/span&gt; cpio -ocv &lt;span class="p"&gt;|&lt;/span&gt; pigz -9 &amp;gt; diskless.cpio.gz&lt;/code&gt;&lt;/pre&gt;&lt;/div&gt;&lt;p&gt;Now, take your newly created diskless.cpio.gz file, and the vmlinuz file from your chroot&amp;#8217;s /boot/ directory, and copy them into your &lt;span class="caps"&gt;TFTP&lt;/span&gt; root. Assuming you are using PXELinux to boot this, you would need a menu option like this:&lt;/p&gt;
&lt;pre class="highlight"&gt;

label diskless
	# Change the name here to match your actual kernel
	kernel vmlinuz
	append initrd=diskless.cpio.gz

&lt;/pre&gt;
&lt;p&gt;If you are using SysLinux &amp;gt;= 5.10, you can make this process faster by grabbing the files via &lt;span class="caps"&gt;HTTP&lt;/span&gt; instead.&lt;/p&gt;
&lt;pre class="highlight"&gt;

label diskless
	kerenl http://YOURSERVERHERE/vmlinuz
	append initrd=http://YOURSERVERHERE/diskless.cpio.gz

&lt;/pre&gt;</content>
		<published>2011-10-05T00:00:00Z</published><author><name>Brian Rak</name></author><title>Brian Rak: Diskless CentOS booting</title></entry>
  <entry xml:base="http://nahamu.github.io/">
   
   <link href="http://nahamu.github.com/2011/08/17/smartos-pxe.html"/>
   <updated>2011-08-17T00:00:00-07:00</updated>
   <id>http://nahamu.github.com/2011/08/17/smartos-pxe</id>
   <content type="html">&lt;h1&gt;Serving SmartOS from your PXE server&lt;/h1&gt;

&lt;p class="meta"&gt;2011-08-17&lt;/p&gt;


&lt;p&gt;(Quick and Dirty Edition)&lt;/p&gt;

&lt;h2&gt;Assumptions&lt;/h2&gt;

&lt;ol&gt;
&lt;li&gt;This guide assumes that you already have a PXE (TFTP) server set up.&lt;/li&gt;
&lt;li&gt;This guide assumes that you use &lt;a href="http://syslinux.zytor.com/wiki/index.php/PXELINUX"&gt;pxelinux&lt;/a&gt;&lt;/li&gt;
&lt;li&gt;This guide assumes that you only want to boot SmartOS.  Please adjust accordingly.&lt;/li&gt;
&lt;li&gt;This guide assumes that you know how to do all sorts of other things as well...&lt;/li&gt;
&lt;/ol&gt;


&lt;h2&gt;Instructions&lt;/h2&gt;

&lt;ol&gt;
&lt;li&gt;Download the ISO from &lt;a href="http://smartos.org/"&gt;smartos.org&lt;/a&gt;&lt;/li&gt;
&lt;li&gt;Extract the entire &lt;code&gt;platform&lt;/code&gt; subtree from the ISO.&lt;/li&gt;
&lt;li&gt;Download a tarball of &lt;a href="http://syslinux.zytor.com/wiki/index.php/Download"&gt;SYSLINUX&lt;/a&gt; and get the &lt;code&gt;mboot.c32&lt;/code&gt; binary out of it.&lt;/li&gt;
&lt;li&gt;In the tftp root directory, create a directory named &lt;code&gt;smartos&lt;/code&gt;&lt;/li&gt;
&lt;li&gt;Copy the &lt;code&gt;platform&lt;/code&gt; directory you got from the ISO into the &lt;code&gt;smartos&lt;/code&gt; directory&lt;/li&gt;
&lt;li&gt;Copy the &lt;code&gt;mboot.c32&lt;/code&gt; binary into the &lt;code&gt;smartos&lt;/code&gt; directory&lt;/li&gt;
&lt;li&gt;Update your &lt;code&gt;pxelinux.cfg/default&lt;/code&gt; file with this content:
&lt;pre&gt;
default smartos
prompt 1
timeout 50
label smartos
kernel smartos/mboot.c32
append smartos/platform/i86pc/kernel/amd64/unix -B console=text,standalone=true,noimport=true,root_shadow='$5$2HOHRnK3$NvLlm.1KQBbB0WjoP7xcIwGnllhzp2HnT.mDO7DpxYA' --- smartos/platform/i86pc/amd64/boot_archive
&lt;/pre&gt;&lt;/li&gt;
&lt;/ol&gt;


&lt;h2&gt;References&lt;/h2&gt;

&lt;ol&gt;
&lt;li&gt;&lt;a href="http://www.ryan.net/smartos-disk-blogpost/real_disk_smartos.html"&gt;Ryan's Guide to a disk install of SmartOS&lt;/a&gt;&lt;/li&gt;
&lt;li&gt;&lt;a href="http://syslinux.zytor.com/wiki/index.php/Mboot.c32"&gt;mboot.c32 documentation&lt;/a&gt;&lt;/li&gt;
&lt;/ol&gt;

</content>
 <published>2011-08-17T00:00:00-07:00</published><author><name>Nahum Shalman</name></author><title>Nahum Shalman: Serving SmartOS from your PXE server</title></entry>
  <entry xml:base="http://blog.devicenull.org">
			
			<link href="http://blog.devicenull.org/2011/07/27/know-your-architecture.html"/>
			<updated>2011-07-27T00:00:00+00:00</updated>
			<id>http://litanyagainstfear.com/2011/07/27/know-your-architecture</id>
			<content type="html">&lt;p&gt;You need to know your architecture.  How can you expect to effectively develop anything when you don&amp;#8217;t know the basics of your architcture?  When you resolve problems by making changes and guessing at how they work?  When your method of rolling out a new server is some bash commands pasted into a txt file, and when they break you have no idea what to do?&lt;/p&gt;
&lt;p&gt;I&amp;#8217;m not saying you need to understand every minor detail of the stack you work on.  I&amp;#8217;m saying that you need to know the basics of your setup.&lt;/p&gt;
&lt;p&gt;Let&amp;#8217;s say you are a &lt;span class="caps"&gt;PHP&lt;/span&gt; developer.  If you are given a clean install and can&amp;#8217;t manage to setup your site, Apache, and &lt;span class="caps"&gt;PHP&lt;/span&gt;&amp;#8230; you are doing it wrong.  If you rely on others to configure your machines and setup your code for you, can you really feel responsible for the code you rolled out to production?&lt;/p&gt;
&lt;p&gt;Maybe I&amp;#8217;m crazy, but I believe every developer should be able to accomplish at least basic sysadmin tasks.  I don&amp;#8217;t expect them to be able to go and tweak sysctl settings to maximize performance, but I expect them to be able to go set up a server and have it run their code successfully.  I don&amp;#8217;t expect to be asked how to install basic &lt;span class="caps"&gt;PHP&lt;/span&gt; extensions, nor troubleshoot an install when it&amp;#8217;s missing the -devel version of a package.&lt;/p&gt;
&lt;p&gt;I&amp;#8217;ve always been a generalist.  I know something about a wide variety of things, but I know very little in detail about each one.  You know what?  That perfectly suits what I have to do every day.  Some days I might be debugging some ancient &lt;span class="caps"&gt;PHP&lt;/span&gt; code, other days I&amp;#8217;m trying to get unattended installs working via &lt;span class="caps"&gt;SSH&lt;/span&gt; under Windows, other days I&amp;#8217;m fighting network issues that occur during &lt;span class="caps"&gt;PXE&lt;/span&gt; boots.  I wouldn&amp;#8217;t have it any other way.  I take pride in my ability to figue it out, not matter what situation I&amp;#8217;m thrown into.&lt;/p&gt;</content>
		<published>2011-07-27T00:00:00Z</published><author><name>Brian Rak</name></author><title>Brian Rak: Know your architecture</title></entry>
  <entry xml:base="http://blog.devicenull.org">
			
			<link href="http://blog.devicenull.org/2011/07/25/adventures-in-pxe-booting-part-3.html"/>
			<updated>2011-07-25T00:00:00+00:00</updated>
			<id>http://litanyagainstfear.com/2011/07/25/adventures-in-pxe-booting-part-3</id>
			<content type="html">&lt;p&gt;So, in my quest to be able to network boot with a static IP, one issue that comes up a lot is passing the IP and other information to whatever I&amp;#8217;m booting.  It would be pretty annoying to have to enter the information once to get the boot menu, then again to boot whatever it is I wanted to boot.  This seems like it should be pretty straightforward, however every operating system seems to have it&amp;#8217;s own way of doing it.  This gets even worse with the various LiveCD distributions (Clonezilla, GParted, RIPLinux, etc), as they inevitably have their own customized (undocumented) way of handling it, if they handle it at all.&lt;/p&gt;
&lt;p&gt;So, to boot recent Debian-based operating systems and assign it an IP from iPXE, you need to append the following to the kernel command line:&lt;/p&gt;
&lt;pre class="highlight"&gt;
ip=${net0/ip}::${net0/gateway}:${net0/netmask}:${net0/hostname}:eth0
&lt;/pre&gt;
&lt;p&gt;For CentOS, you would use the following:&lt;/p&gt;
&lt;pre class="highlight"&gt;
ip=${net0/ip} netmask=${net0/netmask} gateway=${net0/gateway} hostname=${net0/hostname}
&lt;/pre&gt;
&lt;p&gt;For Clonezilla (which is Debian based, but doesn&amp;#8217;t use the standard Debian way):&lt;/p&gt;
&lt;pre class="highlight"&gt;
ip=eth0:${net0/ip}:${net0/netmask}:${net0/gateway}:8.8.8.8
&lt;/pre&gt;
&lt;p&gt;If you have some software that indicates you should use &amp;#8216;&lt;span class="caps"&gt;IPAPPEND&lt;/span&gt; 1&amp;#8217; from SysLinux, this really means you need to add this to the command line:&lt;/p&gt;
&lt;pre class="highlight"&gt;
ip=${net0/ip}::${net0/gateway}:${net0/netmask}
&lt;/pre&gt;
&lt;p&gt;Similarly, if you have something that says to use &amp;#8216;&lt;span class="caps"&gt;IPAPPEND&lt;/span&gt; 2&amp;#8217;, this is what you need:&lt;/p&gt;
&lt;pre class="highlight"&gt;
BOOTIF=01-${net0/mac:hexhyp}
&lt;/pre&gt;
&lt;p&gt;For that last one, I really don&amp;#8217;t have any idea what the &amp;#8220;01-&amp;#8221; in front is for, but after examining the Anaconda (CentOS installer) source, &lt;strong&gt;something&lt;/strong&gt; seems to be required there, and the installer happily ignores whatever you put.&lt;/p&gt;</content>
		<published>2011-07-25T00:00:00Z</published><author><name>Brian Rak</name></author><title>Brian Rak: Adventures in PXE booting part 3</title></entry>
  <entry xml:base="http://blog.devicenull.org">
			
			<link href="http://blog.devicenull.org/2011/07/22/ipxe-scripting-for-fun-and-profit.html"/>
			<updated>2011-07-22T00:00:00+00:00</updated>
			<id>http://litanyagainstfear.com/2011/07/22/ipxe-scripting-for-fun-and-profit</id>
			<content type="html">&lt;p&gt;iPXE supports a moderately powerful scripting language.  It&amp;#8217;s actually possible to do some pretty cool things with it.  For example, to prompt for the IP information on boot you would use the following script.  Note that the &amp;#8216;ifopen net0&amp;#8217; isn&amp;#8217;t in the example script iPXE gives for this, and without it your connection won&amp;#8217;t actually work.&lt;/p&gt;
&lt;div class="highlight"&gt;&lt;pre&gt;&lt;code class="language-bash" data-lang="bash"&gt;&lt;span class="c"&gt;#!ipxe&lt;/span&gt;
&lt;span class="nb"&gt;echo&lt;/span&gt; -n IP: &lt;span class="o"&gt;&amp;amp;&amp;amp;&lt;/span&gt; &lt;span class="nb"&gt;read &lt;/span&gt;net0/ip
&lt;span class="nb"&gt;echo&lt;/span&gt; -n Subnet mask: &lt;span class="o"&gt;&amp;amp;&amp;amp;&lt;/span&gt; &lt;span class="nb"&gt;read &lt;/span&gt;net0/netmask
&lt;span class="nb"&gt;echo&lt;/span&gt; -n Gateway: &lt;span class="o"&gt;&amp;amp;&amp;amp;&lt;/span&gt; &lt;span class="nb"&gt;read &lt;/span&gt;net0/gateway
	
ifopen net0&lt;/code&gt;&lt;/pre&gt;&lt;/div&gt;&lt;p&gt;You can pull off some pretty basic menus with it too:&lt;/p&gt;
&lt;div class="highlight"&gt;&lt;pre&gt;&lt;code class="language-bash" data-lang="bash"&gt;&lt;span class="c"&gt;#!ipxe&lt;/span&gt;
&lt;span class="nb"&gt;echo&lt;/span&gt; -n 1&lt;span class="o"&gt;)&lt;/span&gt; CentOS netinstall
&lt;span class="nb"&gt;echo&lt;/span&gt; -n 2&lt;span class="o"&gt;)&lt;/span&gt; iPXE shell
&lt;span class="nb"&gt;echo&lt;/span&gt; -n Please &lt;span class="k"&gt;select&lt;/span&gt; an option:

&lt;span class="nb"&gt;read &lt;/span&gt;option

goto option_&lt;span class="o"&gt;{&lt;/span&gt;&lt;span class="nv"&gt;$option&lt;/span&gt;&lt;span class="o"&gt;}&lt;/span&gt;

:option_1
&lt;span class="c"&gt;# Install centos&lt;/span&gt;

:option_2
shell&lt;/code&gt;&lt;/pre&gt;&lt;/div&gt;&lt;p&gt;Embedding these into a custom image is pretty easy, you would just do:&lt;/p&gt;
&lt;div class="highlight"&gt;&lt;pre&gt;&lt;code class="language-bash" data-lang="bash"&gt;make &lt;span class="nv"&gt;EMBED&lt;/span&gt;&lt;span class="o"&gt;=&lt;/span&gt;&lt;span class="s2"&gt;&amp;quot;yourscript.ipxe&amp;quot;&lt;/span&gt;&lt;/code&gt;&lt;/pre&gt;&lt;/div&gt;&lt;p&gt;This would make an image that started yourscript.ipxe immediately on boot, which coupled with the script to read the IP information means you no longer need a &lt;span class="caps"&gt;DHCP&lt;/span&gt; server to network boot.&lt;/p&gt;</content>
		<published>2011-07-22T00:00:00Z</published><author><name>Brian Rak</name></author><title>Brian Rak: iPXE scripting for fun and profit</title></entry>
  <entry xml:base="http://blog.devicenull.org">
			
			<link href="http://blog.devicenull.org/2011/07/21/adventures-in-pxe-booting-part-2.html"/>
			<updated>2011-07-21T00:00:00+00:00</updated>
			<id>http://litanyagainstfear.com/2011/07/21/adventures-in-pxe-booting-part-2</id>
			<content type="html">&lt;p&gt;Today was spent trying to get SysLinux chainloaded via iPXE over &lt;span class="caps"&gt;HTTP&lt;/span&gt;.  This appears to be something that not many people attempt to do.  Usually &lt;span class="caps"&gt;TFTP&lt;/span&gt; is the protocol of choice here, and there&amp;#8217;s very little documentation about getting this working correctly.  In order to do this, I&amp;#8217;m loading gpxelinux.0 (part of the syslinux package, look in the gpxe directory) via &lt;span class="caps"&gt;HTTP&lt;/span&gt;, and having it fetch the config.  The setup for this is rather straightforward, once I determined that putting quotes around the values here breaks everything.  The basic config in iPXE you need for this is:&lt;/p&gt;
&lt;div class="highlight"&gt;&lt;pre&gt;&lt;code class="language-bash" data-lang="bash"&gt;&lt;span class="nb"&gt;set &lt;/span&gt;209:string /menu.cfg
&lt;span class="nb"&gt;set &lt;/span&gt;210:string http://10.10.10.10/
chain http://10.10.10.10/gpxelinux.0&lt;/code&gt;&lt;/pre&gt;&lt;/div&gt;&lt;p&gt;The 209:string line here is the name and path to your configuration file.  The 210:string is the hostname of your web server.  My understanding is that the 210:string line will be used as the base url for any other files that are needed.  Once you have this set your menu.cfg should look something like this:&lt;/p&gt;
&lt;pre class="highlight"&gt;

UI vesamenu.c32

TITLE Test1
	localboot

&lt;/pre&gt;
&lt;p&gt;This &lt;strong&gt;should&lt;/strong&gt; work, but it doesn&amp;#8217;t.  I can check web server logs, and see that both menu.cfg and vesamenu.c32 get downloaded, but the machine immediately reboots after that.  I&amp;#8217;m probably going to have to use &lt;span class="caps"&gt;TFTP&lt;/span&gt; for this, though I&amp;#8217;m going to make every effort to try to use &lt;span class="caps"&gt;HTTP&lt;/span&gt; for everything else.&lt;/p&gt;
&lt;p&gt;An annoying bug I&amp;#8217;ve discovered with most (all?) Debian based LiveCD&amp;#8217;s: You can&amp;#8217;t boot them via MemDisk.  You can usally extract the kernel, initrd, and filesystem from them and boot those, but it&amp;#8217;s a bit more annyoing then dropping an &lt;span class="caps"&gt;ISO&lt;/span&gt; in a directory.&lt;/p&gt;
&lt;p&gt;If you are using Cisco routers (possibly anything with &lt;span class="caps"&gt;STP&lt;/span&gt;), you should be aware it can take anywhere from 15-30 seconds before an ethernet port goes from unlinked to linked.  This is just manifests itself as networking randomly not working, or &lt;span class="caps"&gt;DHCP&lt;/span&gt; timing out.  I&amp;#8217;ve seen the issue where &lt;span class="caps"&gt;DHCP&lt;/span&gt; in &lt;span class="caps"&gt;PXE&lt;/span&gt; works correctly, but when it loads the operating system the port shuts down for long enough for &lt;span class="caps"&gt;STP&lt;/span&gt; to have to reinitialize, leading to more &lt;span class="caps"&gt;DHCP&lt;/span&gt; timeouts.  The appropriate setting to disable this is called &amp;#8216;portfast&amp;#8217; on Cisco routers.  I haven&amp;#8217;t disabled it, because it can apparently cause temporary broadcast storms if you manage to plug a router into itself.  30s of delay is far better then taking down a production network for any amount of time.&lt;/p&gt;</content>
		<published>2011-07-21T00:00:00Z</published><author><name>Brian Rak</name></author><title>Brian Rak: Adventures in PXE booting part 2</title></entry>
  <entry xml:base="http://blog.devicenull.org">
			
			<link href="http://blog.devicenull.org/2011/07/20/adventures-in-pxe-booting.html"/>
			<updated>2011-07-20T00:00:00+00:00</updated>
			<id>http://litanyagainstfear.com/2011/07/20/adventures-in-pxe-booting</id>
			<content type="html">&lt;p&gt;I&amp;#8217;ve been working with getting &lt;span class="caps"&gt;PXE&lt;/span&gt;/network booting working for a few days now, and I&amp;#8217;ve learned all manner of things that aren&amp;#8217;t anywhere in documentation for various projects.  I&amp;#8217;m in a fairly unique environment, in that we can&amp;#8217;t just run your normal &lt;span class="caps"&gt;DHCP&lt;/span&gt; and &lt;span class="caps"&gt;TFTP&lt;/span&gt; server (well, &lt;span class="caps"&gt;TFTP&lt;/span&gt; is probably possible, but has it&amp;#8217;s own set of issues).  Things tend to get irritating quickly when you stop using &lt;span class="caps"&gt;DHCP&lt;/span&gt;.  &lt;span class="caps"&gt;TFTP&lt;/span&gt; is slightly less essential in that regard, but there&amp;#8217;s still a bunch of common &lt;span class="caps"&gt;PXE&lt;/span&gt; tools that assume it&amp;#8217;s what you are using (syslinux for one).&lt;/p&gt;
&lt;p&gt;In order for our network booting to work, we need to be able to manually configure an IP address and subnet.  &lt;span class="caps"&gt;DHCP&lt;/span&gt; is out, because we&amp;#8217;re booting many different machines, in many different locations.  It&amp;#8217;s possible for us to run &lt;span class="caps"&gt;DHCP&lt;/span&gt; servers in some locations, but not in all of them.&lt;/p&gt;
&lt;p&gt;So, a quick overview of how &lt;span class="caps"&gt;PXE&lt;/span&gt; works if you have &lt;span class="caps"&gt;DHCP&lt;/span&gt; and &lt;span class="caps"&gt;TFTP&lt;/span&gt;.  Your machine boots up, and starts looking for an IP address.  When the &lt;span class="caps"&gt;DHCP&lt;/span&gt; server responds to it, it sends the extra field &amp;#8216;next-server&amp;#8217;.  If this is present, the machine tries to get a file called &amp;#8216;pxelinux.0&amp;#8217;.  This contains the second stage bootloader, and (in my experience) is typically SysLinux.  SysLinux can give you nice semi-graphical menus, and can chainload a lot of other stuff.&lt;/p&gt;
&lt;p&gt;This wouldn&amp;#8217;t work for us.  First off, the default pxe software in most network cards (the stuff that gets &lt;span class="caps"&gt;DHCP&lt;/span&gt; and pxelinux.0) is crap.  It&amp;#8217;s not really configuarble, and you usually have to be actively watching the machine so you can press a button and configure it.  Enter &lt;a href="http://ipxe.org/"&gt;iPXE&lt;/a&gt;. iPXE can either be burned into your network cards (I&amp;#8217;ve not tested this yet), or you can create bootable isos or &lt;span class="caps"&gt;USB&lt;/span&gt; drives.  iPXE is scriptable, and can download any necessary files via a wide variety of methods.  The only downside is you lose the nice menus of SysLinux.  It&amp;#8217;s supposedly possible to chainload a &lt;a href="http://git.ipxe.org/people/mcb30/syslinux.git"&gt;modified-syslinux&lt;/a&gt;, but I&amp;#8217;ve been unable to get this working properly.&lt;/p&gt;
&lt;p&gt;I&amp;#8217;ve developed a rather simple script that asks the user for the IP, netmask, and gateway settings, then grabs a &amp;#8220;stage 2&amp;#8221; configuration file off of a remote webserver.  The advantage of this is that the burned iso/usb stick doesn&amp;#8217;t go out of date and need to be redone.&lt;/p&gt;
&lt;p&gt;More on this later.&lt;/p&gt;</content>
		<published>2011-07-20T00:00:00Z</published><author><name>Brian Rak</name></author><title>Brian Rak: Adventures in PXE booting</title></entry>
</feed>